Sana
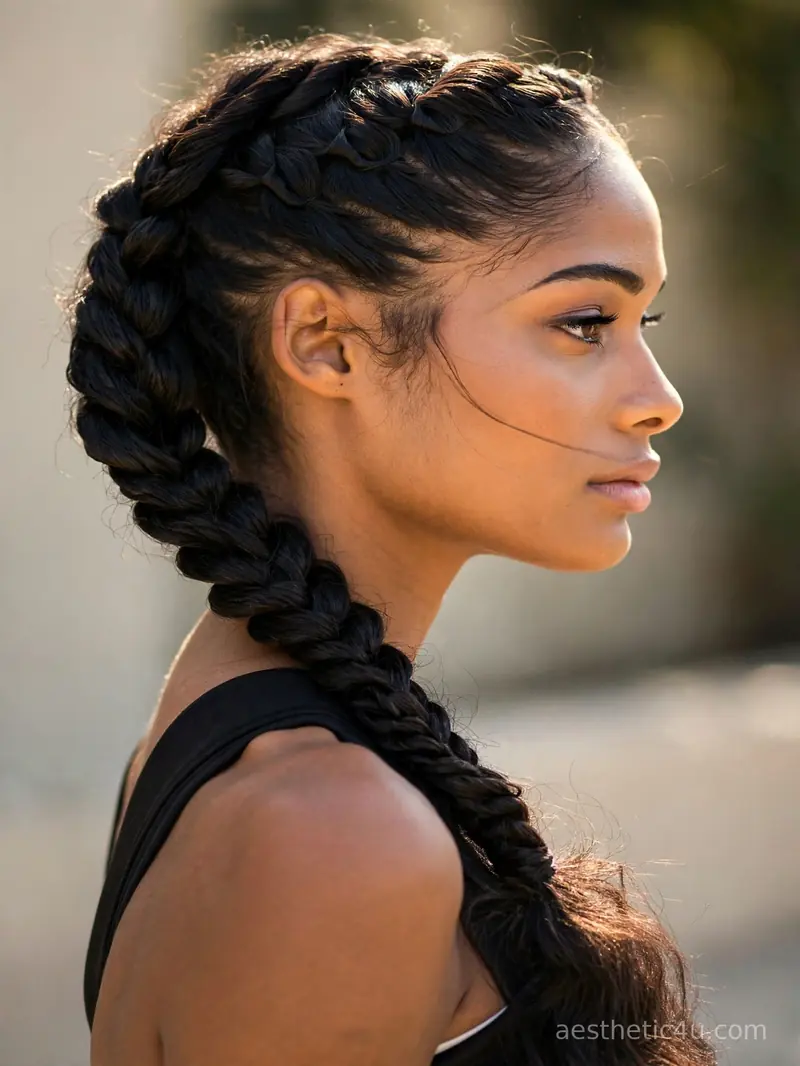
Halloween is the perfect excuse to play with your hair, but nobody wants to spend hours getting ready before the party. These Halloween braid ideas are all easy braids you can actually do yourself: simple three-strand braids, rope twists, pull-through styles, and loose side braids. Every look on this list is beginner-friendly, takes minutes, and still looks amazing in photos. Braids are having a huge moment this October because they solve the Halloween dilemma: they stay put through dancing and costume changes, they look intentional even when they are a little messy, and they work with every costume from witch to vampire.
This guide is for the woman who has always said she cannot braid. You will learn each style with real step-by-step guidance, which products give your hair grip, how long each look takes, and the small mistakes that make easy braids fall apart. As your stylist friend, I will tell you the truth: braiding is a motor skill, not a talent, and every style here was chosen because a true beginner can learn it in one sitting. These twenty-four favorites prove that easy does not mean boring, and I will walk you through every single one step by step.
24 Easy Halloween Braid Ideas for a Fun Night Out
From quick rope twists to pretty waterfall braids, every style below is simple enough for a beginner. Pick your favorite, grab a few elastics, and you will be party-ready in minutes.
1. Classic Loose Side Braid
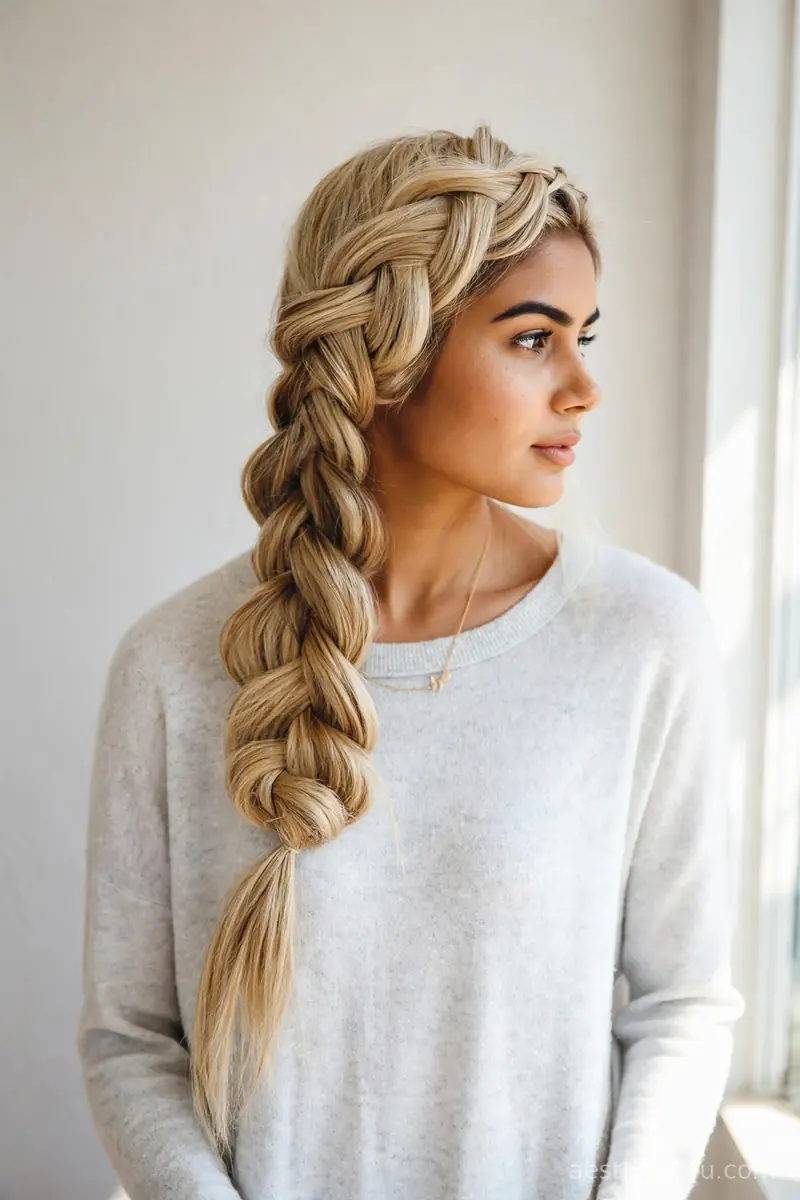
A classic three-strand braid swept over one shoulder and kept loose on purpose. The sections are gently tugged apart, pancaked, so the braid looks soft and full instead of tight and neat. To build it, sweep all hair to one side, divide into three, braid loosely down, secure with a clear elastic, then gently pull each loop outward starting from the bottom. It takes two to five minutes, difficulty easy, the fastest braid on this list. A little texturizing spray before you start gives grip.
I always recommend this one first when someone says they cannot braid. It takes two minutes, it works on almost every hair length past the chin, and it looks pretty even if the sections are uneven. I would choose this for a Halloween party because it feels relaxed and romantic, and it keeps your hair out of your face all night. One honest caveat: a loose side braid loosens further over hours, so secure it well and bring a spare elastic.
2. Simple Three-Strand Braid
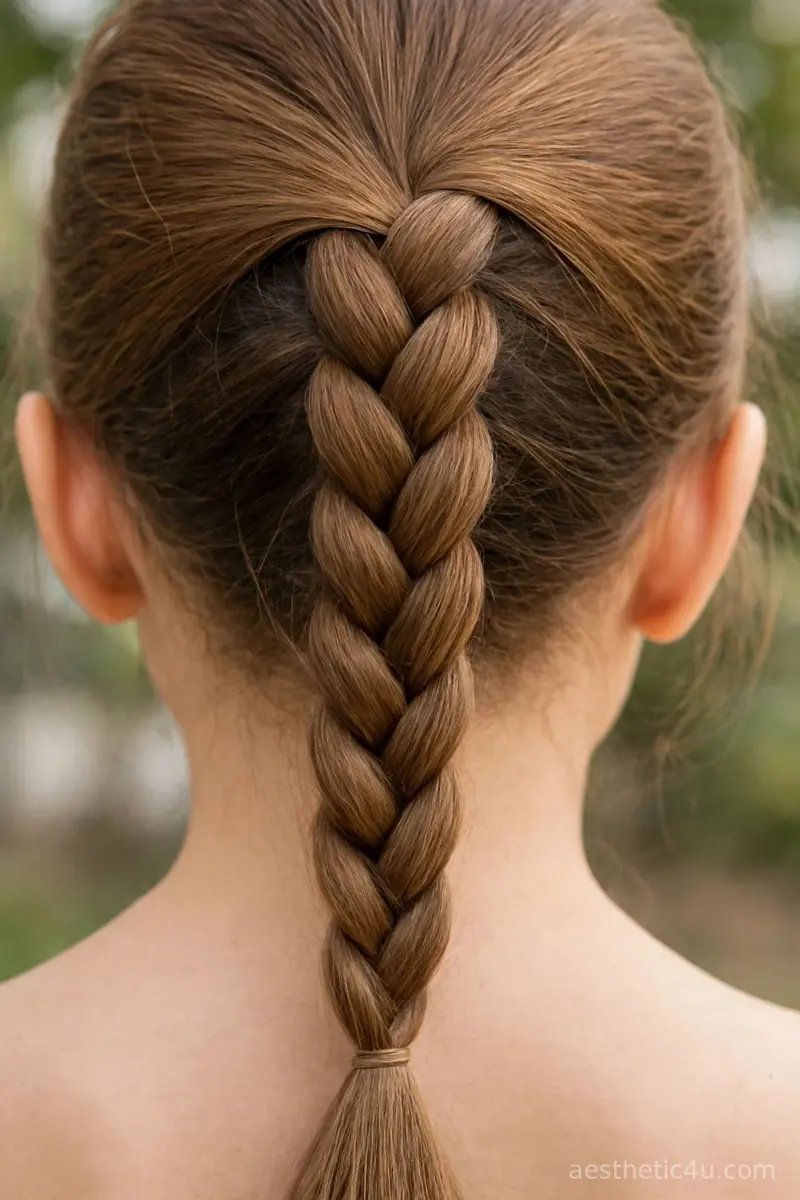
The most basic braid there is. You split your hair into three equal sections and cross them over each other one at a time, all the way down to the ends. That is the entire technique, and it is the foundation every other braid builds on. It takes three to five minutes, difficulty easy. Prep with a little texturizing spray if your hair is silky, secure with a clear elastic, and you are done. There is nothing to learn here, and that is exactly the point. It holds for hours with zero touch-ups needed.
There is nothing to learn here, and that is exactly the point. I would choose this if I wanted a clean, honest look that I know will hold for hours. It also pairs beautifully with a witchy costume, because simple hair lets the outfit do the talking. It suits every hair type and face shape. My pro tip: even this basic braid looks twice as good pancaked, so tug the edges gently after tying.
3. Half-Up Rope Twist Braid
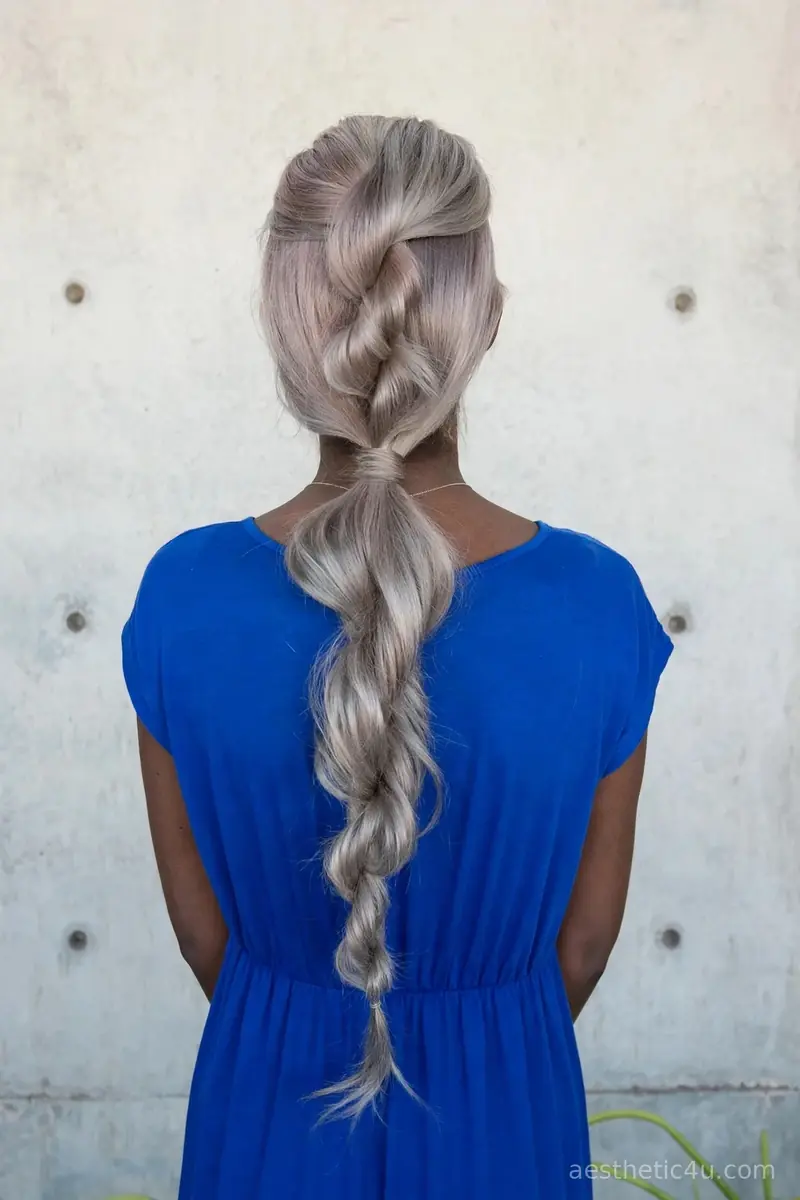
This style twists the top half of the hair back from the crown, then continues the full length into one long, loose rope braid. Twist the top section back from each side, pin it at the back of the crown, then divide the remaining hair into two, twist each piece one way, wrap them the other way, and secure. Kept loose, the tail falls in soft waves instead of a stiff spiral. It takes 10 to 15 minutes, difficulty easy, and the half-up section keeps hair off your face while the rope tail swings free on a Halloween night.
I love how this one gives you the best of both worlds. I would choose it for Halloween because the twisted crown looks styled from the front, while the long rope tail moves beautifully when you dance. It suits medium to long hair. Honest caveat: rope braids unravel if the twists go the same direction, so twist pieces one way, wrap the other way, and tie the end tightly.
4. Pull-Through Braid
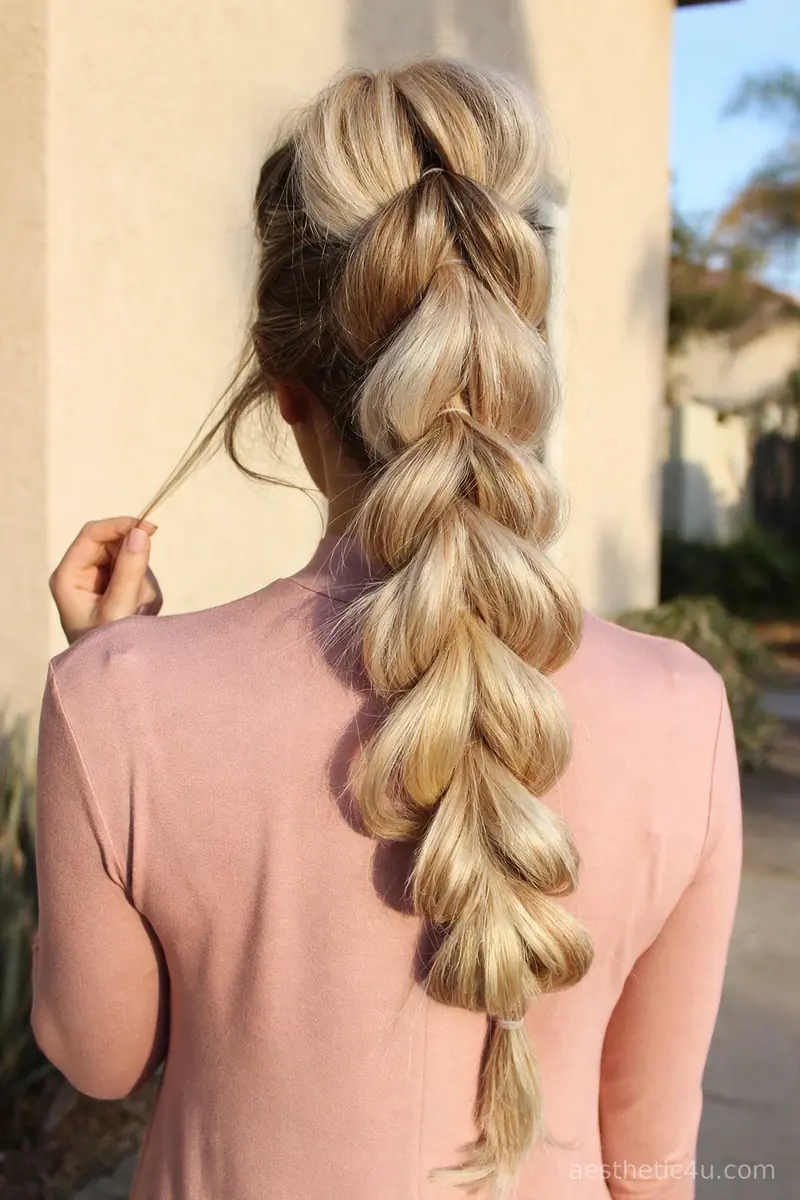
A pull-through braid is built with small ponytails stacked on top of each other, not with real braiding. You secure a small top ponytail, split it, pull the next ponytail through, secure, and repeat, fanning each section out for fullness. It takes 10 to 15 minutes, difficulty easy, and you only need clear elastics and your fingers. It creates a braid look without any weaving at all. I love this one for anyone who has given up on braiding. If your hair is thick, the pull-through shows off volume better than any other easy braid.
I love this one for anyone who has given up on braiding. You only need clear elastics and your fingers, and there is no weaving to learn. I would choose this if my hair is thick, because the pull-through style shows off volume better than any other easy braid on this list. It suits medium to long hair. Honest caveat: you need a lot of small elastics, so buy a pack before Halloween.
5. Simple Waterfall Braid
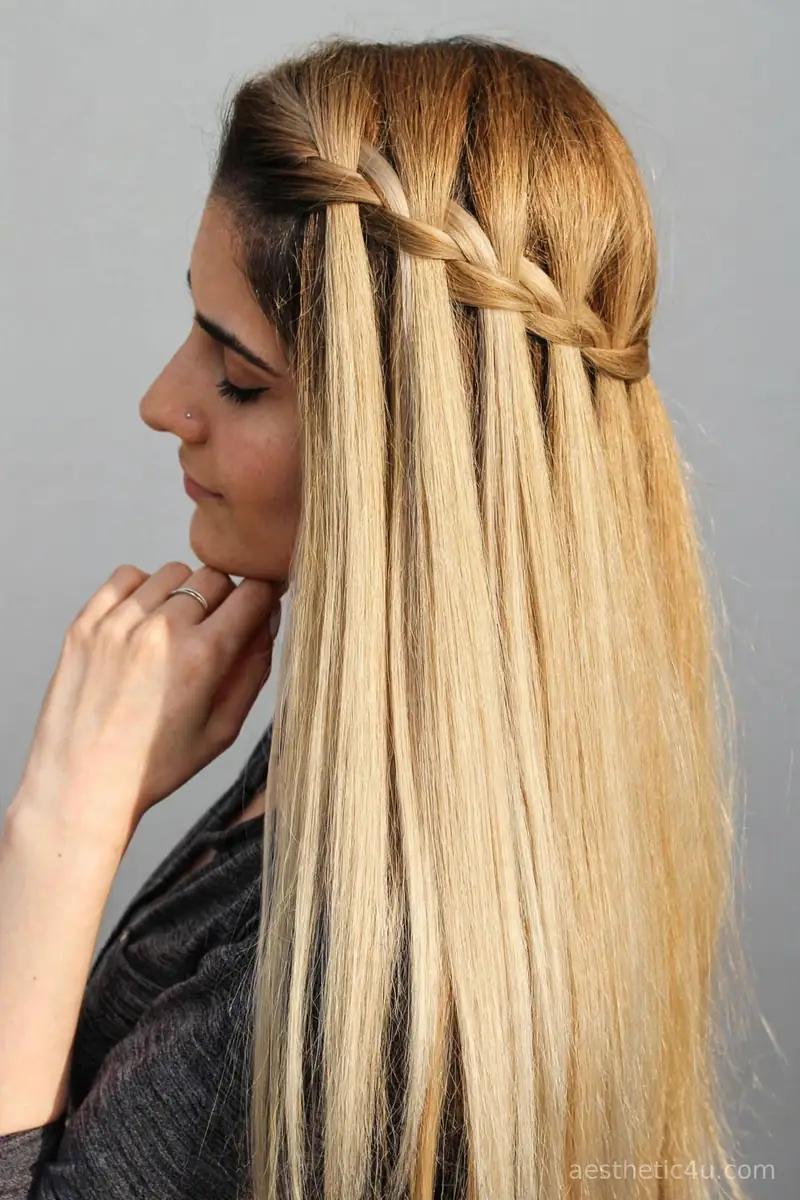
A waterfall braid runs across the back or side of your head like a half-up style. As you braid, you drop one section each time so the falling strands look like a waterfall. It sounds hard, but it is just a regular braid where you let go of pieces on purpose: cross, drop the bottom strand, pick up a new section beside it, repeat. It takes 15 to 20 minutes, difficulty medium. I would choose this for a Halloween party because the falling strands catch the light and look so pretty in photos.
This one sounds hard, but it is just a regular braid where you let go of pieces on purpose. I would choose this for a Halloween party because the falling strands catch the light and look so pretty in photos. It is the easiest way to look like you tried really hard. It suits medium to long hair. One honest caveat: do a trial run before the night, because the drop-and-replace rhythm feels strange the first time.
Keep exploring: 19 Halloween Braid Styles: Skeleton to Spider Braids
6. Double Dutch Braids
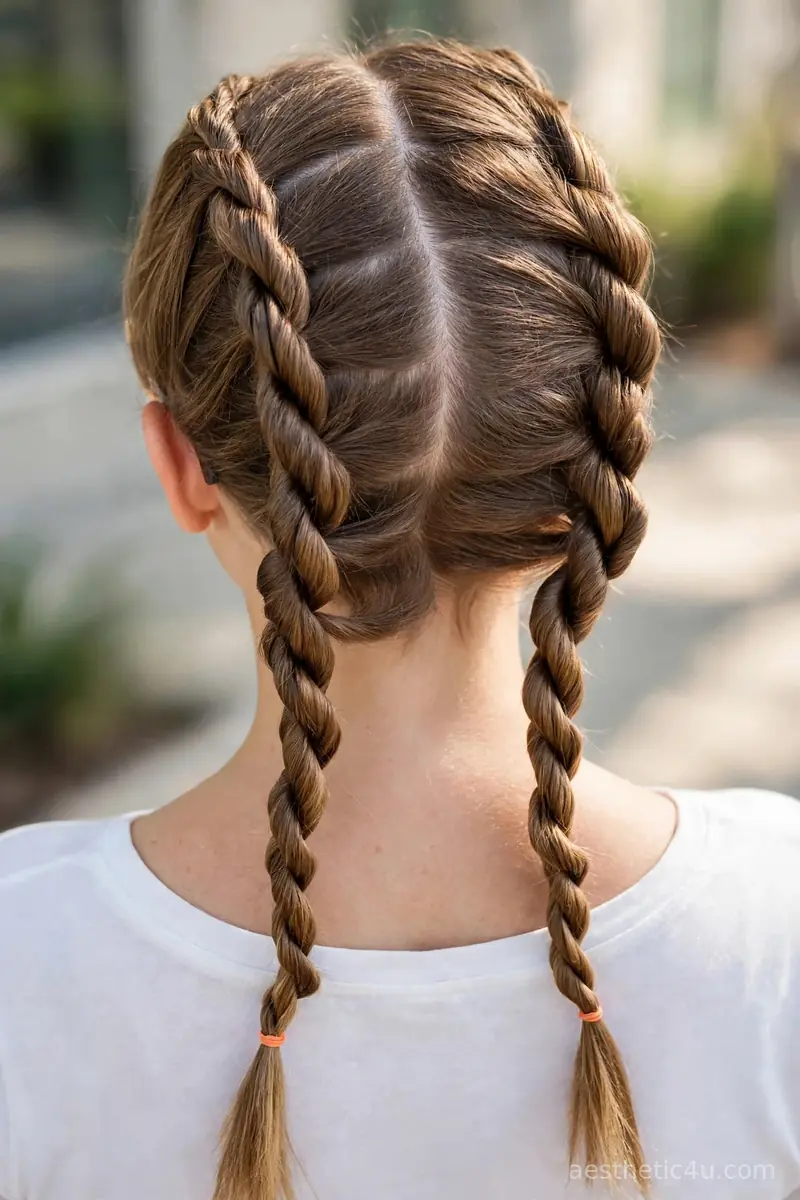
Two Dutch braids run from the crown down each side of the back of the head, ending past the shoulders. Part down the middle, then Dutch braid each side by crossing the outside strands under the middle while feeding in hair from the hairline, keeping the sections close to the scalp. Secure each with a clear elastic. It takes 10 to 15 minutes, difficulty easy to medium. Dutch braids sit raised on the head, so they look bolder than French braids. Keep the parts clean and even, because the center part shows from every angle.
Double Dutch braids are my go-to for any costume that needs sporty energy. I would choose them for Halloween because they stay locked in through dancing and they photograph from every angle. They suit medium to long hair. One honest caveat: crossing under instead of over feels backwards the first time, so do a quick practice run. Once your fingers learn it, you will never go back.
7. Easy Fishtail Braid
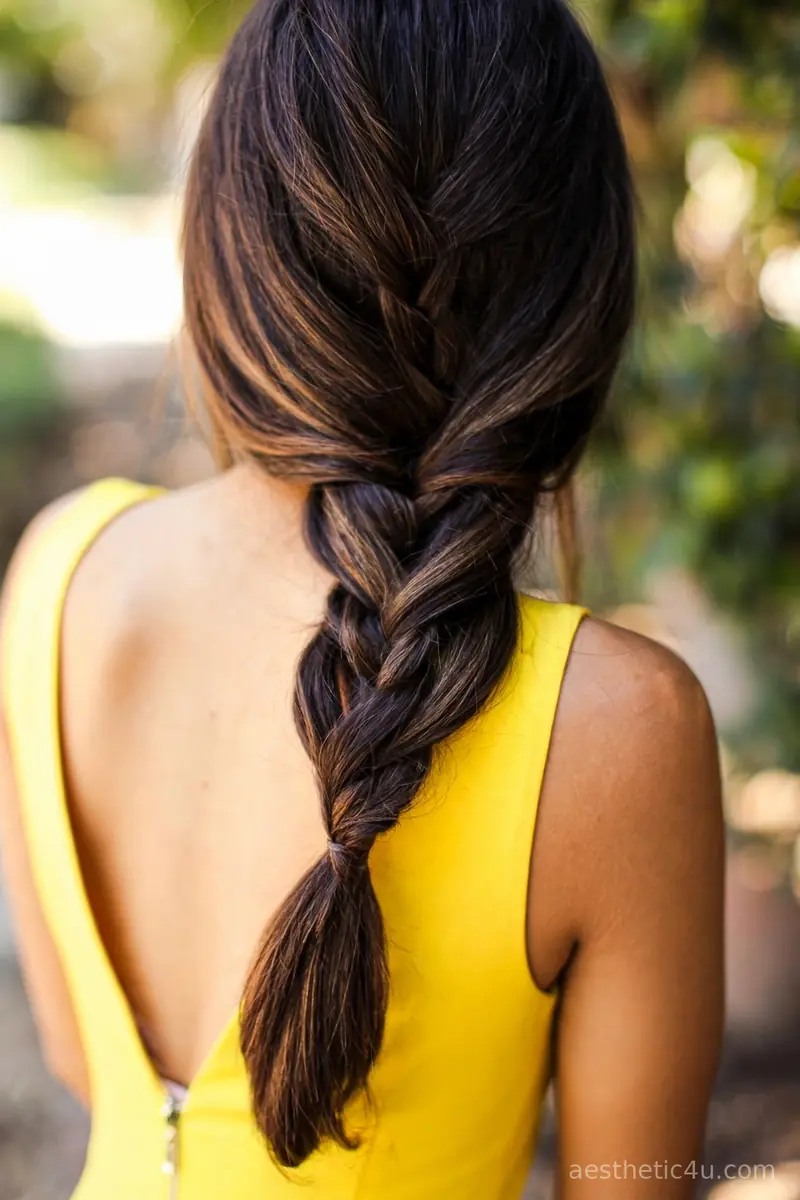
A fishtail braid weaves two sections into a herringbone pattern that looks intricate but is genuinely easy. Divide the hair into two pieces, pull a thin strand from the outside of the left piece across to the right, then from the right across to the left, and repeat down the length. It takes 10 to 15 minutes, difficulty easy. The magic is in small, even pieces: thinner strands make the pattern tighter and prettier. This one hangs down the back in a soft, slightly off-center line that looks elegant without trying hard.
Fishtails get compliments every time because they look far harder than they are. I would choose this for Halloween because the herringbone pattern reads romantic and moody, perfect for a vampire or dark fairy costume. It suits medium to long hair. Honest caveat: thin strands take patience, so do not rush the first few crosses. Once the rhythm clicks, it goes fast.
8. Half-Up Pull-Through Braid
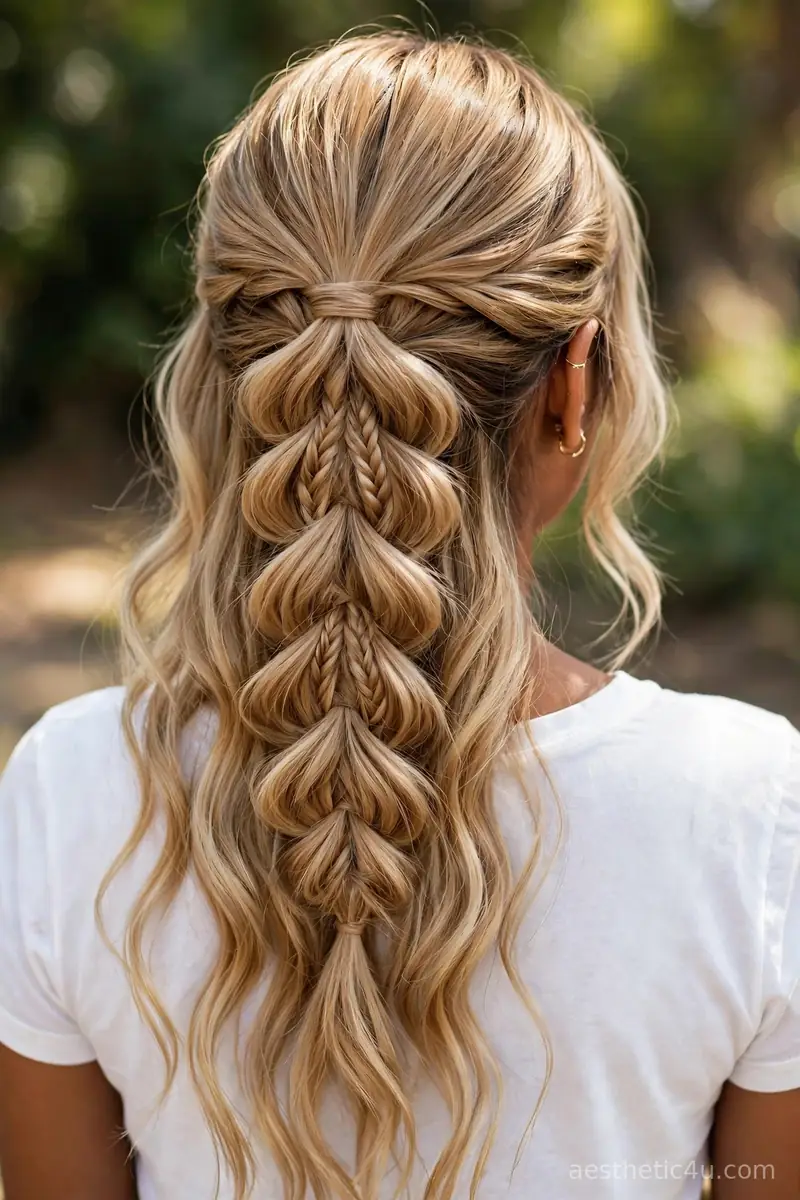
The top half of the hair is gathered and styled into a pull-through braid, while the bottom half stays loose and flowing. It mixes a fun braid detail with easy, natural hair. Section the top half, build stacked mini ponytails down the back of the crown, fan each section, secure, and leave the rest down. It takes 10 minutes, difficulty easy. Half-up styles are my go-to when I want the best of both worlds. It takes minutes and looks sweet with almost any costume. The braid is visible from the front, which is where it counts.
Half-up styles are my go-to when I want the best of both worlds. I would choose this if I wanted my braid visible from the front but still wanted long hair down for the party. It takes minutes and looks sweet with almost any costume. It suits medium to long hair and flatters every face shape. One honest caveat: the pull-through section needs enough elastics and gentle fanning, because rushed fanning looks messy.
9. Three-Strand Braided Ponytail
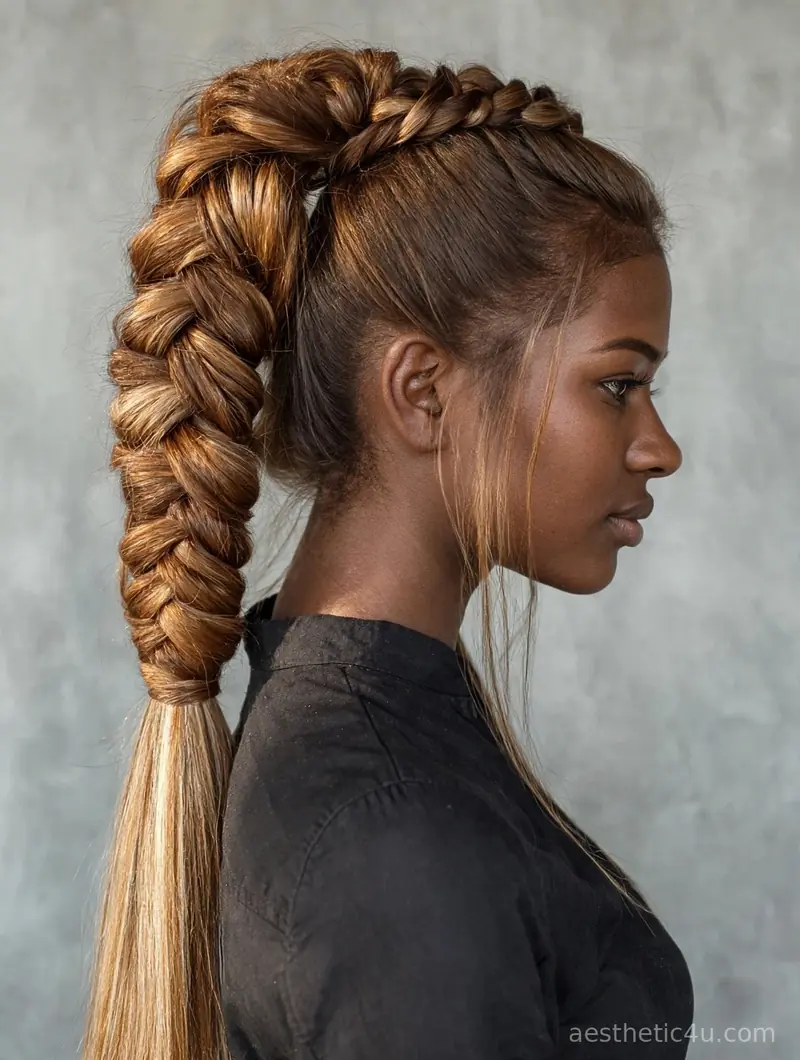
A simple high or mid ponytail that is then braided in a basic three-strand braid down the length. It is a ponytail and a braid in one easy style. Secure the ponytail first, then braid the tail, pancake lightly, and tie. It takes five to eight minutes, difficulty easy. This is my pick for dancing all night, because a braided ponytail swings less than a loose one and never tangles. It looks neat in every photo and survives the whole evening without touch-ups. Wrap a strand around the base to hide the elastic.
This is my pick for dancing all night. A braided ponytail swings less than a loose one and never tangles, which is exactly what you want on a dance floor. I would choose this for Halloween because it looks neat in every photo and it survives the whole evening without touch-ups. It suits medium to long hair. Honest caveat: a high braided pony can feel heavy by midnight on thick hair, so choose a mid-height placement if your hair is heavy.
10. Side-Swept Dutch Braid
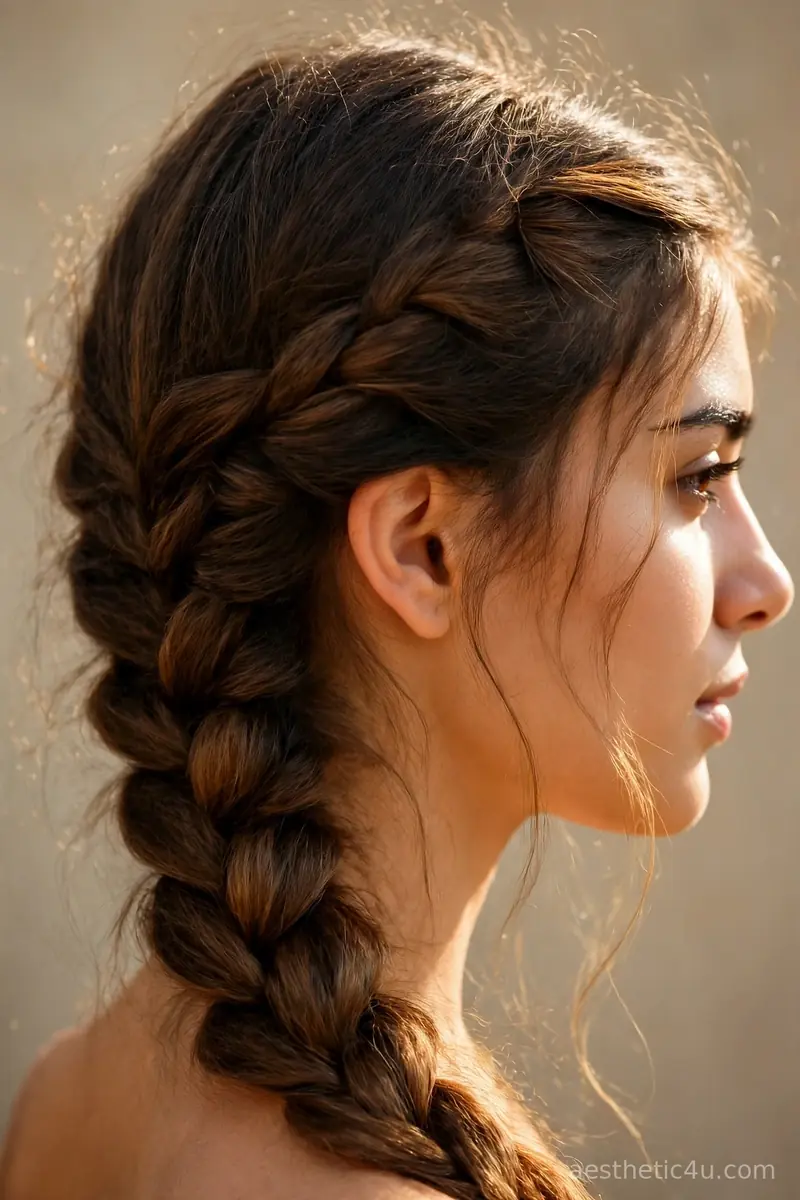
A Dutch braid starts at the front hairline and feeds hair in as it travels back and down over one shoulder. Begin near the temple, cross the outer strands under the middle while adding hair from both sides, then continue down the tail and secure. It takes eight to ten minutes, difficulty easy to medium. The raised braid sits on top of the hair, so the line of the braid stands out clearly. Sweep it over the shoulder that flatters your part, because the side placement keeps it visible in front-facing photos.
I reach for Dutch braids when I want something that looks polished but still takes minutes. I would choose this one for Halloween because the raised braid looks bold and intentional, and it holds tighter than a French braid through a long night. It suits medium to long hair. Honest caveat: keep tension even as you add hair, because loose feeding makes the braid bumpy.
Keep exploring: 21 Spider Braid Halloween Hairstyles: Web-Inspired Plaits
11. Soft Pancaked Side Braid
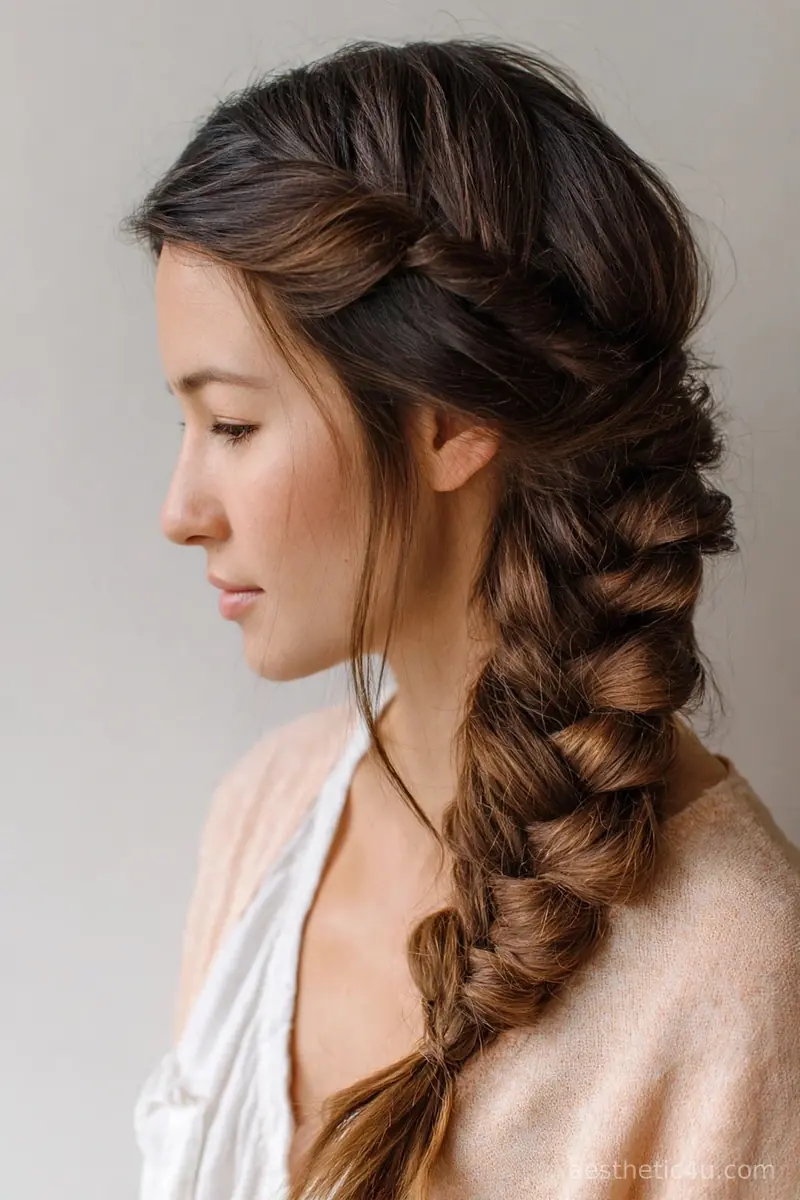
A soft pancaked side braid starts near the temple and sweeps back into a wide, full braid that drapes over the shoulder. Braid a French braid along the side, feeding in hair as you go, secure, then tug each loop gently outward to widen and flatten it. It takes 10 minutes, difficulty easy. The pancaking is what makes it look twice as thick, which is why this style works so well on fine hair. Loose face-framing strands soften the whole look and keep it romantic for a Halloween night.
I would pick this one when I want a braid that photographs thick and romantic without much real effort. It suits fine to medium hair best, because the pancaking creates fullness you do not naturally have. I love how the soft side sweep keeps it feminine. Honest caveat: pancake from the bottom up, because top-down tugging loosens the whole braid.
12. Double Crown Braid
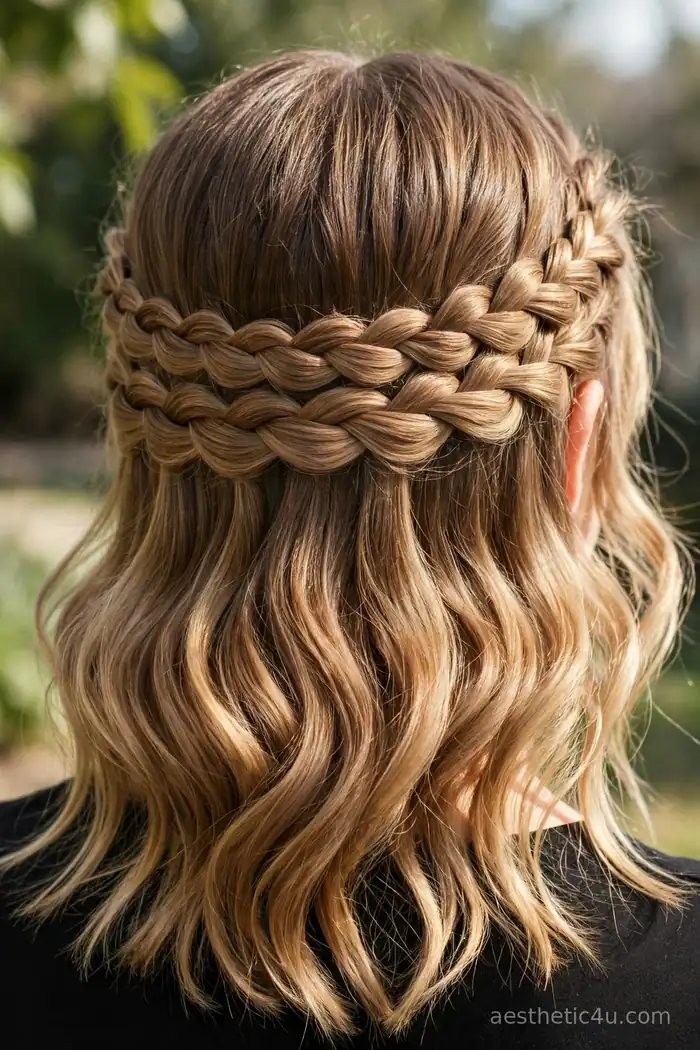
Two small braids wrap around the back of the head to form a double crown, while the rest of the hair falls loose in waves. Braid a small three-strand section on each side near the temples, wrap both toward the back of the head, pin them in place one above the other, and tuck the ends. It takes 10 minutes, difficulty easy. The double layer looks far more detailed than a single crown. It keeps hair off your face all night and sits low enough to work under any costume headpiece.
This is my secret for looking detailed with almost no effort. I would choose the double crown for Halloween because it frames the head so prettily in photos and keeps every strand off your face. It suits medium to long hair. Honest caveat: the braids need crossed bobby pins to hold, because a single pin slides out. Cross two pins in an X and the crown stays put all night.
13. Loose Braided Low Bun
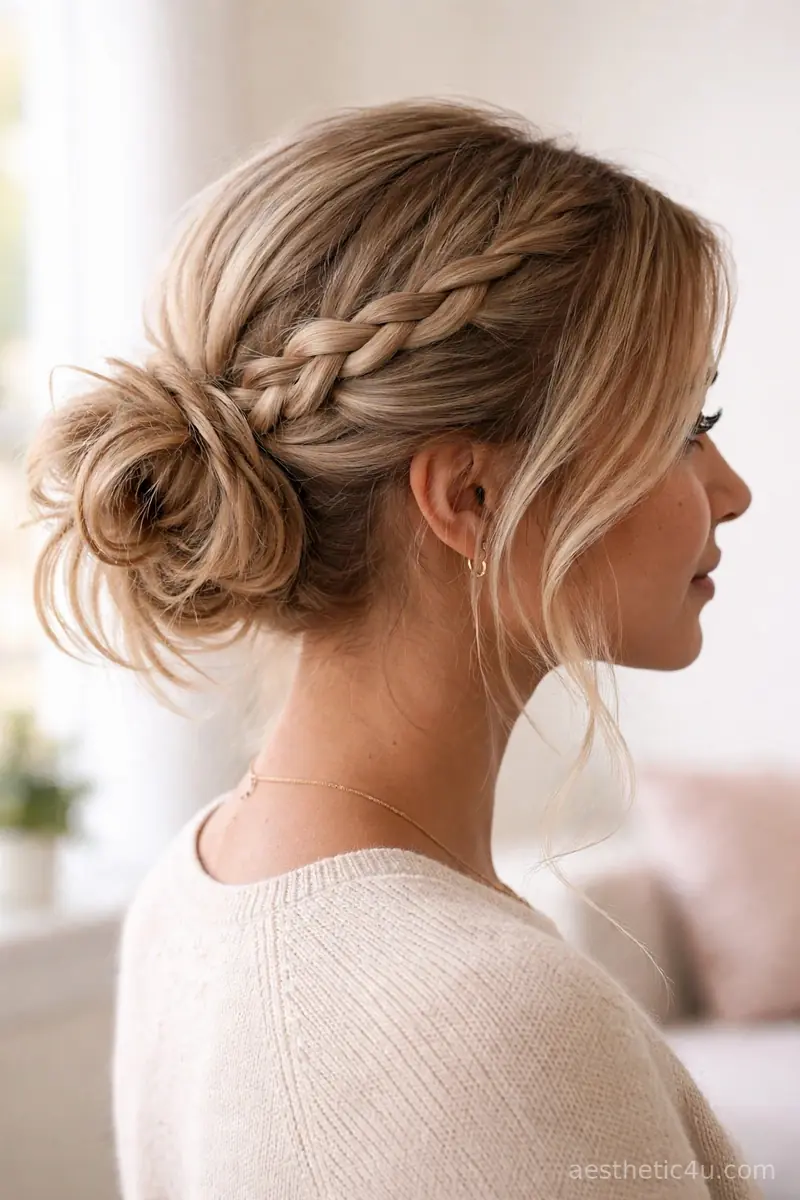
A soft low braid that is wrapped into a bun at the nape of the neck. The braid gives the bun texture and detail, and the low placement keeps it relaxed. Braid loosely, wrap the braid around its base into a bun, pin generously, and pull out a few soft pieces. It takes eight to ten minutes, difficulty easy. A plain bun can look flat, but a braided one never does. It is secure, it is pretty from every angle, and it is perfect for an elegant Halloween look like a vampire or dark fairy costume.
A plain bun can look flat, but a braided one never does. I would choose this for an elegant Halloween look, like a vampire or dark fairy costume. It is secure, it is pretty from every angle, and it takes less than ten minutes. It suits medium to long hair and flatters oval and long faces. My pro tip: pancake the braid before wrapping it into the bun, because a flat braid makes a flat bun.
14. Wavy Waterfall Braid
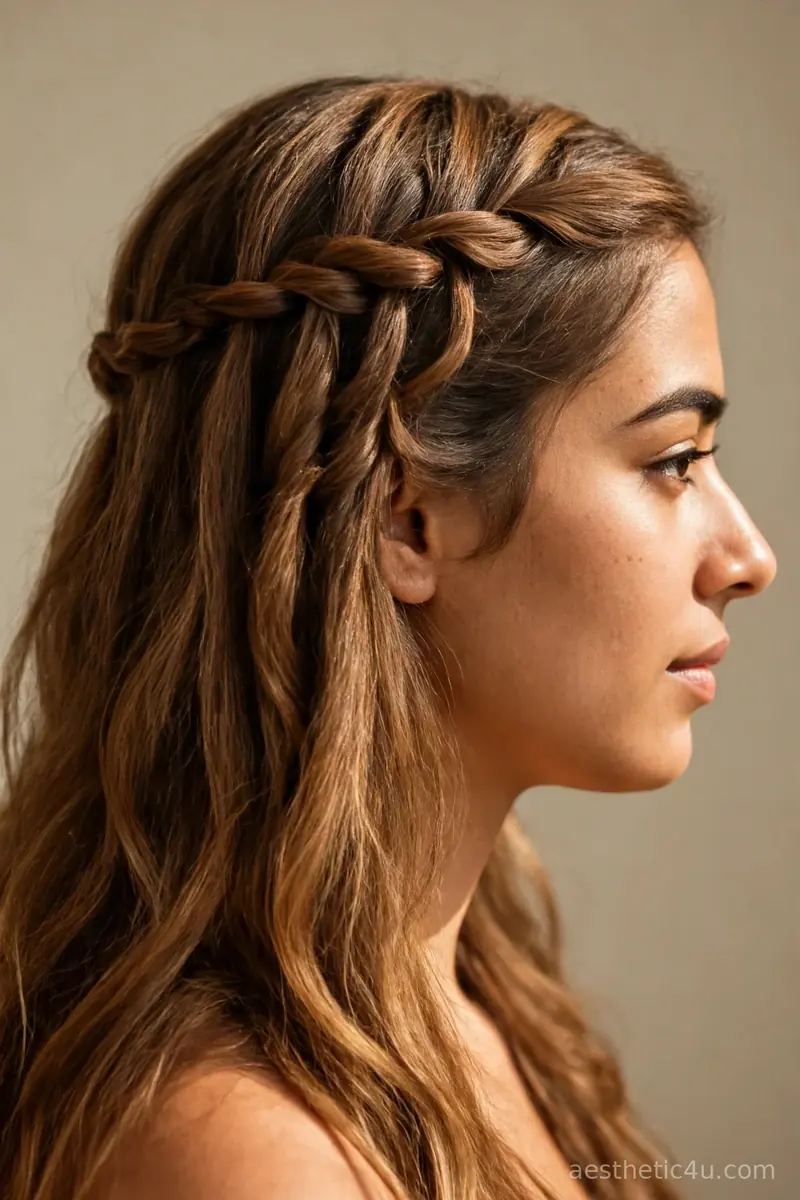
A waterfall braid runs across the side of the head while strands drop through the weave, creating a cascading effect over loose waves. Start near the temple, braid across while dropping the bottom strand each round and picking up new hair beside it, then pin the end behind the ear. It takes 12 to 15 minutes, difficulty easy to medium. The falling strands blend into the waves below, which is why this style looks so soft and natural. The braid sits right where front-facing photos catch it.
Waterfall braids always look more impressive than the effort they take. I would choose this one for Halloween because the cascading strands catch the light and look gorgeous in photos. It suits medium to long wavy or curly hair best. Honest caveat: do a trial run first, because the drop-and-replace rhythm feels strange until your fingers learn the pattern completely.
15. Rope Braid Ponytail
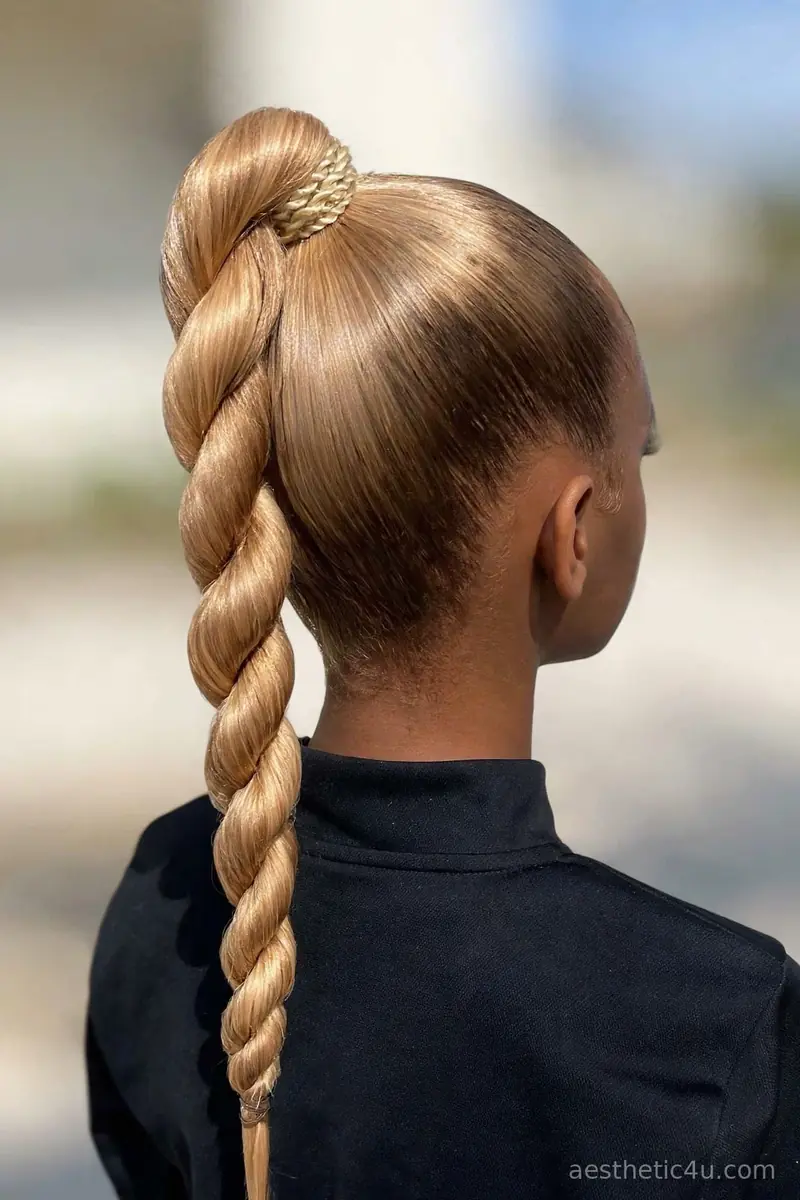
The hair goes up into a ponytail first, then the tail is twisted into a rope braid. Starting from a ponytail makes the rope braid easier to control and gives it extra height. Secure a high pony, divide the tail in two, twist each section one way, wrap the other way, secure. It takes eight to ten minutes, difficulty easy. This is one of the sportiest styles on the list, and it looks so clean. The ponytail base also means it takes half the time of a full rope braid. It stays perfect all night.
This is one of the sportiest styles on the list, and it looks so clean. I would choose this if I wanted a high-energy Halloween look that stays perfect all night. The ponytail base also means it takes half the time of a full rope braid, which I love. It suits medium to long hair. Honest caveat: the rope tail can feel heavy and swing, so secure the ponytail base really well with two elastics.
Keep exploring: 25 Simple Halloween Hairstyles for Women: No-Fuss Party Looks
16. Double Pull-Through Braids
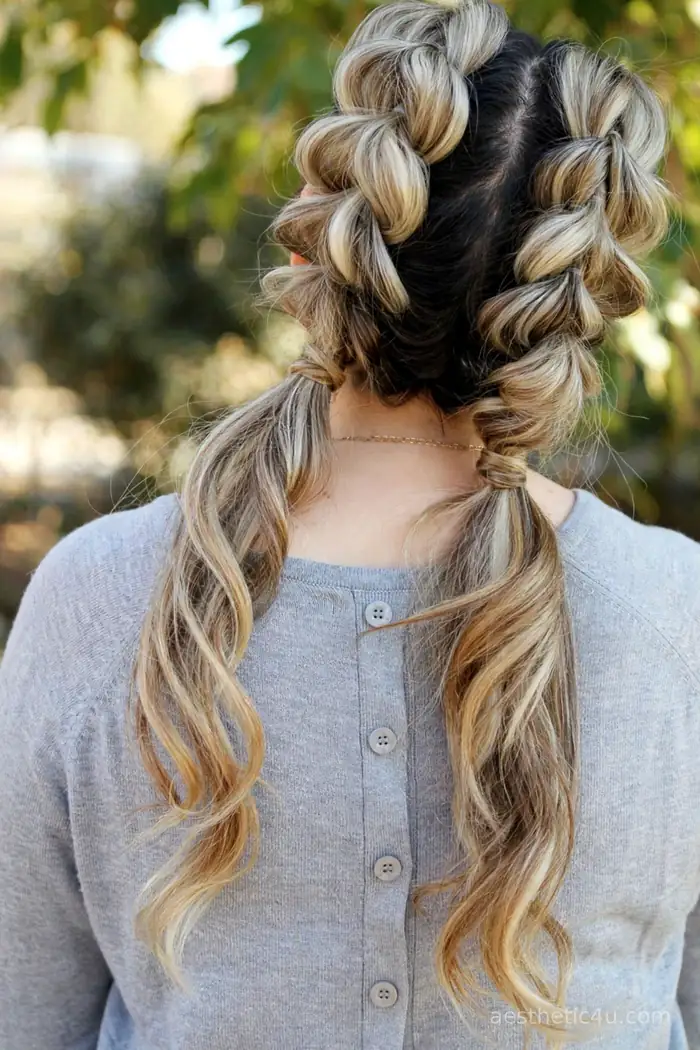
Two pull-through braids, one on each side, made from stacked mini ponytails and fanned out. You get the look of two chunky braids with no actual braiding at all. Part down the middle, build a pull-through on each side, fan evenly, secure. It takes 15 to 20 minutes, difficulty easy. This is the ultimate cheat braid, and I mean that as a compliment. Double braids photograph so well, and the pull-through technique gives amazing volume. It is fun, young, and completely beginner-proof.
This is the ultimate cheat braid, and I mean that as a compliment. I would choose this for Halloween because double braids photograph so well, and the pull-through technique gives amazing volume. It is fun, young, and completely beginner-proof. It suits medium to long hair. My pro tip: keep both sides even by counting your ponytail sections. Four stacked ponies on the left means four on the right. Matching sections make matching braids, and symmetry is what sells the style.
17. Classic Dutch Braid
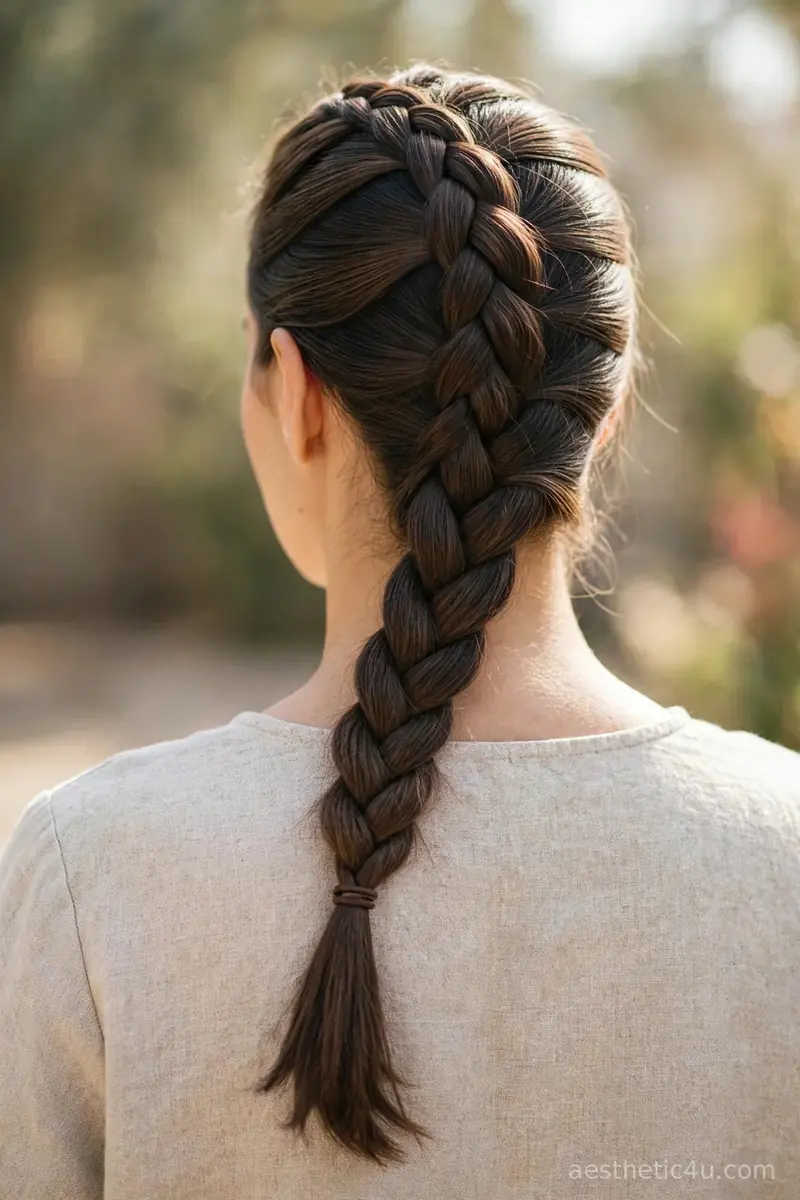
A classic Dutch braid runs from the crown straight down the back of the head, feeding in hair as it goes and ending in a neat tail. Gather the top section, cross the outer strands under the middle while adding hair from each side, keep it snug to the scalp, then braid the tail and secure with an elastic. It takes 10 minutes, difficulty easy to medium. The braid sits raised and sculpted on the head, which gives it that bold, Viking-inspired look. Keep the feeding even on both sides so the braid stays centered.
This is the braid I recommend when someone wants one style that works with every costume. I would choose it for Halloween because the raised braid looks strong and intentional, and it survives dancing, weather, and long nights. It suits medium to long hair. Honest caveat: crossing under instead of over feels wrong at first, so watch your hands for the first few stitches.
18. Simple Half-Up Twist Braid
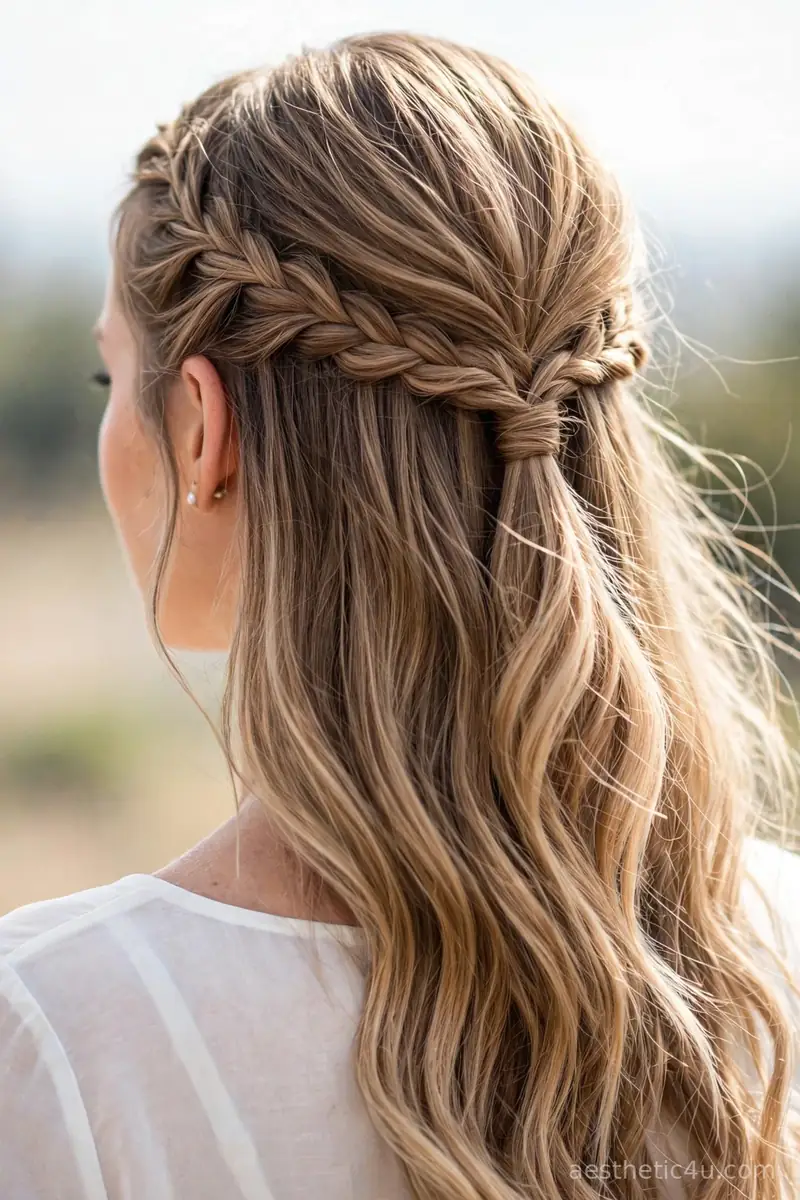
Two sections from the front are twisted back and pinned or joined at the back of the head, while the rest of the hair falls loose. It is the simplest half-up style you can do. Twist each front section back, cross them, pin with crossed bobby pins, leave the rest down. It takes three minutes, difficulty easy. I reach for this when I have exactly three minutes. It keeps the front of the hair neat for photos while the loose back looks effortless. Simple, fast, and always flattering.
I reach for this when I have exactly three minutes. I would choose it for Halloween because it keeps the front of the hair neat for photos while the loose back looks effortless. Simple, fast, and always flattering on every face shape. Honest caveat: on very silky hair the twists slide, so add texturizing spray first and use crossed pins. Two pins in an X hold where one pin fails.
19. Braided Side Ponytail
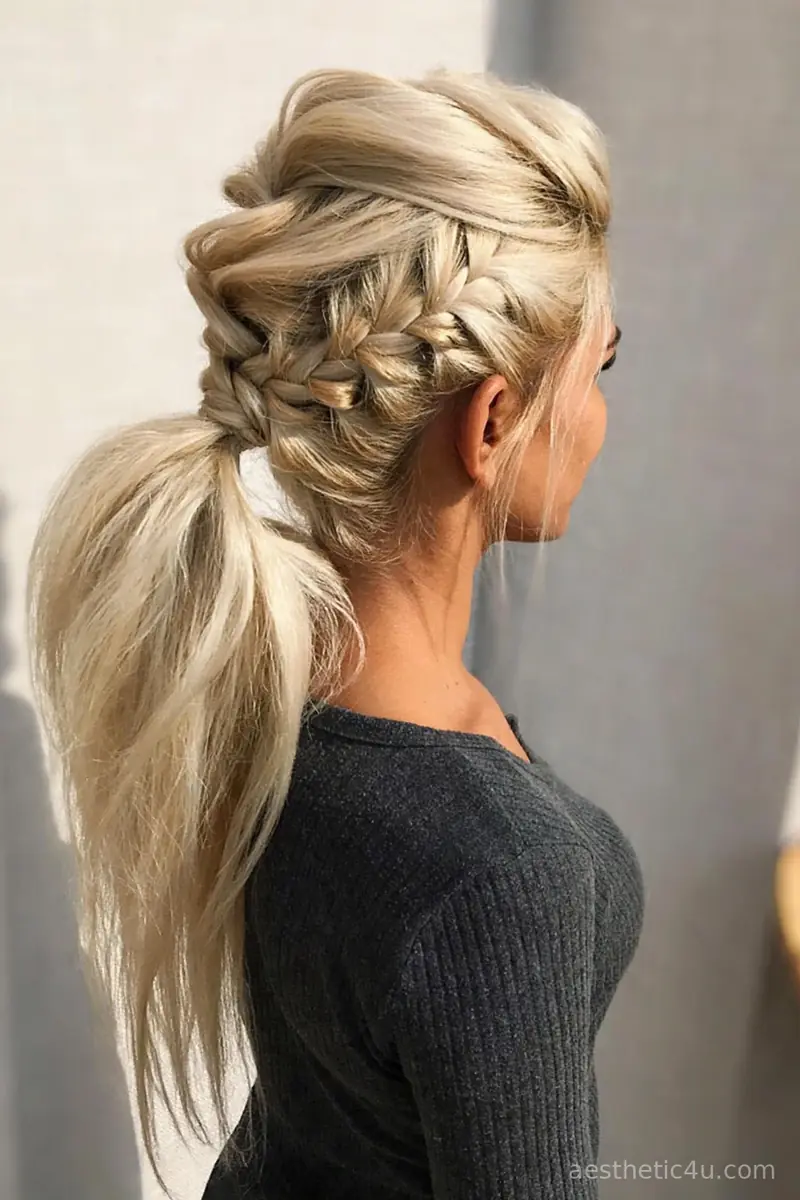
A French braid starts at the top of the head and feeds hair in as it travels down, then gathers into a loose side ponytail at the nape. Begin at the crown, cross strands over the middle while adding hair from both sides, angle the braid toward one side, then secure the whole thing into a low side pony. It takes 10 minutes, difficulty easy. The braided top adds polish while the loose tail keeps it relaxed. Sweep the braid toward the side opposite your part for the most flattering drape.
I love this one because the braid does all the styling work. I would choose it for Halloween because the braided top looks intentional and festive while the loose pony stays comfortable all night. It suits medium to long hair. Honest caveat: keep redirecting the braid toward the side as you go, because braids naturally drift back to center. Check the angle in a mirror halfway down.
20. Easy Twin Side Braids
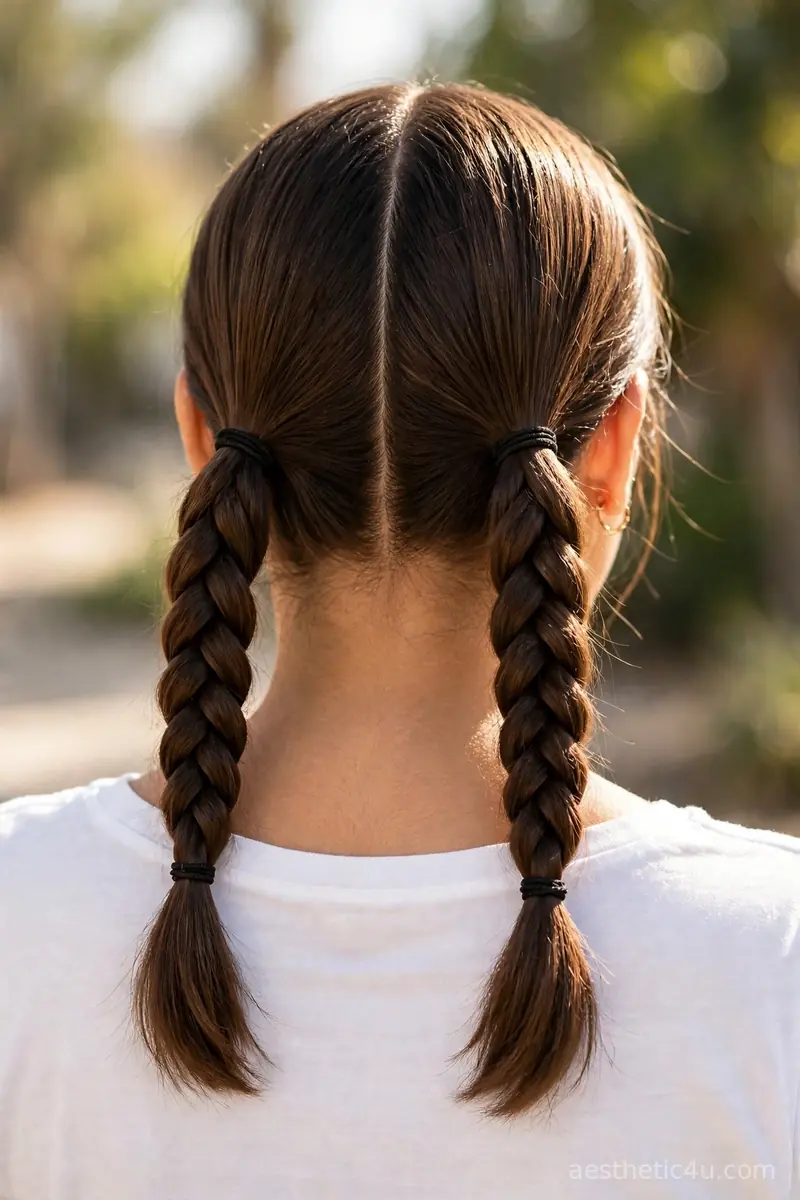
Two simple three-strand braids tied low and worn down the back, one on each side. Each braid is kept soft and slightly undone for a relaxed finish. Part down the middle, braid each side loosely, pancake gently, secure. It takes eight to ten minutes, difficulty easy. Twin braids are classic for a reason: they read cute and youthful instantly. Loosening the braids keeps them from looking too schoolgirl and makes them feel grown-up and cool. They look neat and symmetrical in photos.
Twin braids are classic for a reason. I would choose this for a playful Halloween costume because it reads cute and youthful instantly. Loosening the braids keeps them from looking too schoolgirl and makes them feel grown-up and cool. They suit medium to long hair and flatter round and heart-shaped faces. One honest caveat: keep them loose from the start, because tight twin braids read very young. Soft and pancaked is the grown-up version, and that is the one you want.
Keep exploring: 22 Halloween Hairstyles for Black Women: Stunning Protective Styles
21. Pull-Through Braided Ponytail
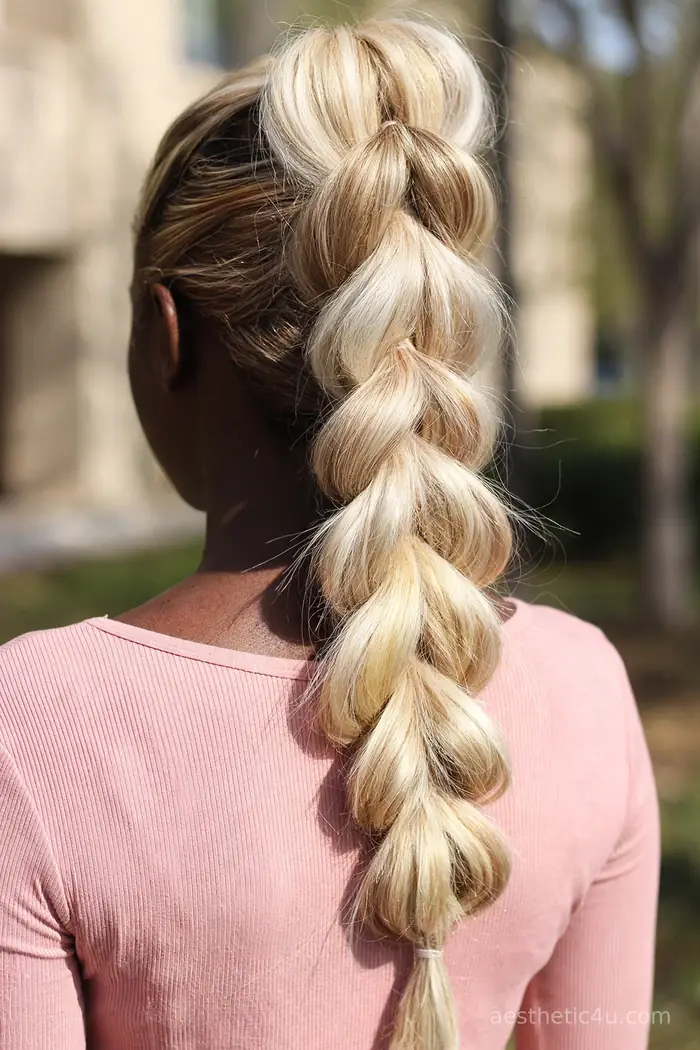
A ponytail base transformed with the pull-through technique down the tail. It looks like a thick, textured braid but is made only with elastics. Secure a ponytail, then stack mini ponytails down the tail, pulling each through and fanning wide. It takes 10 to 12 minutes, difficulty easy. This one gets compliments every time, and nobody believes how easy it is. The chunky texture looks amazing in photos. If your hair is fine, this technique makes it look twice as thick, which is pure magic.
This one gets compliments every time, and nobody believes how easy it is. I would choose it for Halloween because the chunky texture looks amazing in photos. If your hair is fine, this technique makes it look twice as thick, which is pure magic. It suits medium to long hair. Honest caveat: fan each section before moving to the next, because going back to fan earlier sections disturbs the stack.
22. Simple Side Waterfall Braid
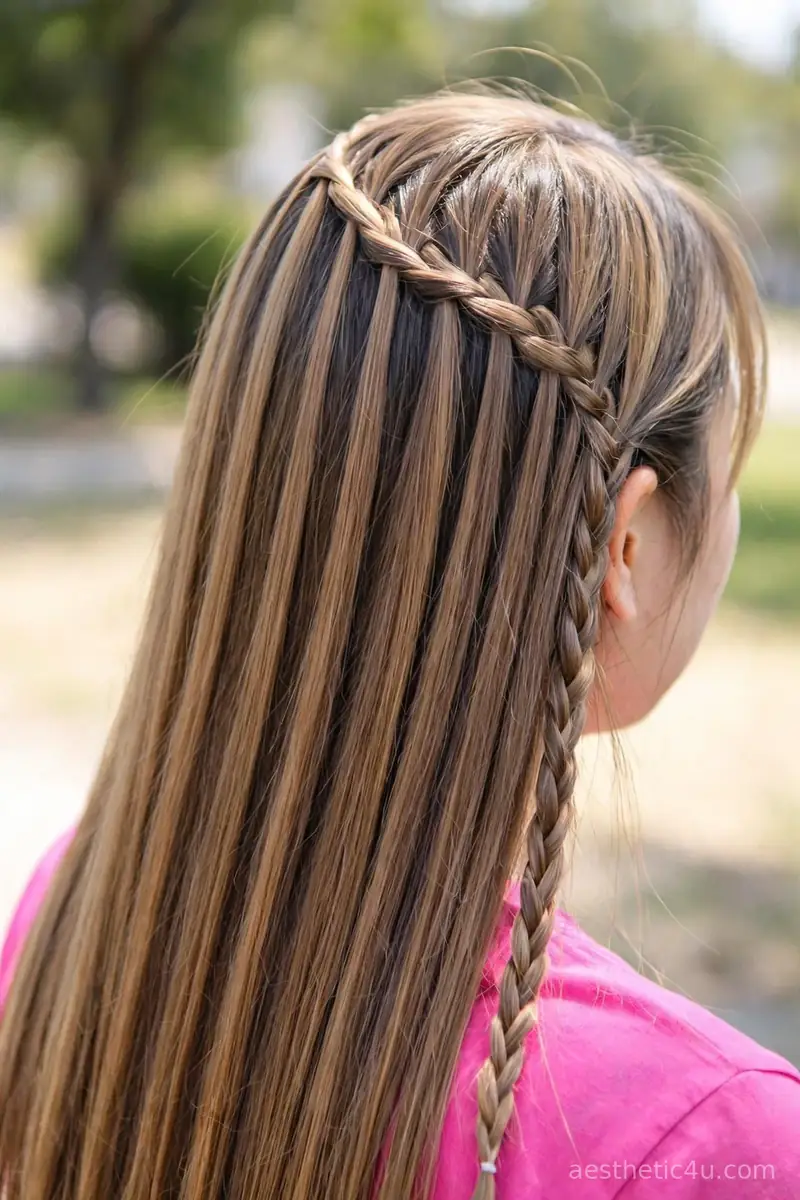
A waterfall braid worked along one side of the head instead of across the back. The falling strands frame the face and the braid finishes over the shoulder. Start near the temple, braid with the drop-and-replace rhythm along the side, finish over the shoulder. It takes 12 to 15 minutes, difficulty medium. Moving the waterfall to the side makes it visible from the front, which is where it counts. It is one of the prettiest easy styles here, and the side placement means you can show it off without turning around.
Moving the waterfall to the side makes it visible from the front, which is where it counts. I would choose this for Halloween because it is one of the prettiest easy styles here. The side placement also means you can show it off without turning around. It suits medium to long hair. My pro tip: curl the falling strands lightly with a wand, because straight dropped strands can look stringy.
23. Braided Crown Low Bun
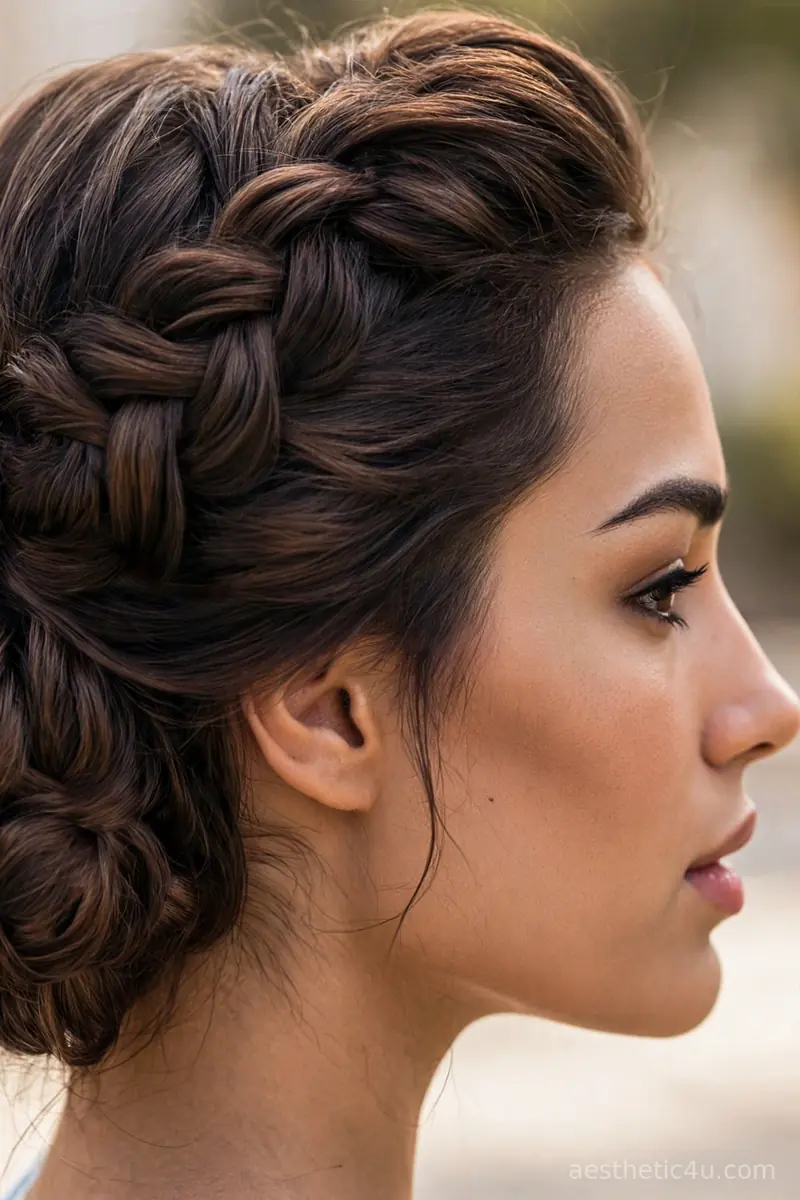
A wide, pancaked braid wraps around the head like a crown and feeds into a low bun tucked at the nape. Braid loosely from one side, pancake each section wide, continue the braid around the back of the head, then twist the end into a low bun and pin generously. It takes 15 minutes, difficulty medium. The braid is the star here: thick, textured, and visible from every angle, with the bun sitting quietly underneath. Pin the bun generously, because a heavy braided crown needs real support.
This style looks like it took an hour but it really takes fifteen minutes. I would choose it for a formal Halloween event because the wide crown braid reads expensive and dramatic, like a dark queen costume. It suits long hair best. Honest caveat: use plenty of pins and crisscross them, because three pins is hoping and eight pins is secure.
24. Chunky Loose Braid
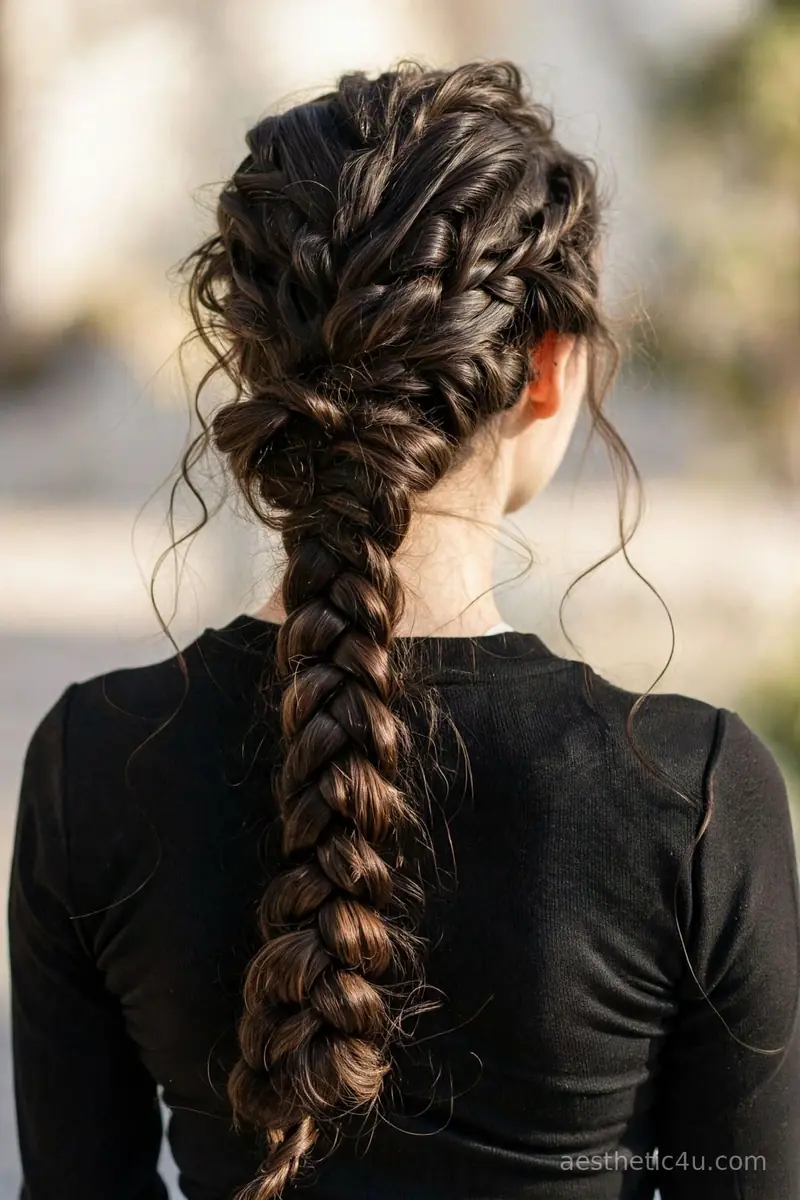
A thick three-strand braid made with big sections and pulled wide for maximum fullness. It is one braid, but the chunky size makes it a statement. Divide into three big sections, braid loosely, secure, then pancake generously for width. It takes five minutes, difficulty easy. Bigger sections mean less work and more impact. A chunky braid looks bold and dramatic in the best way. If you have thick hair, this is your moment to show it off, because chunky braids need volume to work.
Bigger sections mean less work and more impact. I would choose this for Halloween because a chunky braid looks bold and dramatic in the best way. If you have thick hair, this is your moment to show it off. It suits long thick hair best. Honest caveat: chunky braids on fine hair can look thin despite the pancaking, so add texturizing powder for grit and fullness. And pancake from the bottom up, because top-down tugging loosens the tie.
How to Choose the Right Easy Braid for You
Start with what your hands already know. If you have never braided before, begin with rope braids and pull-through braids, because they use only two sections or no weaving at all, and they look impressive with almost zero skill. If you can manage a basic three-strand plait, the whole list opens up: side braids, braided ponytails, and messy braids are all just variations on that one move. Do not start with the waterfall braid on party night, because dropped-strand patterns need a practice run. Pick one style, practice it once two days before Halloween, and you will do it in half the time on the night.
Next, match the braid to your hair. Fine or silky hair needs texturizing spray or day-two texture for grip, because clean fine hair slides out of braids within an hour. Thick hair holds braids beautifully but takes longer to work through, so budget extra minutes. Short hair past the chin can do most side braids and half-up styles, while crown braids and long plaits need medium to long hair or clip-in extensions. Finally, think about your night: tight styles like rope-braid ponytails survive dancing, while loose pancaked braids are better for dinners and photos. Choose the braid that fits your skill, your hair, and your plans.
Styling Tips & Common Mistakes to Avoid
My biggest tip for beginners is to prep for grip. Braids hold best on hair with texture, so second-day hair is ideal. If your hair is freshly washed, add a texturizing spray or a sprinkle of dry shampoo before you start. It makes an enormous difference. Use small clear elastics to secure ends, because they disappear, and keep bobby pins matching your hair color nearby. A pea-sized amount of styling cream on the lengths tames flyaways without making hair slippery. Finish with a light mist of flexible-hold hairspray, not the crunchy kind.
The mistakes beginners make are all fixable. First, starting with slippery, freshly conditioned hair, because the braid slides apart. Texture first, always. Second, braiding too tightly at the hairline, which causes headaches. Firm is fine, painful is not. Third, giving up after one lopsided attempt. Braiding is muscle memory, and your third try will be twice as neat as your first. One honest caveat: easy braids still take longer the first time, so do a trial run before Halloween night. Twenty calm practice minutes beat ten panicked party-night minutes every time.
Final Thoughts
Easy braids are proof that you do not need complicated styling to look amazing on Halloween. Whether you went classic with a three-strand braid or cheated brilliantly with a pull-through, you picked a style that stays put and photographs beautifully.
Practice your favorite once before the big night, pack extra clear elastics in your bag, and wear it with confidence. You will be amazed how quickly your hands learn. Have fun with it. Happy Halloween, and may your braids hold until morning.
Follow Us On Pinterest: Easy To Find Next Style