Sana
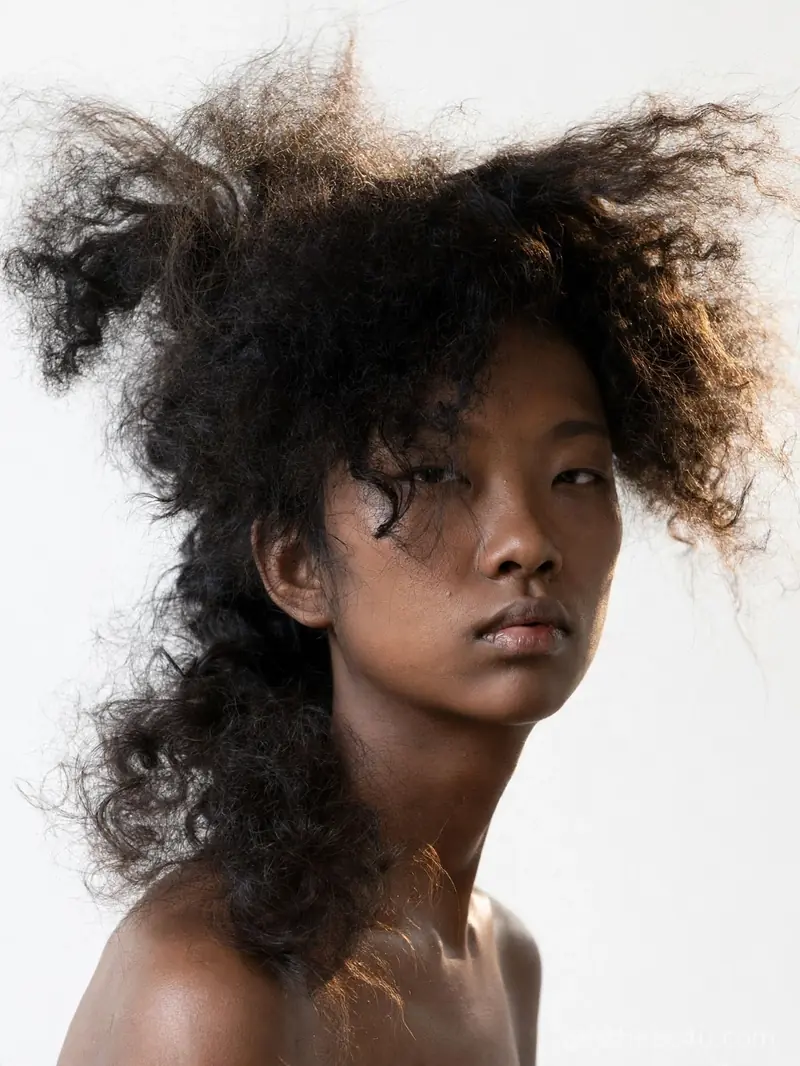
I love a zombie costume because the hair does half the work. These zombie halloween hairstyles are all about messy, undone texture that looks like you just crawled out of the ground. No perfect styling needed here. The messier, the better. Zombie hair is the one Halloween trend that rewards every bad hair day you have ever had – frizz, bedhead, grown-out layers, and day-three grease all become assets instead of flaws.
This guide is for anyone dressing as a zombie – or anyone who wants cool undone texture for October – with any hair length and any texture. These are the lowest-effort Halloween styles in existence: most take under fifteen minutes and several take under five. You will learn how to build believable messy texture on purpose (it is harder than it looks), which products create grit without damage, how to keep intentional mess from crossing into just-messy, and the mistakes that ruin the effect. As a stylist, I will be honest: good zombie hair is controlled chaos. Random mess looks like you gave up; directed mess looks like a costume.
24 Zombie Halloween Hairstyles: Messy Undone Hair Ideas
Each look below is tousled, grungy, and easy to create on the night of your party. Grab some dry shampoo, tease your roots, and let the mess do the talking. I added time and difficulty notes for each style.
1. Tousled Zombie Bedhead Waves
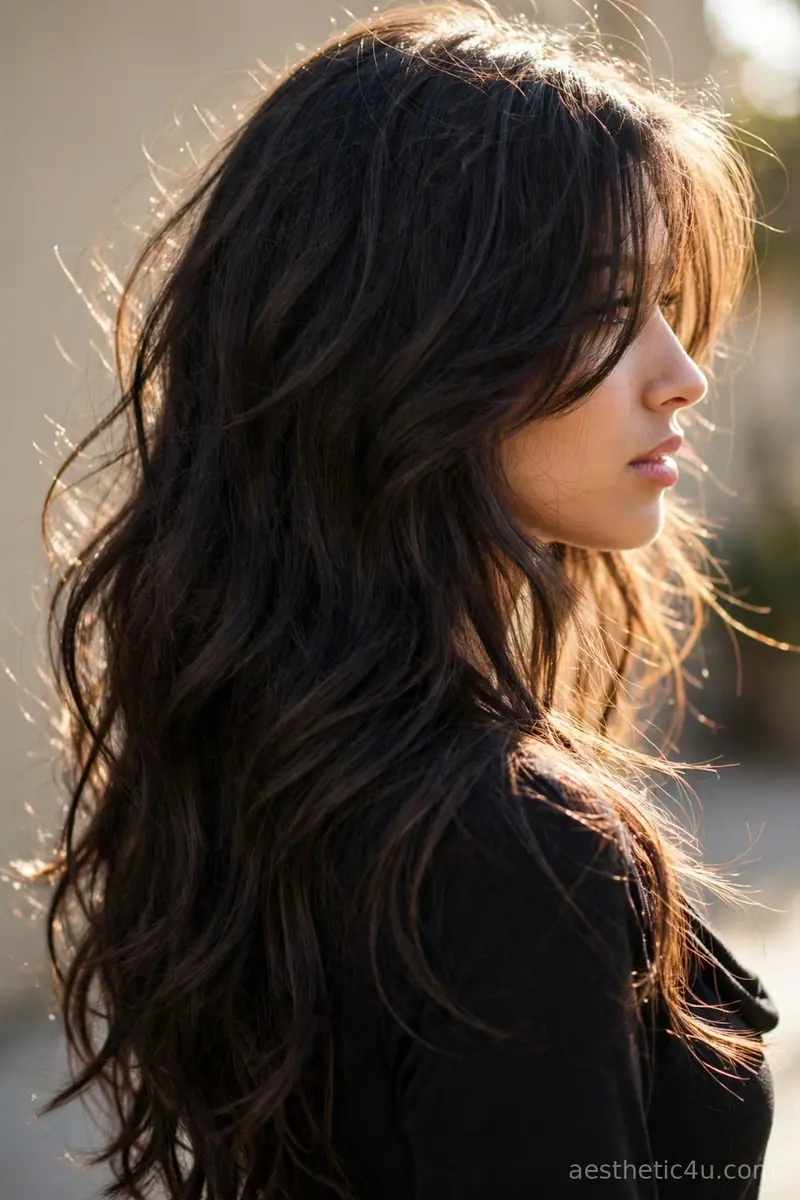
Long waves with a slept-in, tousled finish. The texture is soft and loose with no defined curl pattern. To fake perfect bedhead, sleep in two loose braids overnight, then undo them in the morning and shake the hair out upside down. Mist with texturizing spray and scrunch random sections in different directions. Strands fall naturally with a bit of frizz at the ends – do not smooth anything. Ten minutes in the morning after the overnight braids. Very easy difficulty.
I would choose this if I want the classic zombie look without much effort. It works on almost any hair length past the shoulders and takes ten minutes with a curling wand and your fingers. It suits every face shape. Pro tip: real bedhead goes flat by noon, so the texturizing spray is non-negotiable – it is what keeps the tousle alive all night.
2. Grungy Messy Bun with Loose Strands
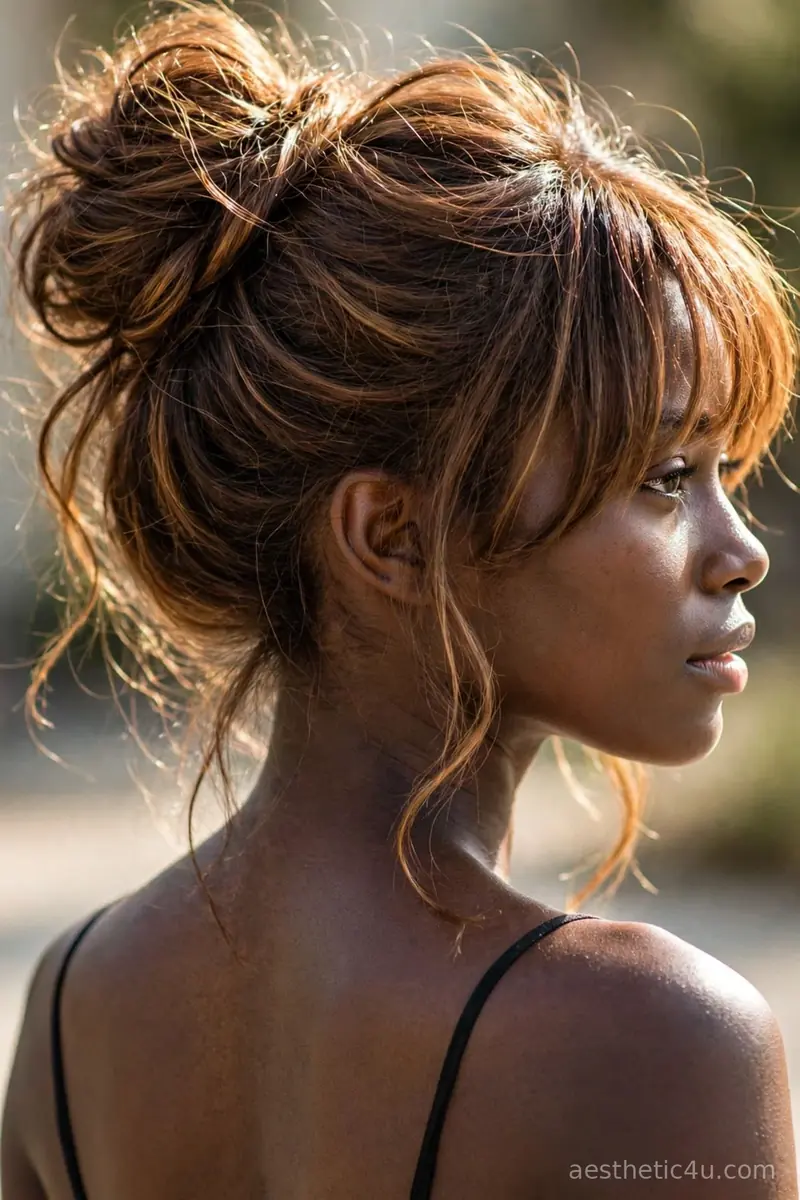
A high bun that is deliberately undone. Wispy strands are pulled loose around the face and at the nape. The bun itself is lumpy and imperfect on purpose. To build it, gather the hair high, twist it loosely, coil it into a bun, and pin – then pull pieces out deliberately around the face, the nape, and the bun itself. Backcomb the bun lightly first so the lumpiness holds. Five minutes. Very easy difficulty.
I love this one for parties because it keeps hair off my face all night. I would pick it when my hair is on day three and too dirty to wear down – dirty hair actually holds messy buns better. It suits oval and long faces. One caveat: a messy bun still needs pins – use at least four in an X pattern or the deliberate mess becomes an accidental collapse.
3. Undone Mermaid Waves with Teased Roots
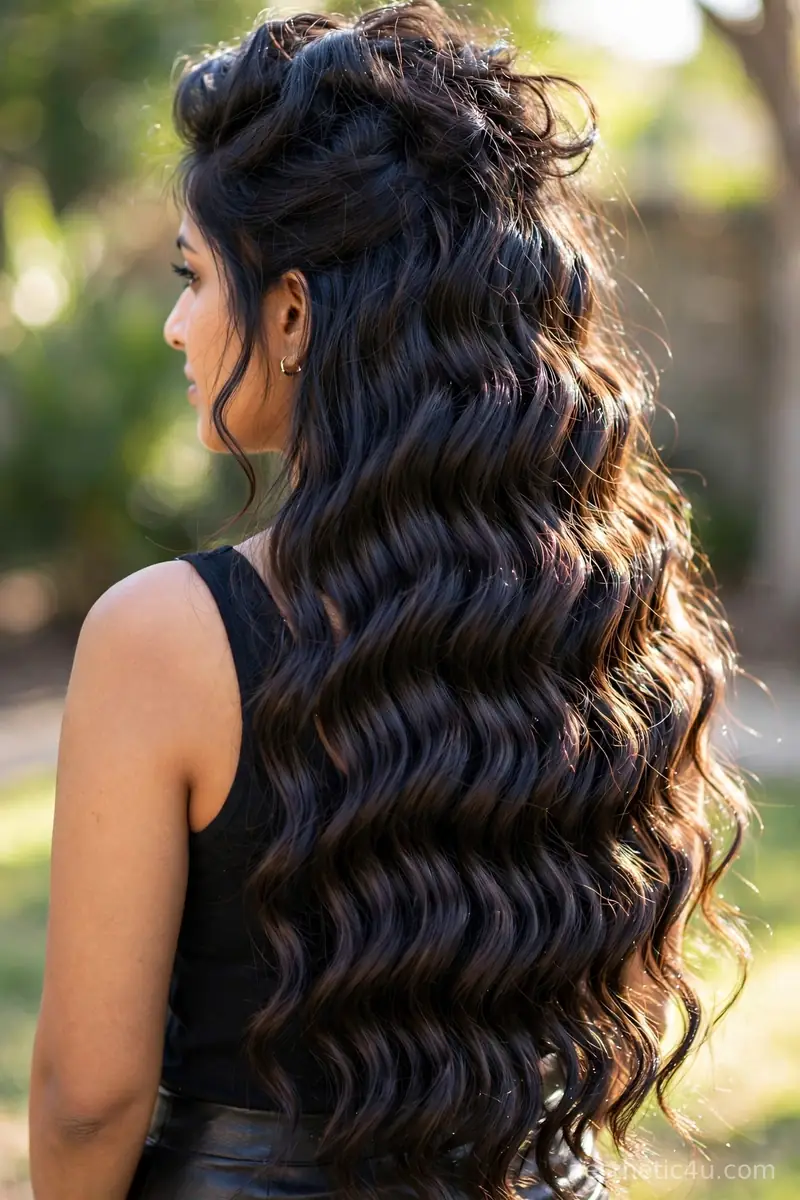
Very long waves with a teased, lifted crown. The roots are darker and slightly roughed up for a gritty finish. Tease the crown in one-inch sections with a fine-tooth comb, then wrap the lengths loosely around a 1.25-inch iron in alternating directions. Break the waves up roughly with your fingers – no brushing. The lengths stay loose and wavy while the crown stays wild. Twenty minutes. Easy to medium difficulty.
I would choose this if I want drama from behind and in photos. The teased crown gives instant zombie volume, and it suits long hair best. It flatters round faces with the height. Pro tip: tease with a volumizing spray as a buffer, never on dry unprotected hair – backcombing without product causes breakage you will feel for weeks.
4. Ragged Messy Ponytail with Flyaways
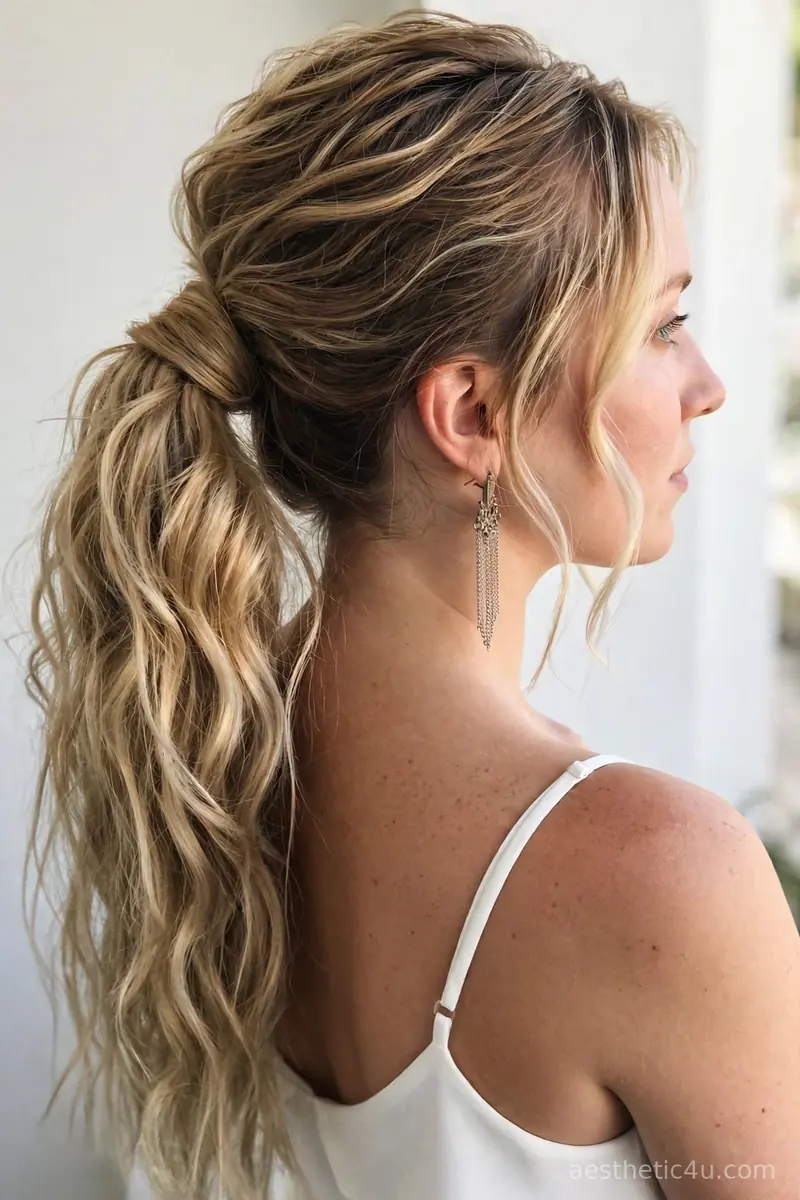
A ponytail tied loosely at mid-height with a deliberately ragged finish. Flyaways and short layers escape around the hairline and the base. The tail has a rough, brushed-through texture with pieces sticking out everywhere. To build it, brush the hair back roughly – not smoothly – gather loosely at the back of the head, and secure with an elastic. Pull pieces loose around the hairline on purpose. Backcomb the tail lightly and brush through once for the rough finish. Three minutes. Extremely easy difficulty.
This is my pick for a quick costume when I am running late. I like how the flyaways make it look worn and lived in without any real styling. The mid-height placement keeps it casual and takes seconds to throw up. It suits every face shape. One caveat: a loose ponytail slides down on silky hair, so anchor the elastic with two crossed bobby pins underneath.
5. Shattered Choppy Zombie Bob
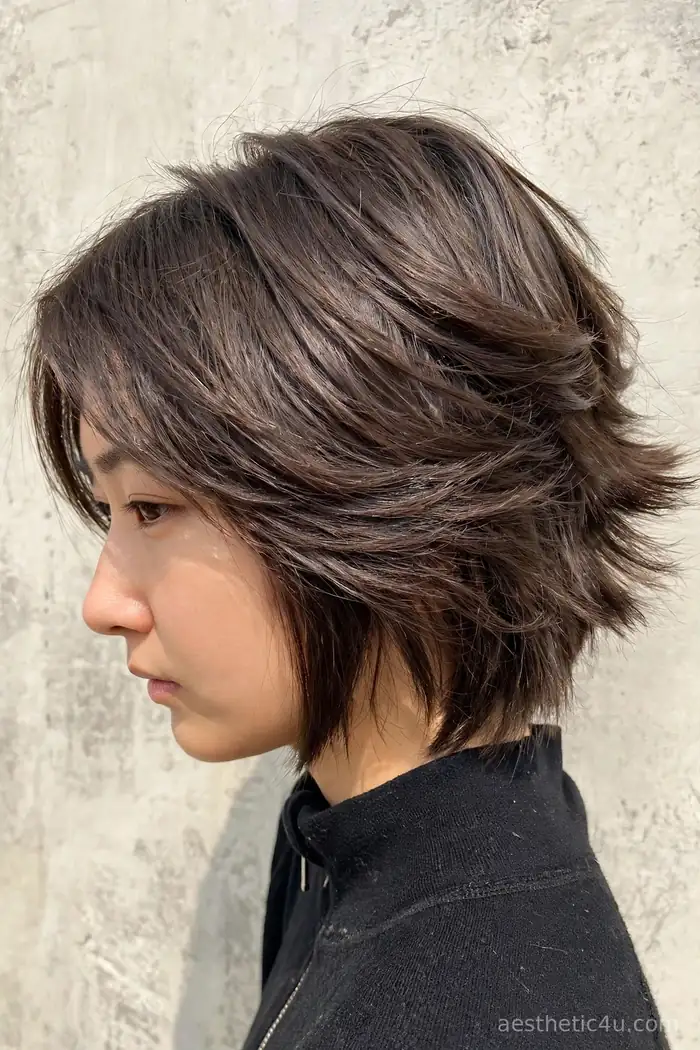
A chin-length bob with choppy, shattered ends. The layers are uneven and piecey. The texture is rough and air-dried, never smooth. To style, apply texturizing cream to damp hair, scrunch, and let it air-dry – or rough-dry with your fingers pointing in every direction. Pinch the ends apart into pieces. The choppier, the better. Ten minutes. Very easy difficulty – the cut does the work.
I would choose this if I have short hair and want edge. It gives major zombie attitude, and the choppy ends do all the talking for you. It suits oval and heart faces. Pro tip: this cut needs the texture to read shattered – on wash day without product it just looks grown out, so never skip the texturizing cream.
Keep exploring: 26 Halloween Hair Color Ideas: Orange & Purple Combos
6. Teased Ragged High Ponytail
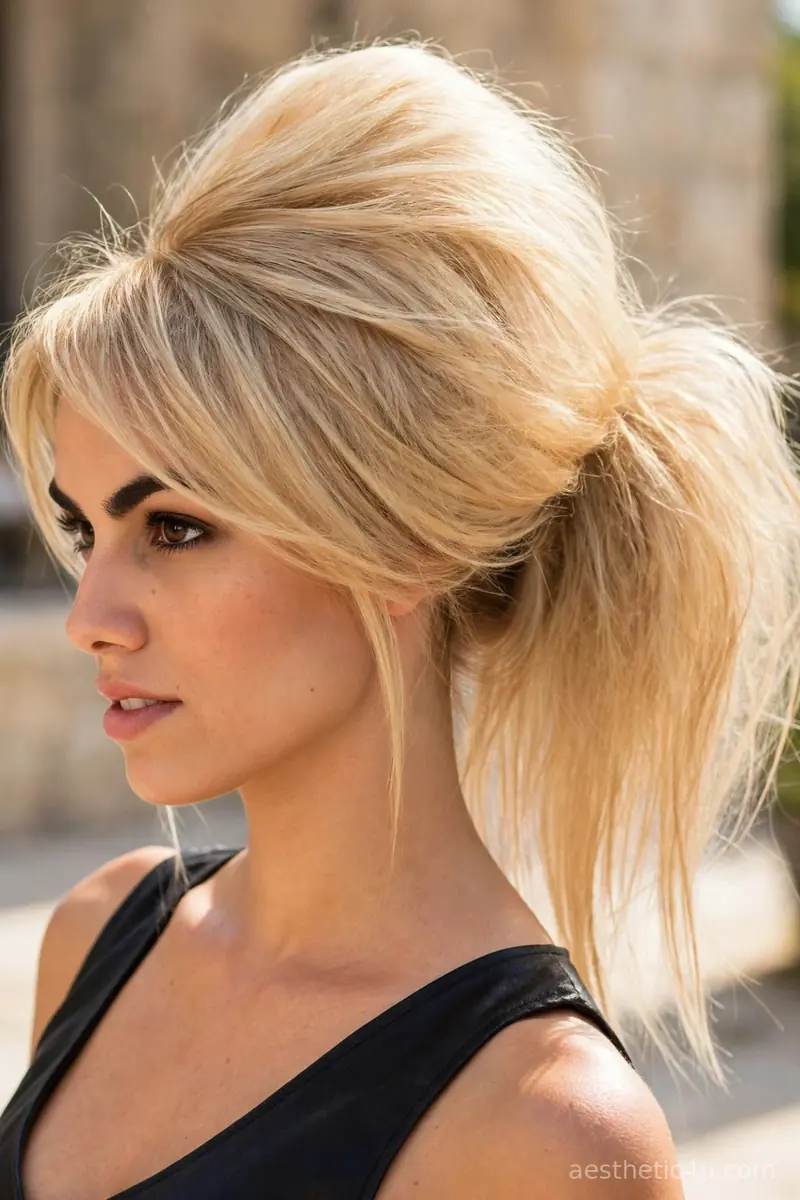
A high ponytail with a heavily teased crown. The tail is rough and textured, not sleek. Pieces stick out for a wild, electric finish. Tease the crown heavily in sections, gather high with the upside-down flip, and secure. Backcomb the tail and pull pieces out in every direction. Mist with firm-hold hairspray – this much texture needs lockdown. Ten minutes. Easy difficulty.
I love the energy of this look. I would wear it to a Halloween party where I plan to dance, because the height and texture hold up all night. It suits oval and heart faces. One caveat: heavy teasing plus dancing equals epic tangles, so detangle gently with conditioner and a wide-tooth comb the next day – never brush it dry.
7. Tousled Textured Zombie Pixie
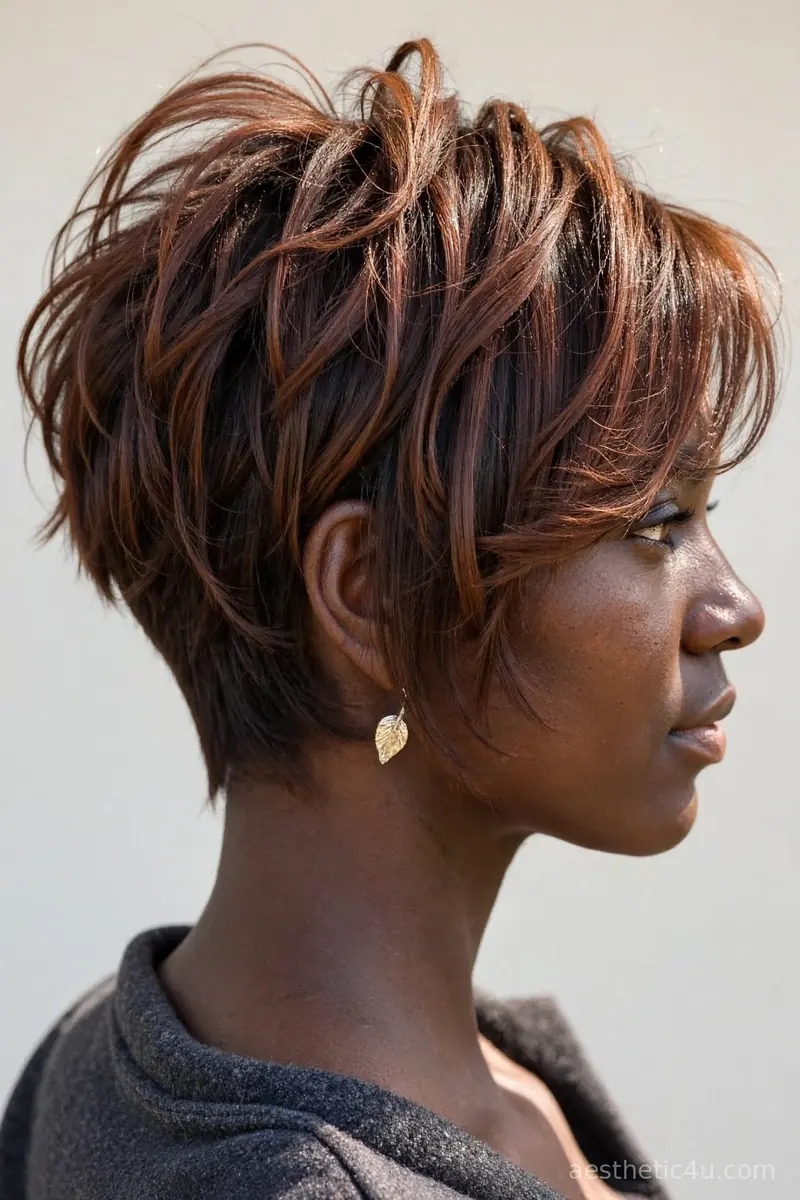
A short pixie with tousled, piecey texture on top. The fringe is choppy and falls forward. The sides are slightly roughed up. To style, work matte texture paste through dry hair and pinch the top into pieces pointing in different directions. Push the fringe forward roughly – no precision. Rough up the sides with your fingertips. Two minutes. Extremely easy difficulty.
I would choose this for a bold, low-maintenance zombie look. It shows off your face and your makeup, and it takes about two minutes to style. It suits oval and heart faces. Pro tip: zombie pixies look best with the makeup doing half the work – pale foundation and dark eyes against the tousled texture sell the whole costume.
8. Messy Half-Up Top Knot
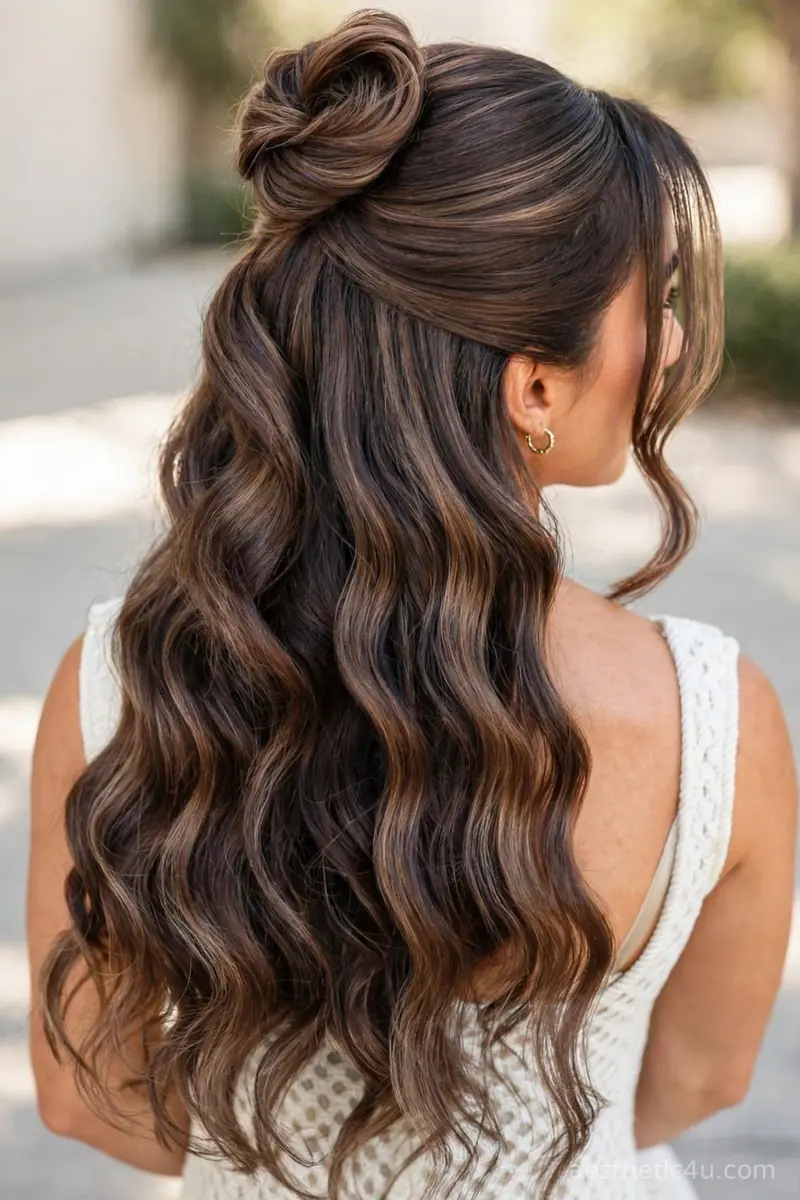
The top section is pulled into a small, messy knot. The rest of the hair falls in tousled waves. Loose pieces frame the face. Gather the top half, twist it loosely into a small knot at the crown, and pin – pulling pieces out deliberately. Tousle the bottom half with texturizing spray. This is a great middle ground: undone zombie texture but hair out of the eyes. Eight minutes. Very easy difficulty.
This is a great middle ground for me. I get the undone zombie texture but keep hair out of my eyes, which matters when I am out all evening. It suits medium to long hair. One caveat: the knot slides down on silky hair, so backcomb the gathered section lightly before twisting for grip.
9. Salt-Spray Zombie Beach Waves
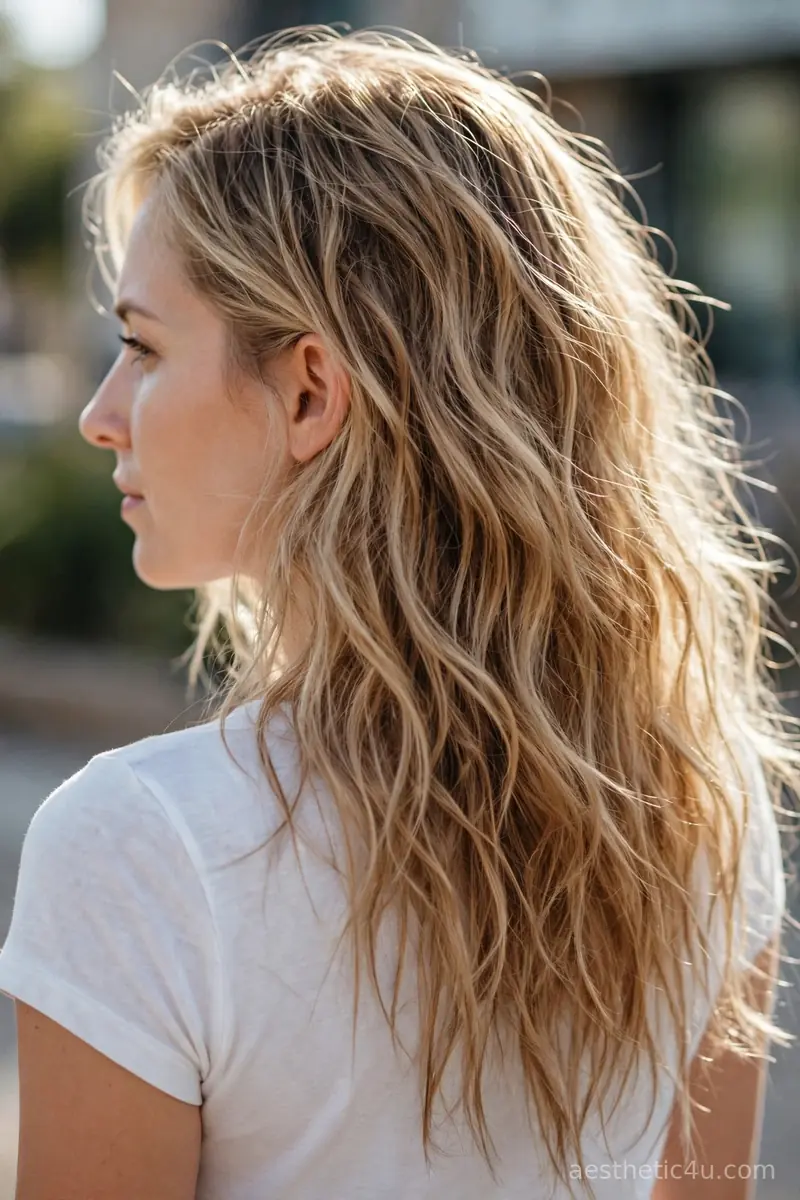
Waves with a crunchy, salt-sprayed texture. The finish looks damp and gritty, like ocean air dried it. Mist damp hair generously with sea-salt spray, scrunch in sections, and let it air-dry – or diffuse on low for speed. The ends go slightly stringy, which is exactly right for this look. Do not brush it out. Ten minutes hands-on plus drying. Very easy difficulty.
I would pick this for a beachy zombie or shipwreck costume. It is one of the easiest textures to fake with a salt spray and a scrunch. It suits wavy to curly hair best. Pro tip: salt spray is brutally drying, so deep-condition the day after – your ends will thank you.
10. Voluminous Teased Zombie Blowout
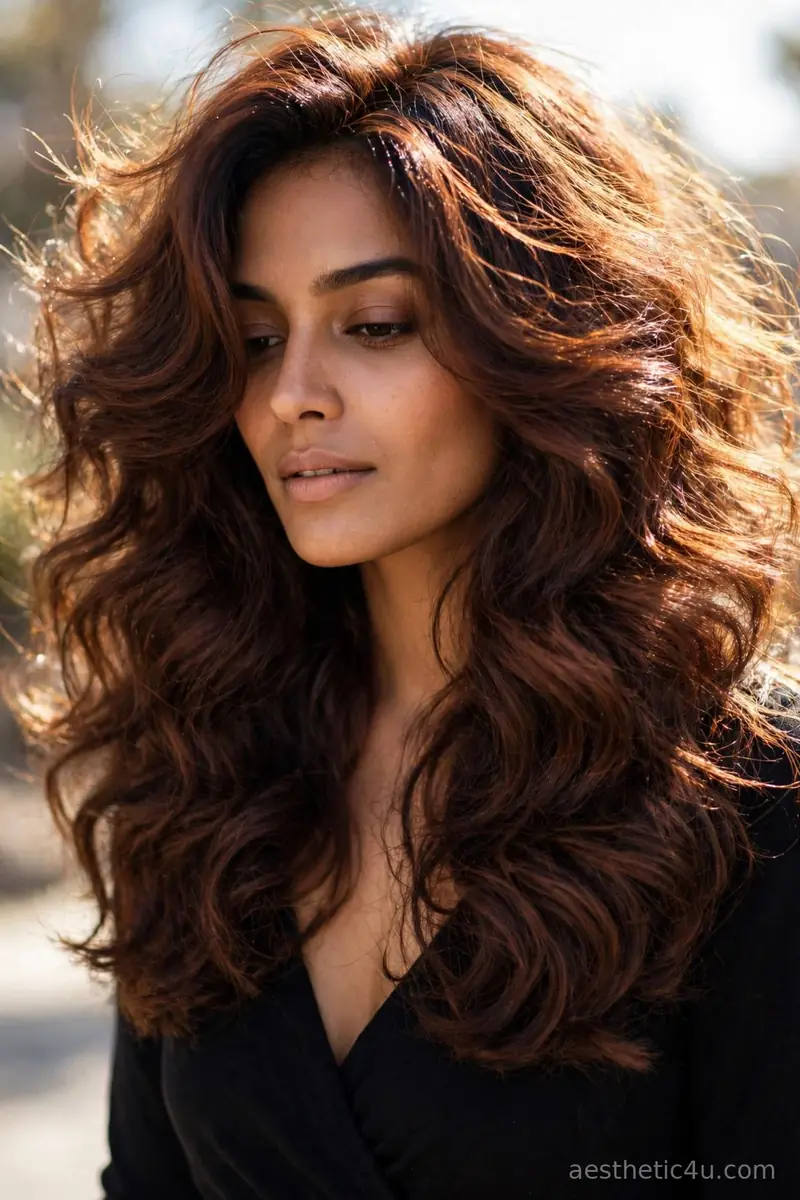
A big, blown-out style with maximum volume. The parting is messy and undefined. Blow-dry with a round brush for volume, then tease the crown and mid-lengths in sections for the wild finish. Shake the hair out roughly and mist with texturizing spray. The texture is teased and slightly frizzy – wild, not polished. Twenty-five minutes. Easy to medium difficulty.
I love this for full glam zombie. I would choose it when I want big hair that photographs well from every angle. It suits medium to thick hair. One caveat: teased blowouts collapse in humidity, so this is an indoor-party look – and pack a travel texturizing spray for a mid-night root refresh.
Keep exploring: 21 Split Dye Halloween Hair: Two-Tone Color Ideas
11. Uneven Air-Dried Messy Lob
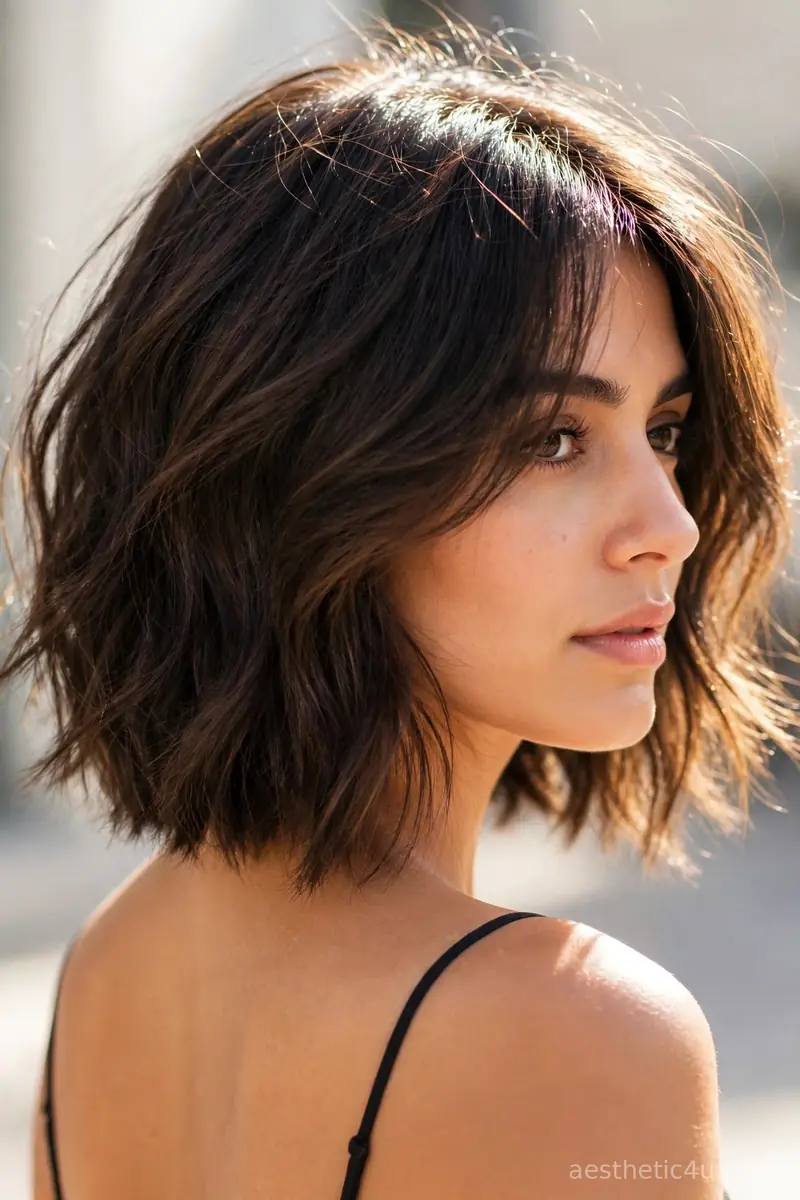
A long bob left to air-dry with zero styling. The texture is uneven and natural. Some sections wave, some stay straight, and that is the point. To get the best version of this, apply a little texturizing cream to damp hair, scrunch once, and do not touch it while it dries. Flip the part to the opposite side halfway through drying for extra unevenness. Zero hands-on styling time plus air-drying. Extremely easy difficulty.
I would choose this on a busy Halloween morning. It is the most low-effort look on the list, and the unevenness reads perfectly zombie. It suits wavy to straight lobs. Pro tip: the one thing that elevates this from bedhead to costume is the part – a messy, off-center part reads intentional, while a clean part reads like you just did not style it.
12. Pulled-Apart Messy Braid Pigtails
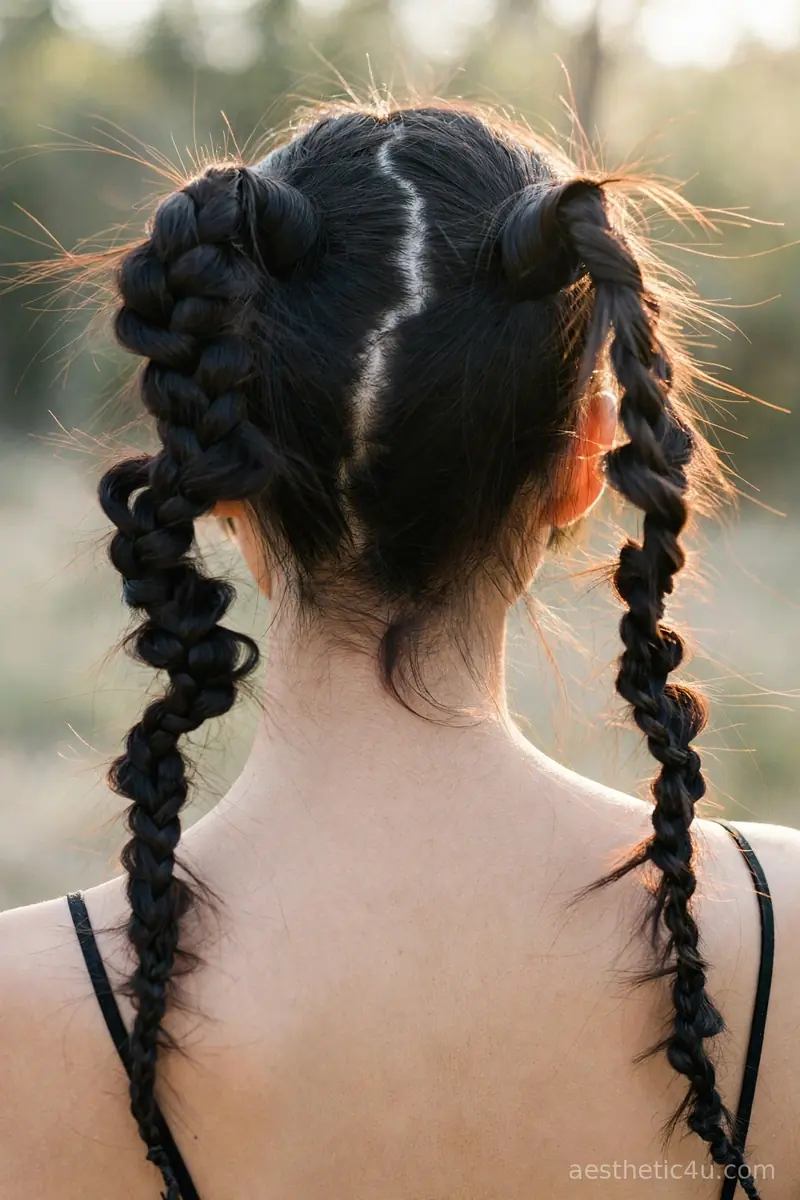
Two loose braids that are pulled apart for width. The plaits look soft and pancaked. Part down the middle roughly – not precisely – braid each side loosely, then gently pull the braid edges outward to pancake them wide. Pull pieces loose around the face. Flyaways and short layers stick out everywhere, which is exactly right. Ten minutes. Easy difficulty.
I like this for a creepy-cute zombie vibe. I would wear it with a schoolgirl-style costume to balance the scary and the sweet. It suits medium to long hair. One caveat: pancaked braids loosen fast, so mist each braid with hairspray before pulling it apart – pre-set braids hold their width all night.
13. Frayed Loose Zombie Side Braid
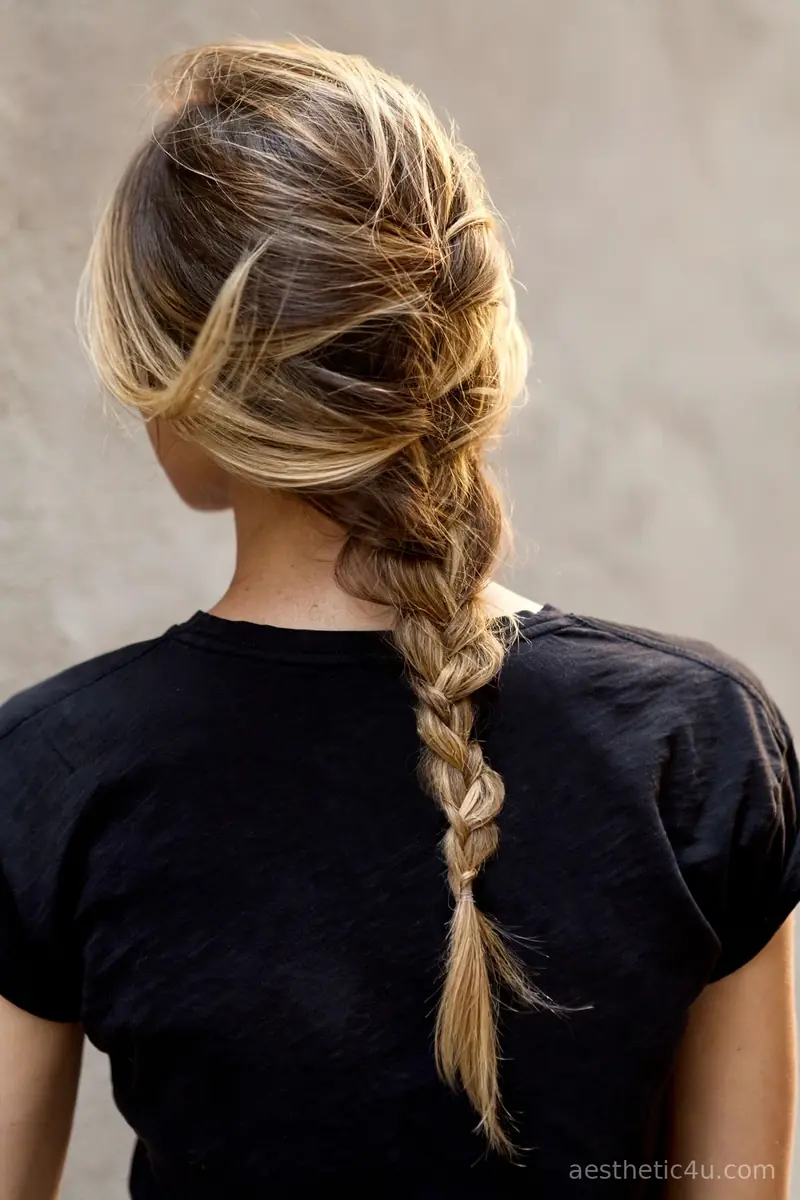
A single braid draped over one shoulder. The braid is loose with frayed, fuzzy edges. Sweep the hair over one shoulder, braid it loosely, and secure. Then rough up the braid: pull the edges outward, tug pieces loose, and backcomb the tail lightly for the frayed finish. The tail thins out into wispy ends. Eight minutes. Very easy difficulty.
I would choose this if I want something romantic but ruined. It is pretty from the front and perfectly messy from the side. It suits long hair. Pro tip: braid on second-day hair – the natural texture grips the loose braid, while freshly washed hair slips and the braid unravels.
14. Bedhead Shag with Feathered Layers
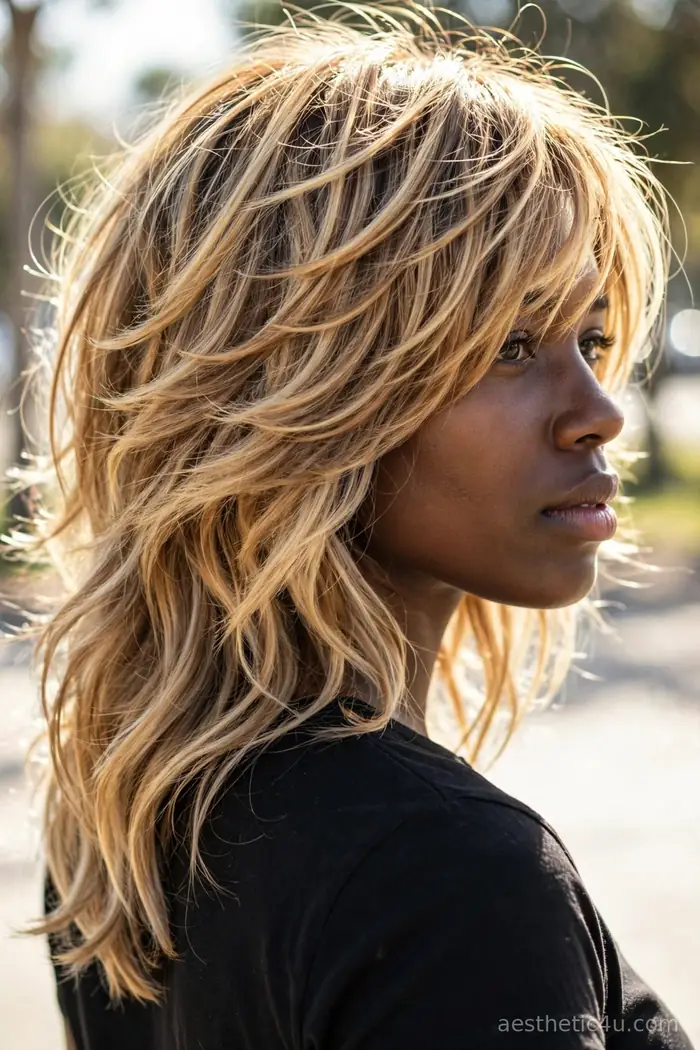
A shag cut with feathered, face-framing layers. The texture is tousled and lived-in. To style, rough-dry with your fingers, work matte texture paste through the layers, and let the pieces flip and bend in different directions – do not direct them. The shag already looks undone, so the styling is basically done for you. Ten minutes. Very easy difficulty.
This is my pick for an effortlessly cool zombie. I love how the shag already looks undone, so the styling is basically done for you. It suits medium to thick hair. One caveat: shags grow out shapeless fast, so get the layers freshened every eight weeks or the bedhead turns into just-a-mess.
15. Wispy Undone Zombie Bun
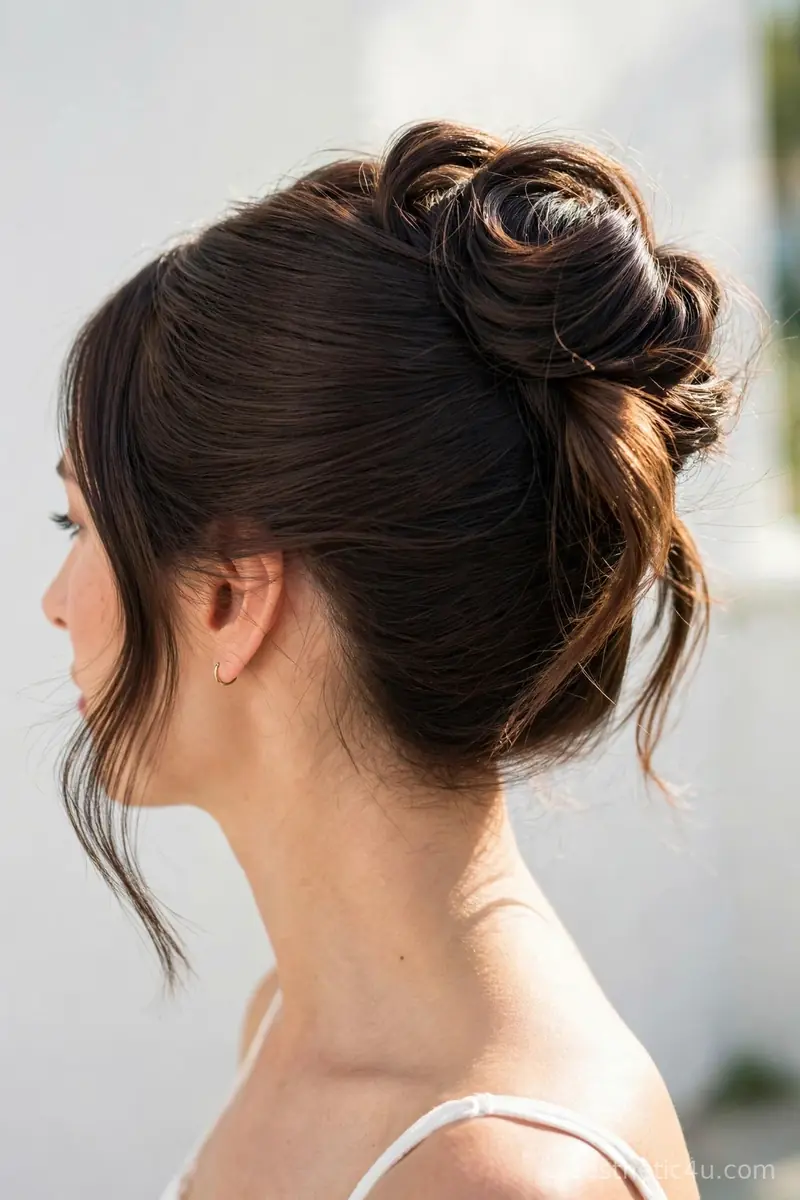
A messy bun that is soft and falling apart. Wispy pieces escape at the temples and nape while the base stays pinned and secure. Gather the hair to the back of the head at mid-height, twist it loosely, coil it into a soft knot, and pin firmly underneath – then pull pieces out deliberately at the temples, the nape, and around the knot itself. The knot sits loose and lopsided on the surface, like it was done in a hurry. Twelve minutes. Easy difficulty.
I would choose this for a zombie bride or ghost costume. It looks elegant at first glance, then beautifully wrecked up close, which is exactly the effect a zombie updo needs. The mid-height placement keeps it from feeling too formal. It suits medium to long hair. Pro tip: the falling-apart effect needs structure underneath – pin the base knot firmly, then loosen only the surface, or the whole thing collapses instead of looking artfully undone.
Keep exploring: 18 Temporary Halloween Hair Color: Wash-Out Shades
16. Stringy Wet-Look Tousled Hair
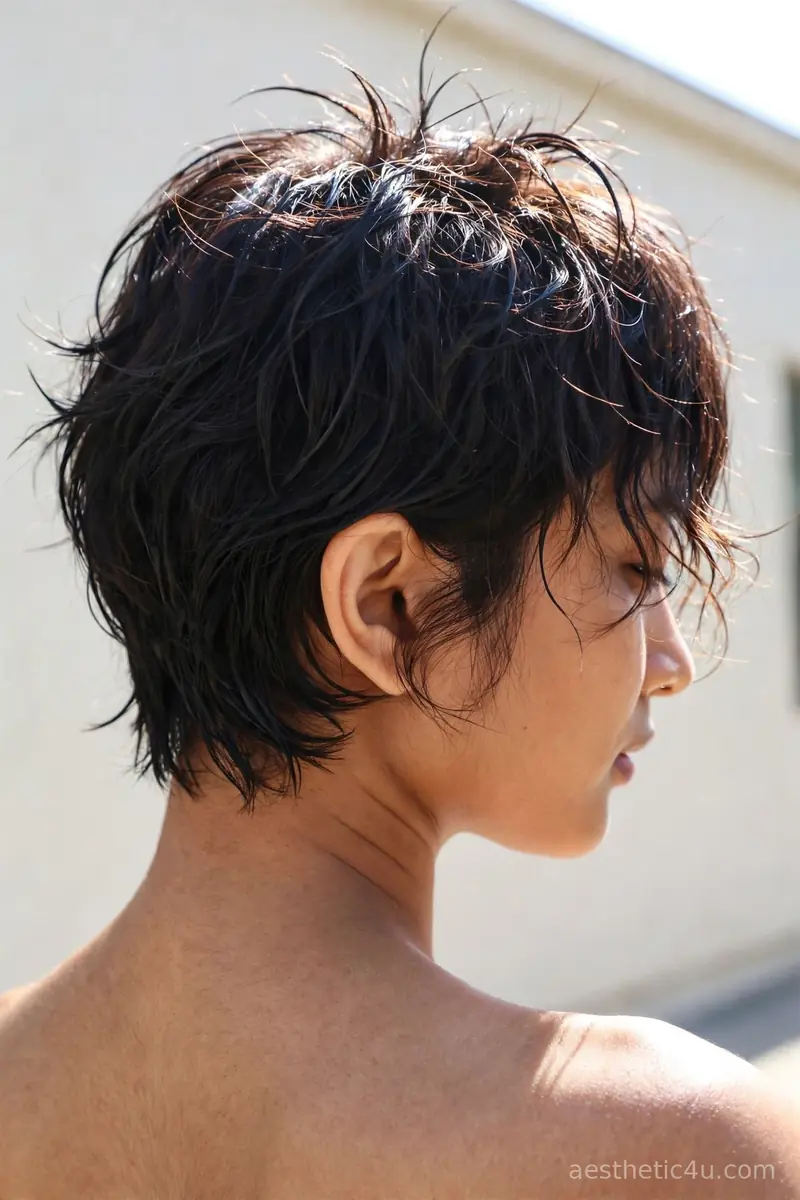
Hair with a glossy, wet-look finish and stringy texture. Strands clump together in damp pieces. Work wet-look gel through damp hair in sections, then twist small sections roughly and let them set – the twisting creates the stringy clumps. Do not brush it out. The overall effect is dark and dripping. Ten minutes hands-on plus setting time. Easy difficulty.
I love this for a swamp or drowned zombie costume. I would wear it with dark eye makeup and let the wet texture do the scaring. It suits straight to wavy hair. One caveat: the wet finish transfers onto everything, so get dressed after it sets and keep a towel handy for your neck and shoulders.
17. Teased Bubble Ponytail
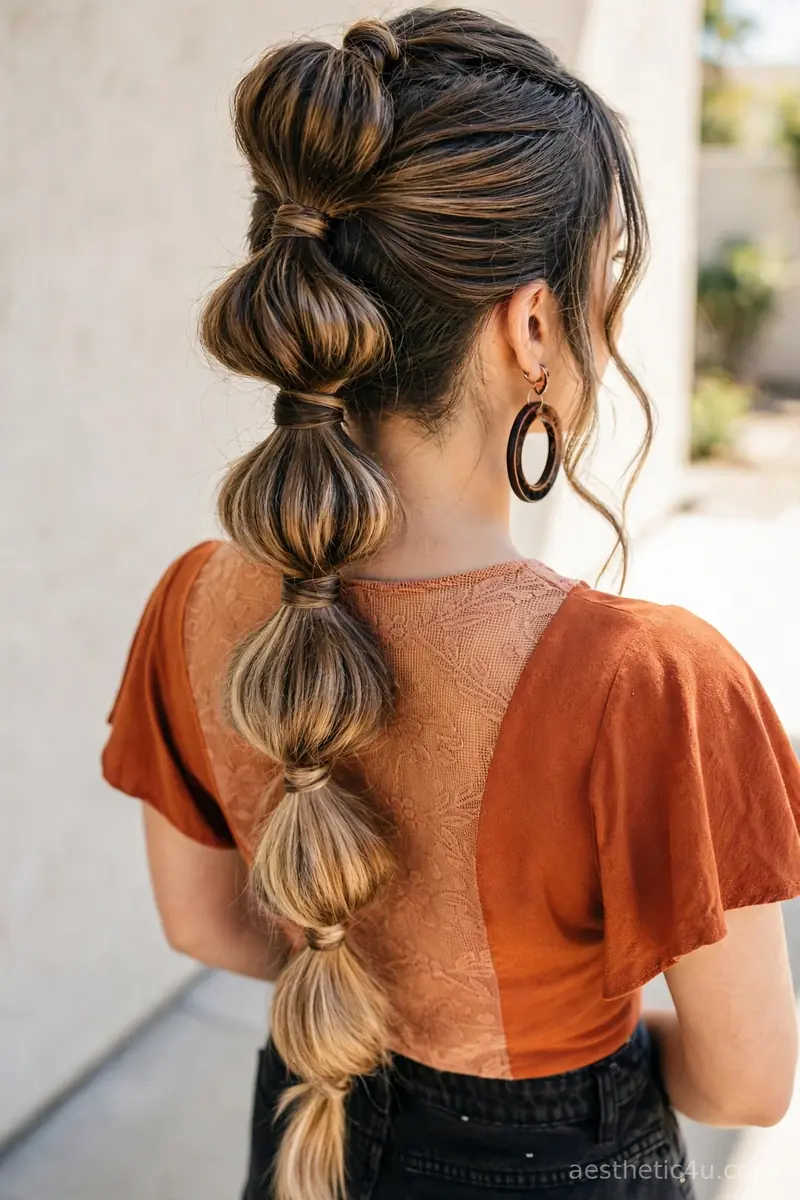
A ponytail divided into teased, puffy sections. Each bubble is roughed up for volume. Make a ponytail, place elastics down the tail, and tease each section before puffing it into a bubble – the teasing is what makes these bubbles wild instead of neat. Leave the ends messy and textured. Mist with firm hairspray. Fifteen minutes. Easy difficulty.
I would choose this for a playful zombie look. It is fun, it is different, and the teased bubbles give it that wild, undone edge. It suits thick hair best. Pro tip: tease each section before placing the elastic that defines it – teasing after puffing just flattens the bubble you just made.
18. Shaggy Zombie Mullet Layers
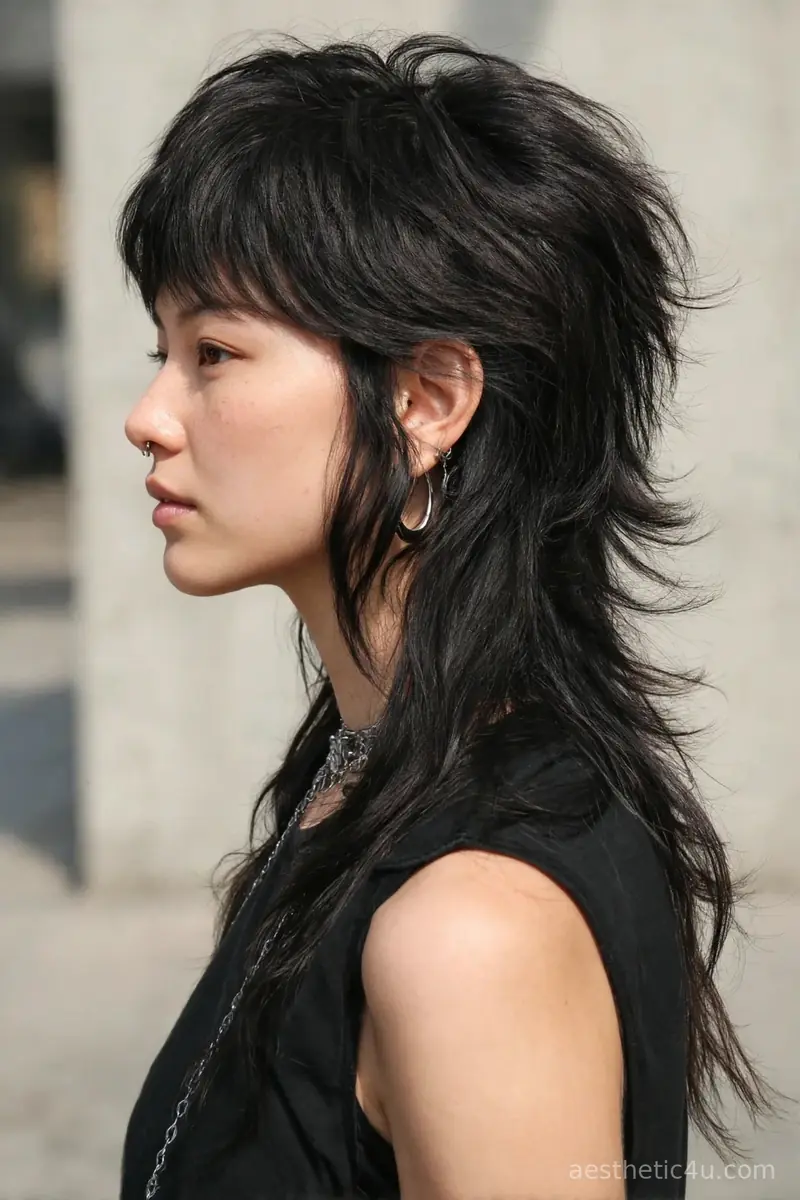
Short, choppy layers on top with longer messy length in back. The texture is rough and piecey all over. To style, work matte paste through dry hair and pinch the top layers into pieces, letting the back fall naturally messy. The ends are thinned and jagged – that is the cut’s job, not the styling. Five minutes. Very easy difficulty.
I would pick this for a rock-and-roll zombie. It is bold, it is grungy, and it needs almost no styling to look right. It suits thick hair that can hold the texture. One caveat: mullets are a commitment – the grow-out is awkward for months, so be sure you love it beyond Halloween.
19. Crimped Grunge Texture Hair
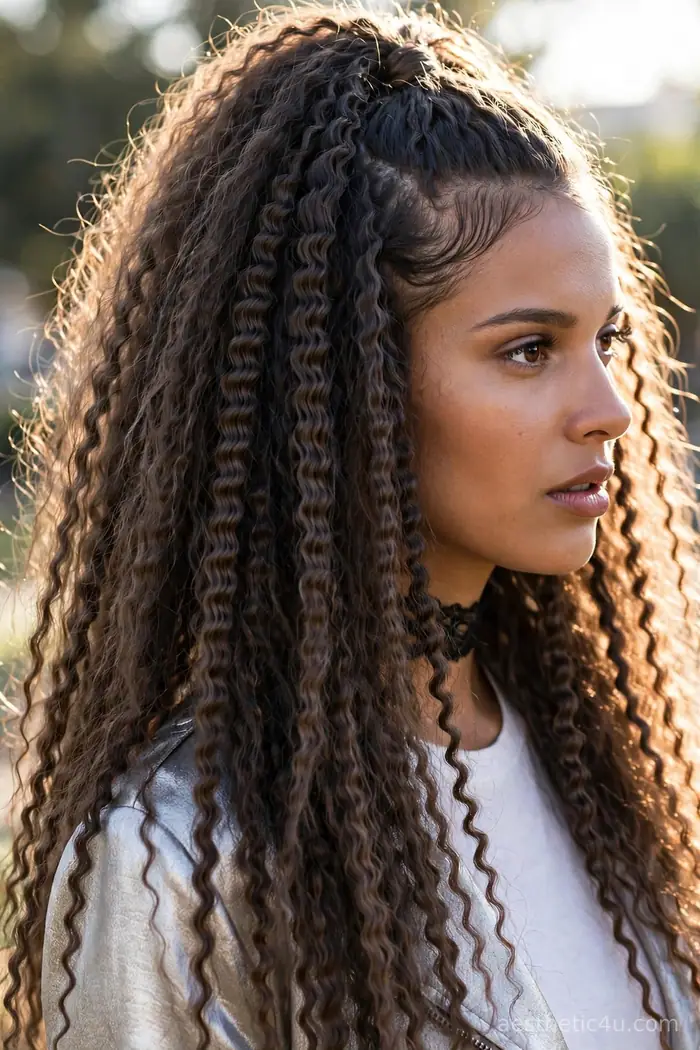
Hair with a zigzag crimped texture from roots to ends. The finish is matte and gritty. Work in half-inch sections with a crimping iron – always with heat protectant – from roots to ends. Once done, shake the hair out roughly and mist with texturizing spray for the gritty matte finish. Do not brush it smooth. The volume is big and slightly frizzy. Thirty to forty-five minutes. Medium difficulty – slow but simple.
I love the throwback feel of this one. I would choose it for a 90s-inspired zombie, and the crimp texture holds for days. It suits every hair length. Pro tip: crimped hair plus teasing equals epic tangles, so if you do both, detangle with a wide-tooth comb and heavy conditioner before bed.
20. Undone Twisted Zombie Space Buns
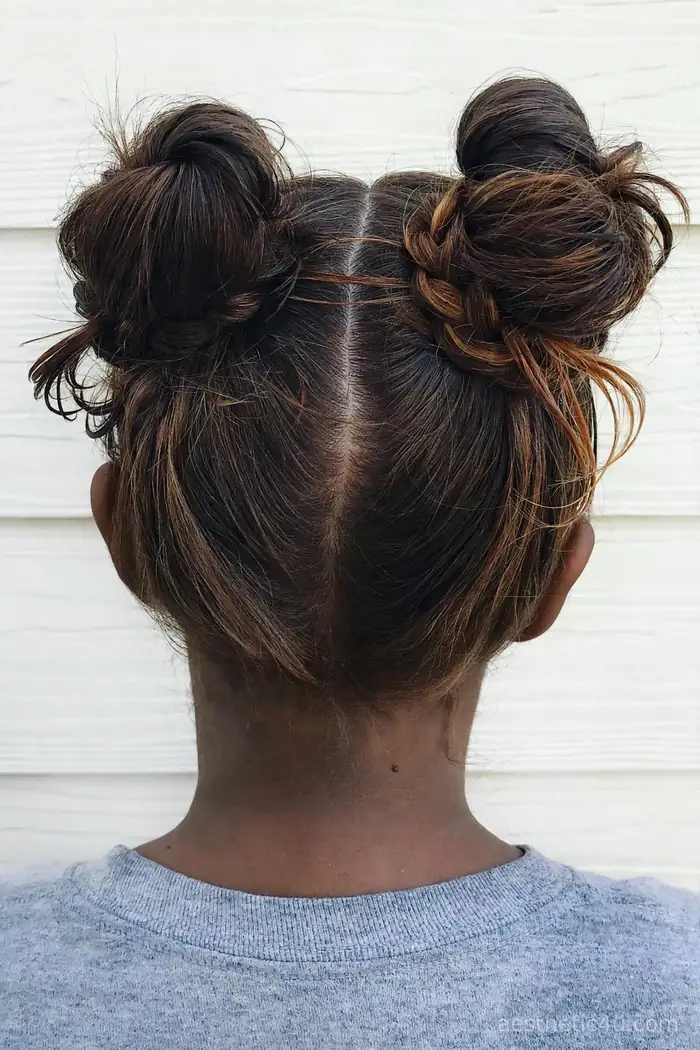
Two twisted buns that are loose and lopsided. Strands pull free around the buns. The parting is rough and uneven. Part roughly – not precisely – down the middle, twist each side loosely into a bun, and pin. Pull strands free around each bun deliberately. Make one bun slightly higher than the other for the lopsided effect. Ten minutes. Very easy difficulty.
I would choose this for a cute zombie look that still feels messy. The lopsided buns keep it from looking too polished. It suits medium to long hair. One caveat: lopsided works when it looks deliberate – check the mirror and adjust until the asymmetry feels intentional, not accidental.
Keep exploring: 23 Purple Halloween Hair Ideas: Witchy Violet Looks
21. Brushed-Out Frizzy Zombie Curls
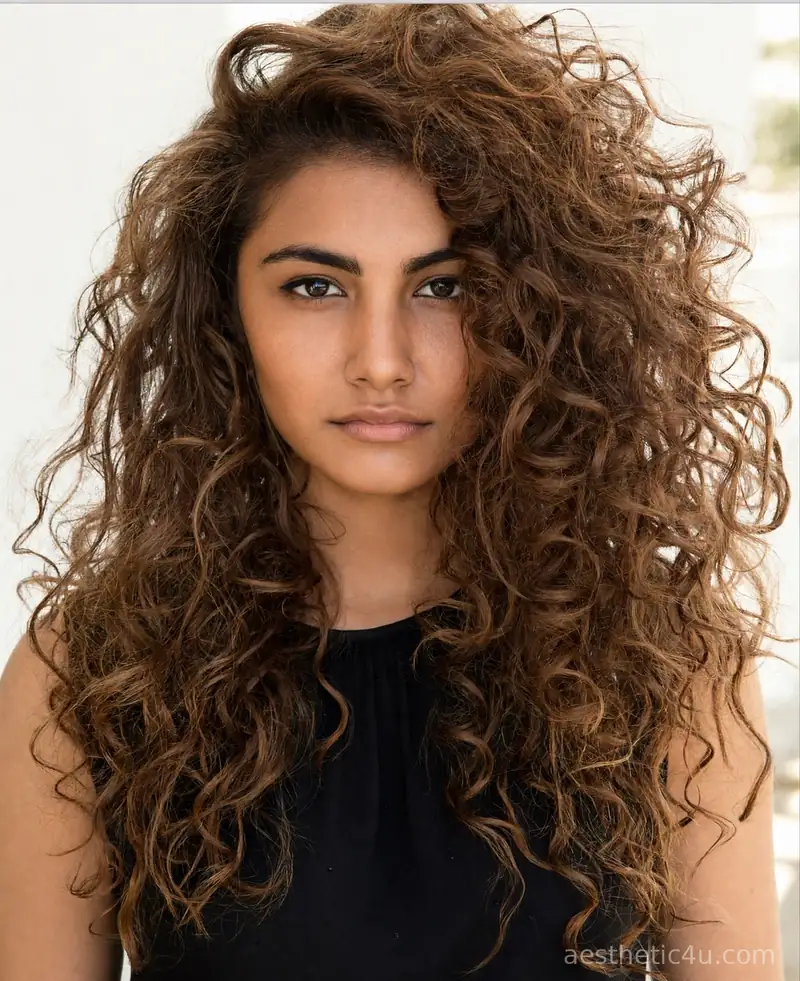
Curls that are brushed out into a big, frizzy cloud. The texture is soft and undefined. To create it, brush dry curls out thoroughly with a paddle brush – yes, really – then pick the roots for extra volume. The volume is huge and wild. Mist with texturizing spray to keep the cloud from collapsing. Five minutes. Extremely easy difficulty.
I would choose this if I have natural curls and want maximum impact. The frizz is the whole point here, so embrace it fully. It suits type 3 to 4 curls. Pro tip: this is a one-night texture – deep-condition after, because brushed-out dry curls need serious moisture recovery.
22. Messy Curtain Bangs with Tousled Layers
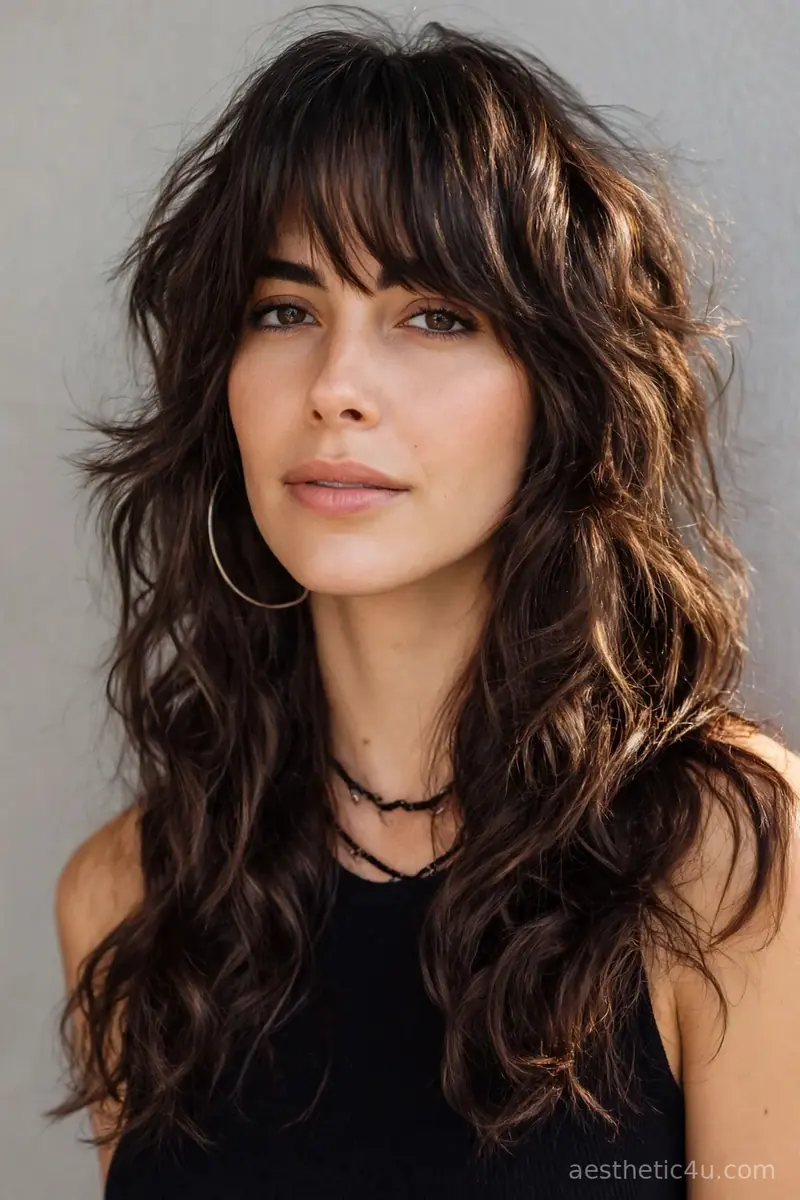
Curtain bangs that fall in messy, separated pieces. The layers underneath are tousled and uneven. To style, separate the curtain bangs into pieces with your fingers and a dab of texture cream – do not smooth them together. Tousle the layers roughly with texturizing spray. The bangs frame the face in soft, rough strands. Ten minutes. Very easy difficulty.
I love this for showing off zombie makeup around the eyes. I would pick it when I want the bangs to be the star of the look. It suits oval and heart faces. One caveat: separated bangs plus sweat equals clumping, so blot – do not wipe – your forehead through the night to keep the pieces airy.
23. Sleek Glam Zombie Waves
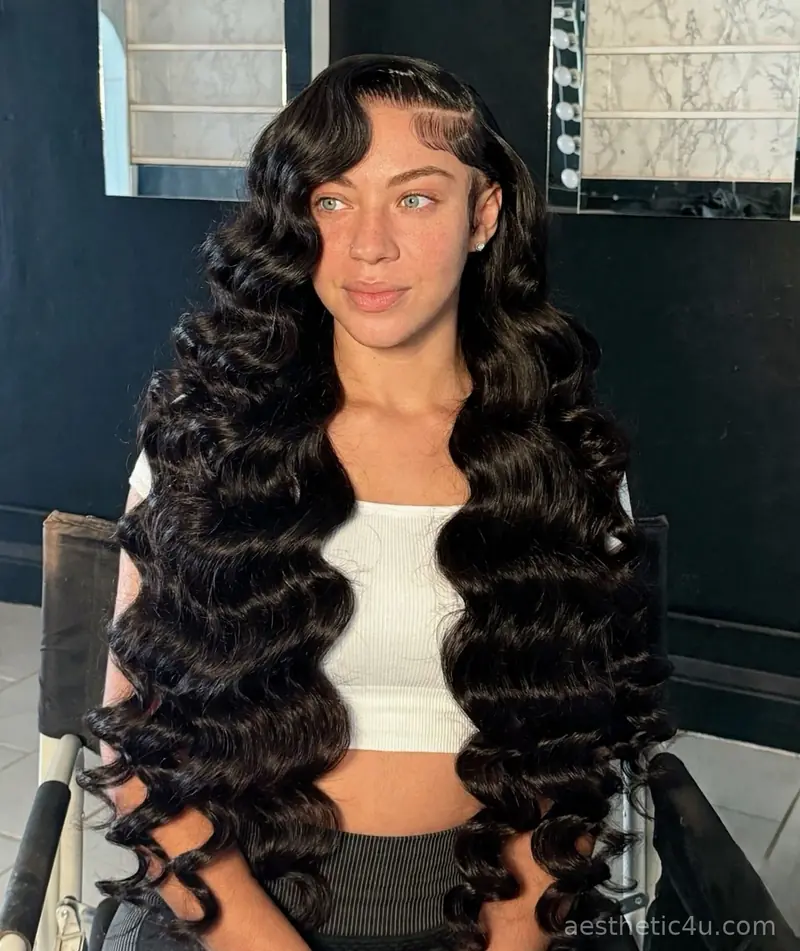
Long, sleek waves with a glossy, polished finish. The crown is smoothed flat and the lengths fall in defined, shiny waves from a neat side part. To get it, set a clean side part on damp hair with smoothing serum, curl one-and-a-half-inch sections with a 1.25-inch iron in the same direction, then brush through for smooth, defined waves. Smooth the crown with a soft brush and mist with shine spray. The look is glamorous, not messy – like a zombie who still takes pride in her hair. Thirty minutes. Easy to medium difficulty.
I would choose this for a glamorous zombie or vampire-adjacent costume. It is polished and pretty, which makes the zombie makeup look even more striking by contrast. It suits long hair and oval faces beautifully. Pro tip: the shine is what sells this – a gloss spray on the lengths keeps the waves looking wet and fresh all night, not dry and costume-y.
24. Wrapped-Braid Low Zombie Ponytail
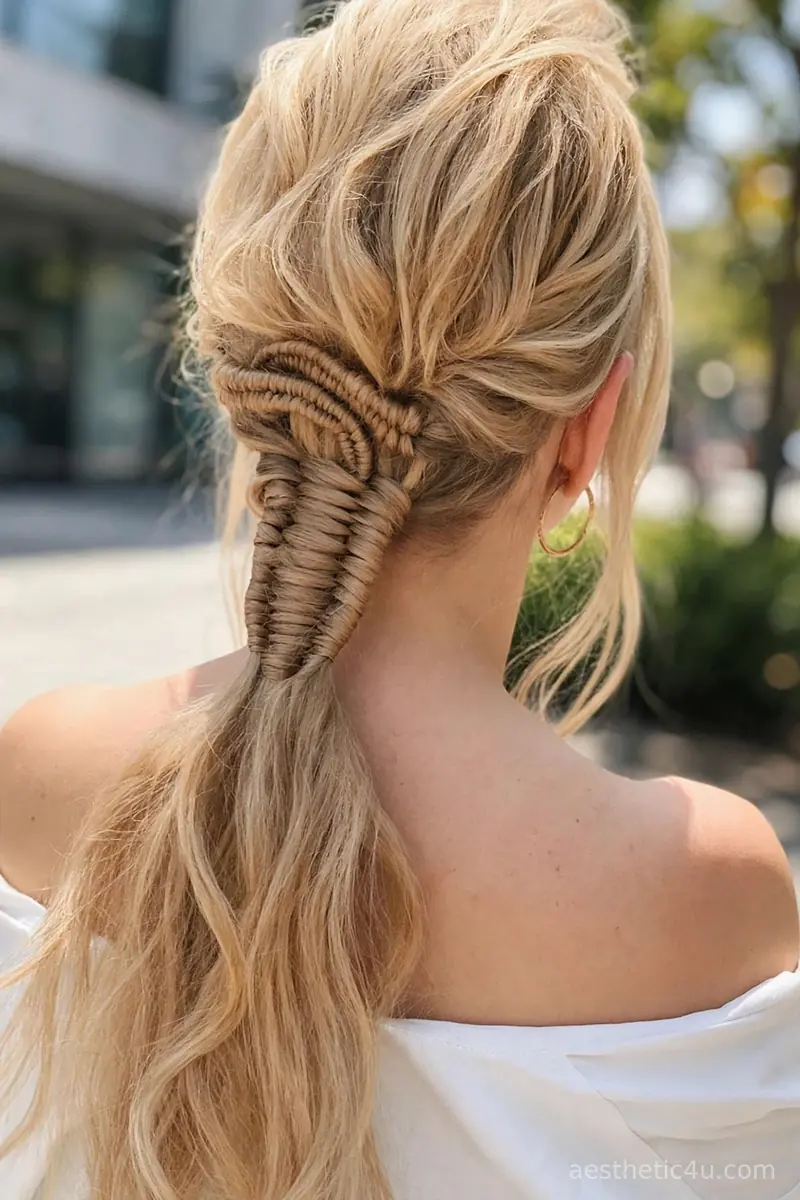
A low ponytail at the nape with the top of the tail wrapped in thin twisted braids. The wrapped section forms a textured sleeve around the tail, while the rest falls loose and wavy below it. Make a low ponytail, braid several thin sections from the crown, then wrap them tightly around the top of the tail and pin underneath. Leave the remaining length loose and tousle it with texturizing spray. Pull pieces loose around the face. Fifteen minutes. Easy difficulty.
I would choose this for a zombie look that feels styled without being neat. The wrapped braid sleeve gives the ponytail real texture and visual interest, and the loose lower half keeps it undone. It suits long hair and frames the face with the pulled-loose pieces. One caveat: the wrapped braids slip on silky hair, so mist each small braid with hairspray before wrapping it around the tail.
How to Choose the Right Halloween Hairstyle for You
Start with your costume’s zombie type, because it decides the texture. Fresh zombies want damp, stringy texture – the wet-look tousled hair, the salt-spray beach waves, the stringy pieces. Classic graveyard zombies want dry, dusty mess – the bedhead waves, the teased blowout, the brushed-out curls. Fashion zombies want undone-with-intention – the wispy chignon, the messy curtain bangs, the textured pixie. Match the texture to the story and the costume sells itself. Then check your hair length: pixies and bobs own the short messy looks, lobs and long hair own the waves and ponytails, and every length can do a messy bun.
Next, be honest about your hair’s natural tendencies. Naturally wavy or frizzy hair gets zombie texture almost free – lean into the bedhead waves and air-dried lob. Pin-straight hair needs help: teasing, crimping, salt spray, or overnight braids create the mess that straight hair will not make on its own. For face shapes in a messy style: height on top flatters round faces, face-framing pieces flatter square faces, and low undone styles flatter long faces. Beginners should pick the five-minute ideas – the ragged ponytail, the messy bun, the rope-twist pony. The crimped texture and teased blowout take the most time, so save those for when you have thirty minutes, not five.
Styling Tips & Common Mistakes to Avoid
Here is my zombie-hair playbook. First, build the mess in layers – tease first, then tousle, then spray. Each layer adds texture that the next one locks in. Second, use dry shampoo or texturizing spray as your foundation, even on clean hair; grip is what makes intentional mess hold, and clean hair has none. Third, direct the mess – pull pieces loose where you want them, tease where you want volume, and leave the rest alone. Random mess looks like you gave up; directed mess looks like a costume. Fourth, photograph the mess before the party – what looks perfectly undone in the mirror can look just messy in photos, so check and adjust.
The mistakes I see most with zombie hair are ironic. The biggest is over-styling – smoothing, perfecting, and fixing until the zombie looks like it just left the salon. Stop one step before you think you are done. The second is using too much product; heavy product turns gritty texture into greasy texture, so build in light layers. The third is forgetting recovery – teasing, crimping, and salt spray all stress the hair, so deep-condition the next day and detangle gently with conditioner, never dry. Get these right and your zombie hair will look perfectly, intentionally wrecked.
Final Thoughts
Zombie hair is the one Halloween look where messy is the goal. Pick the texture that matches your costume, rough it up with your fingers, and do not overthink it. The wilder it looks, the better it works.
Have fun with it, and happy haunting. Build the mess with intention, pin what needs pinning, and walk in knowing your perfectly wrecked hair is the whole costume.
Follow Us On Pinterest: Easy To Find Next Style