Sana
December is the busiest hair month on the school calendar, and it is not even close. Between spirit week, the holiday concert, class parties, and picture day, there is a reason searches for festive school hairstyles spike every November. The trick is finding styles that read as Christmas without crossing the line into costume territory, and that is exactly what this guide is built for. Every look here was chosen with real school mornings in mind, the kind where you have ten minutes, a backpack to pack, and a bus to catch.
This guide is for students of every age, from middle school to college, and every hair type, from pin-straight to coily. Most of these styles are beginner-friendly and take under ten minutes, with a few slightly fancier options for concert days and dances. You will learn how to pick the right style for your morning routine, the exact tools and products that make each look last through a full school day, and the small mistakes that turn cute into chaotic. As a stylist, I always tell my clients that school hair should do two jobs: look intentional in the morning selfie and still look good by last period. These fifteen styles do both.
1. Low Twisted Bun with a Velvet Bow
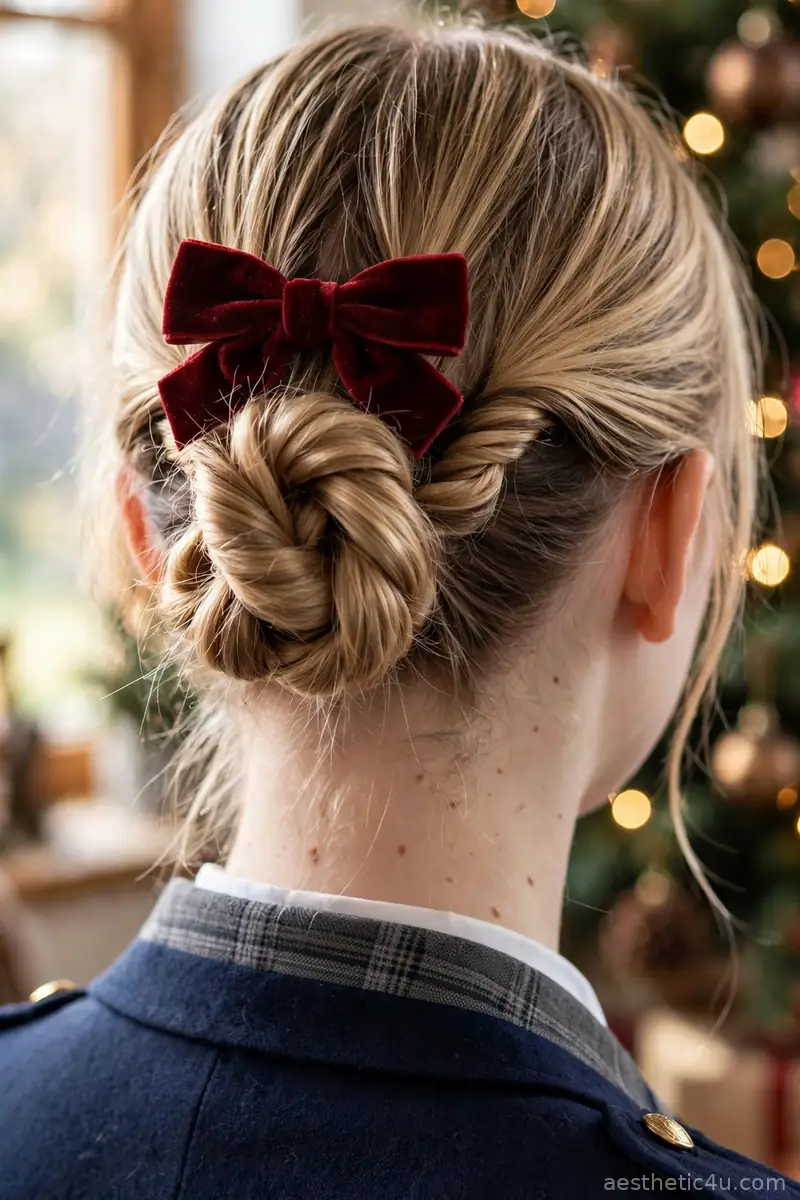
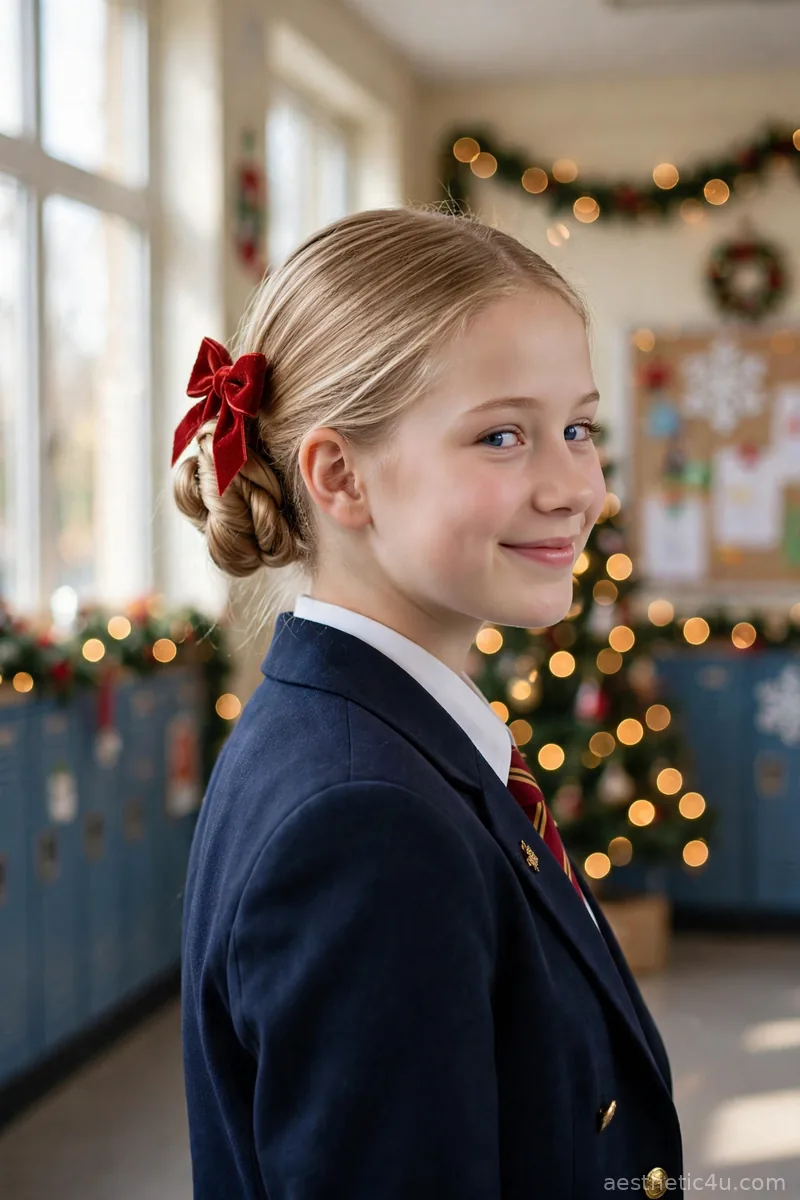
A low twisted bun is two sections of hair twisted around each other and coiled at the nape of the neck, finished with a soft velvet bow clipped or pinned just above the knot. To make it, brush your hair smooth with a paddle brush, split it in two at the back, twist each section in the same direction, then wrap them together and coil into a bun. Pin with three or four bobby pins tucked under the coil and mist with medium-hold hairspray. It takes about seven minutes and is easy once you get the twist tension right.
This suits oval, round, and heart-shaped faces best, and works on straight to wavy hair at shoulder length or longer. I would pick this for picture day or the holiday concert because it photographs beautifully from every angle and never looks messy. My honest caveat is that fine hair can make the twist look thin, so tease the roots lightly or use a small texturizing spray before twisting to give the bun some fullness.
2. Half-Up Twisted Crown with a Red Scrunchie

The half-up twisted crown twists two front sections back along the sides and joins them at the crown, where a red scrunchie locks them in place. Part down the middle, then take a two-inch section above each ear, twist each one away from your face, and pull them together at the back of the crown. Wrap the red scrunchie around the joined sections twice so it sits like a band. Curl the loose lengths with a 1-inch iron if you have extra time. It takes six minutes flat, and it is a true beginner style.
This is flattering on every face shape and works on straight, wavy, and relaxed curly hair from shoulder length down. I would pick this for regular school days because it keeps hair out of your face during class while still showing off your length. One pro tip: pick a scrunchie with a strong elastic core, since cheap ones stretch out by third period and the whole twist will sag with it.
3. Sleek Low Ponytail with a Green Ribbon
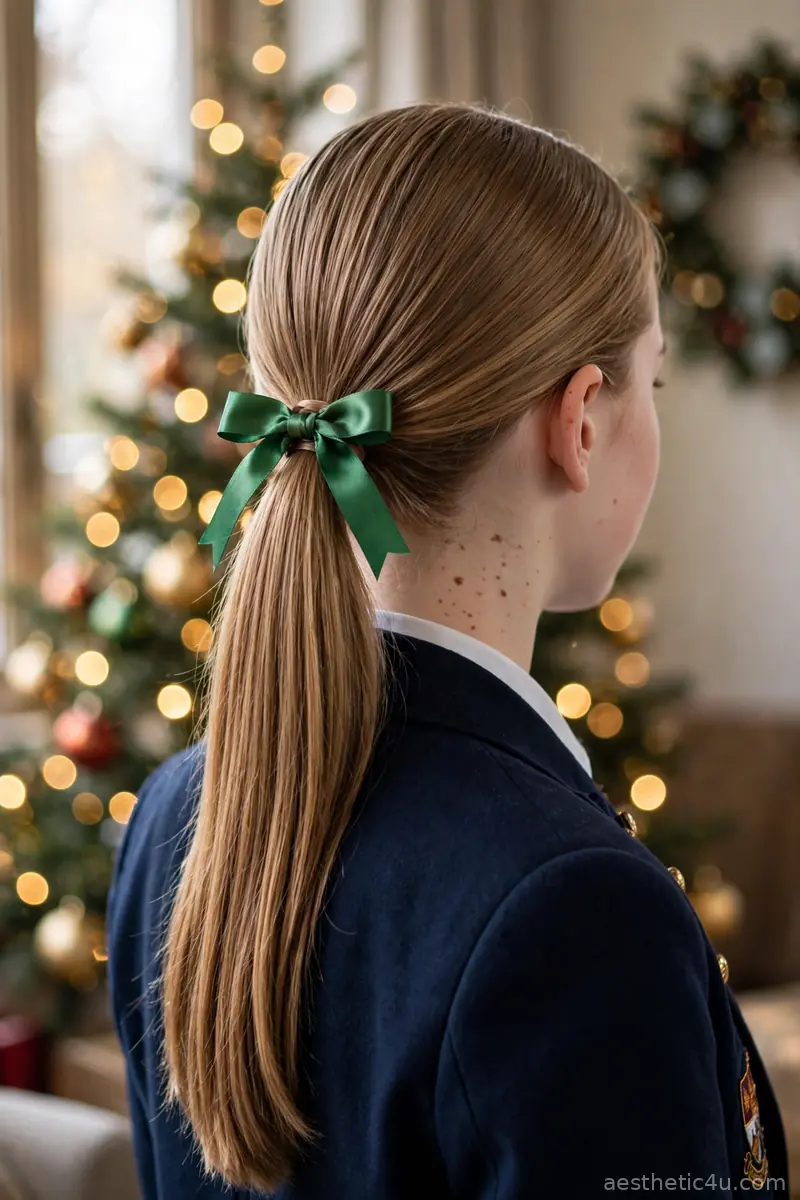
A sleek low ponytail brushed completely smooth and tied at the nape, then wrapped with a green satin or grosgrain ribbon tied in a small bow at the base. Work smoothing serum through freshly brushed hair, then polish the crown with a boar-bristle brush as you gather it low. Tie it with a clear elastic first, then tie your ribbon over the top so the elastic never shows. Smooth a pea-sized drop of shine serum over the top. Five minutes total, and this is the easiest style on the list.
This works on all face shapes and every hair type, though very curly hair needs a flat iron pass first to get the sleek finish. I would pick this for exam days or gym days because nothing falls in your face and it survives a full day untouched. The honest caveat is that a low ponytail can look severe on long faces, so leave two small face-framing pieces out in front to soften it.
4. Double Dutch Braids with Tinsel Strands
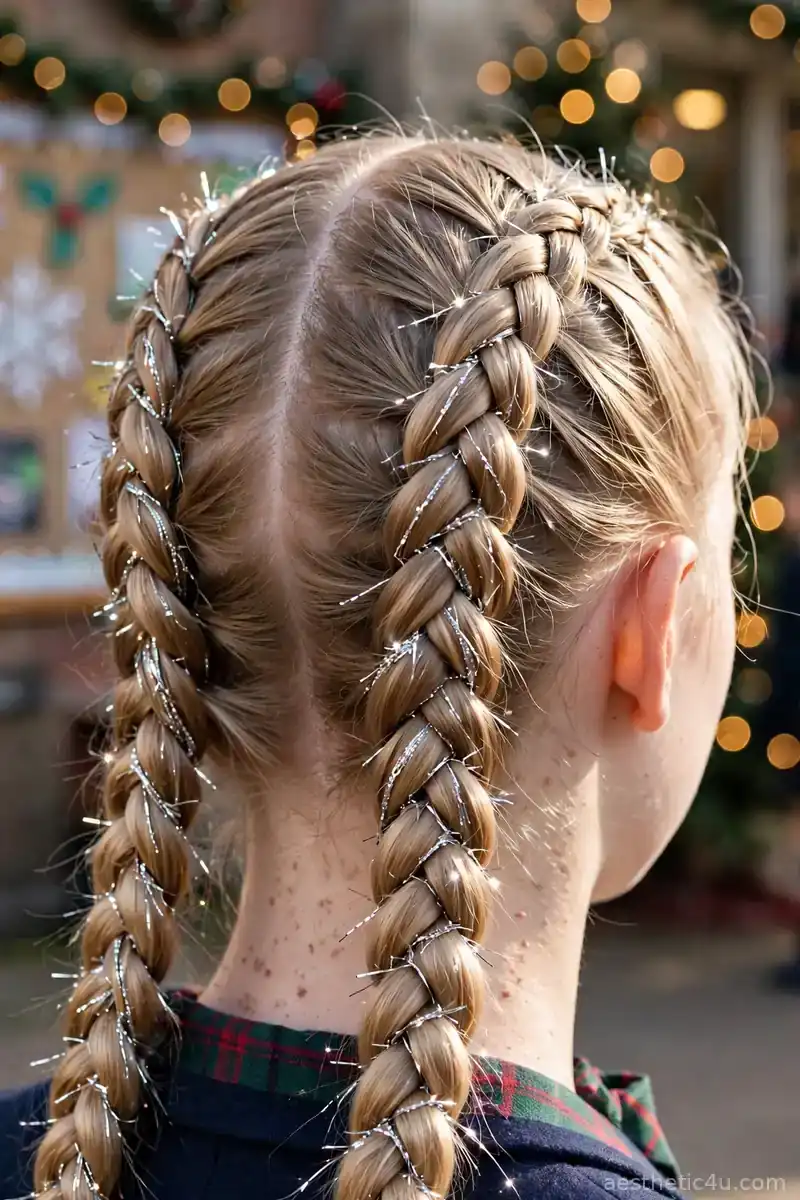
Two Dutch braids run from the front hairline to the nape, with thin tinsel strands woven in as you braid so they catch the light with every turn of your head. Part down the middle, clip one side away, and lay two tinsel strands along the top section before braiding. Braid Dutch-style, crossing outer strands under the middle and adding hair as you go, letting the tinsel feed in naturally. Secure each braid with a small clear elastic. This takes about fifteen minutes and sits at medium difficulty if you are new to Dutch braiding.
Dutch braids suit round and square faces especially well because the raised braid adds height and structure up top. I would pick this for spirit week or the class holiday party because it is the most festive look on this list and it genuinely lasts all day. My pro tip: use tinsel sparingly, three or four strands per braid is plenty, since too much gets tangled in the elastic and is a nightmare to remove at night.
5. Messy Top Knot with a Festive Scrunchie
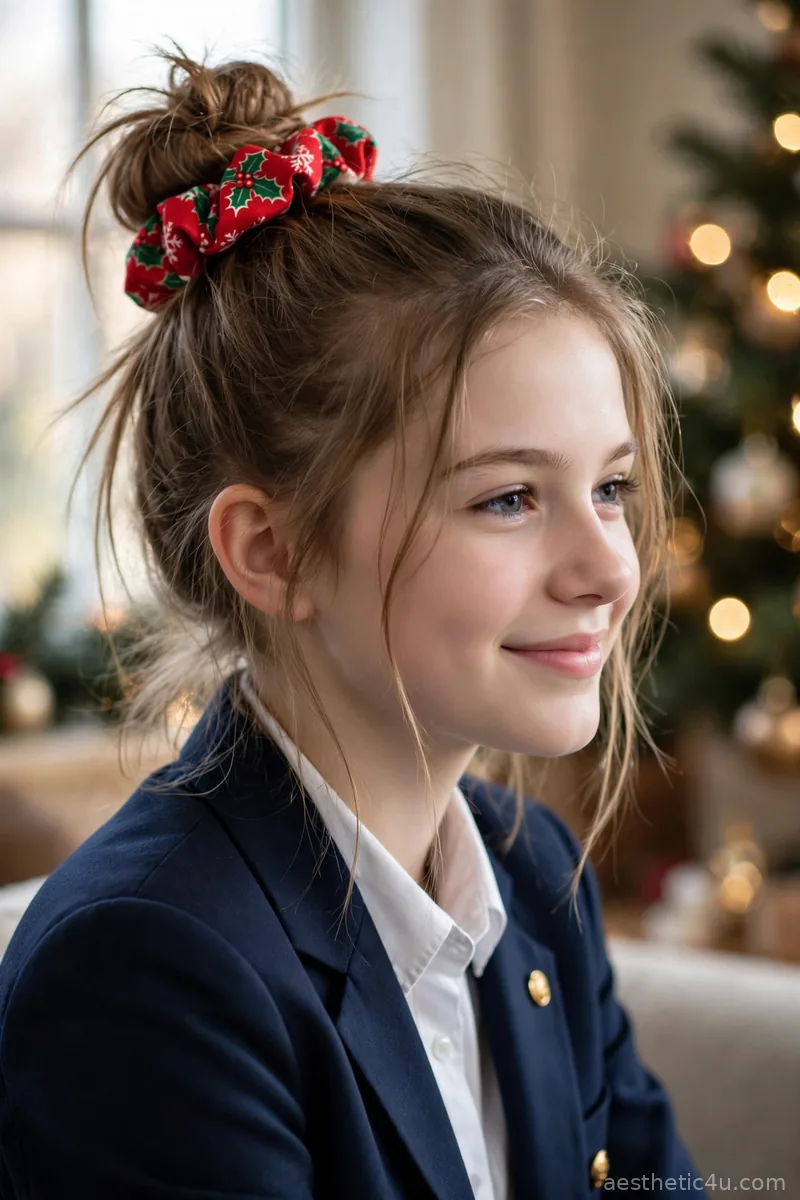
All the hair is pulled high, loosely twisted into a bun at the crown, and wrapped with a holiday-print scrunchie, with a few face-framing pieces pulled out for softness. Flip your head upside down, gather the hair into a high ponytail with your fingers instead of a brush for that undone texture, twist the tail loosely, coil it around the base, and pin it with four bobby pins. Wrap the festive scrunchie over the base so it hides any pins. Tug gently at the crown for volume. Two minutes, beginner level, and it is the fastest style here.
This flatters oval and heart-shaped faces and works on every hair type, though very short hair may need a small donut form to look full. I would pick this for the mornings you oversleep because it looks intentional even when it is rushed. The honest caveat is that a top knot worn too tight all day can cause a headache, so keep the base comfortable and never sleep in it.
Keep exploring: Christmas Hairstyles for Teens
6. Side-Swept Loose Waves with a Barrette
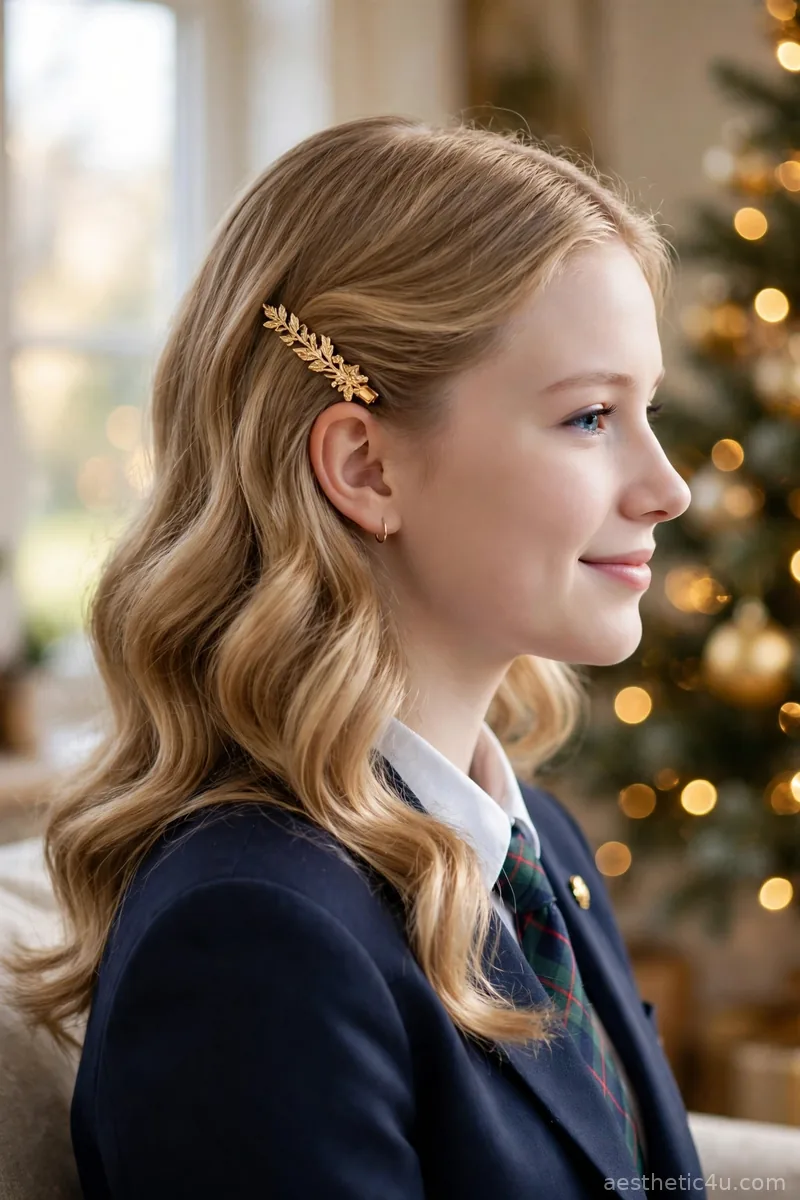
The hair is worn down in soft waves swept to one side, with a single decorative barrette pinning back the heavier side just above the ear. Get the waves by braiding damp hair loosely overnight, or curl large sections with a 1.25-inch iron and brush out with your fingers. Sweep everything to your preferred side, then slide the barrette in to hold the sweep. Morning work is about three minutes if the waves are prepped the night before, and difficulty is easy.
Side sweeps are universally flattering but especially kind to square and round faces because the diagonal line breaks up width. I would pick this for days when you want to look like you tried without actually trying. One pro tip: choose a barrette with teeth or a strong clasp, since smooth decorative ones slide right out of silky hair by lunchtime.
7. Bubble Ponytail with Red Bands
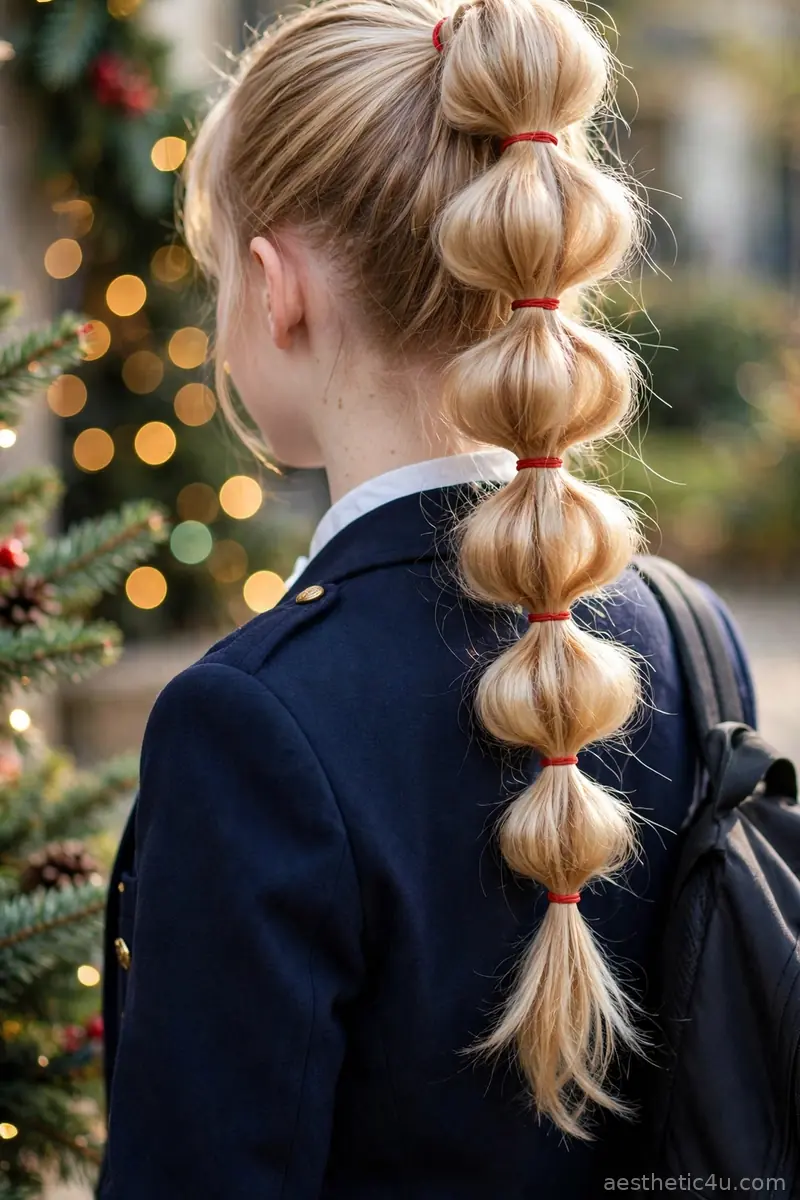
A high or mid ponytail is divided into stacked sections with small red hair bands, and each section is gently pulled outward to form rounded bubble shapes down the length. Start with a secure high ponytail, then place a red band every two to three inches down the tail. After each band is placed, tug the hair between the bands outward with your fingertips to puff each bubble. A light spritz of texturizing spray before you start gives the bubbles more grip and fullness. It takes about eight minutes and is easy as long as your base ponytail is tight.
This suits oval and long faces well since the horizontal bubbles add width, and it works best on medium to thick hair that can hold the puffed shape. I would pick this for holiday photos because the bubbles photograph with amazing dimension. The honest caveat is that fine, slippery hair can make the bubbles deflate, so backcomb each section lightly before puffing it out.
8. Fishtail Side Braid with a Mini Bow
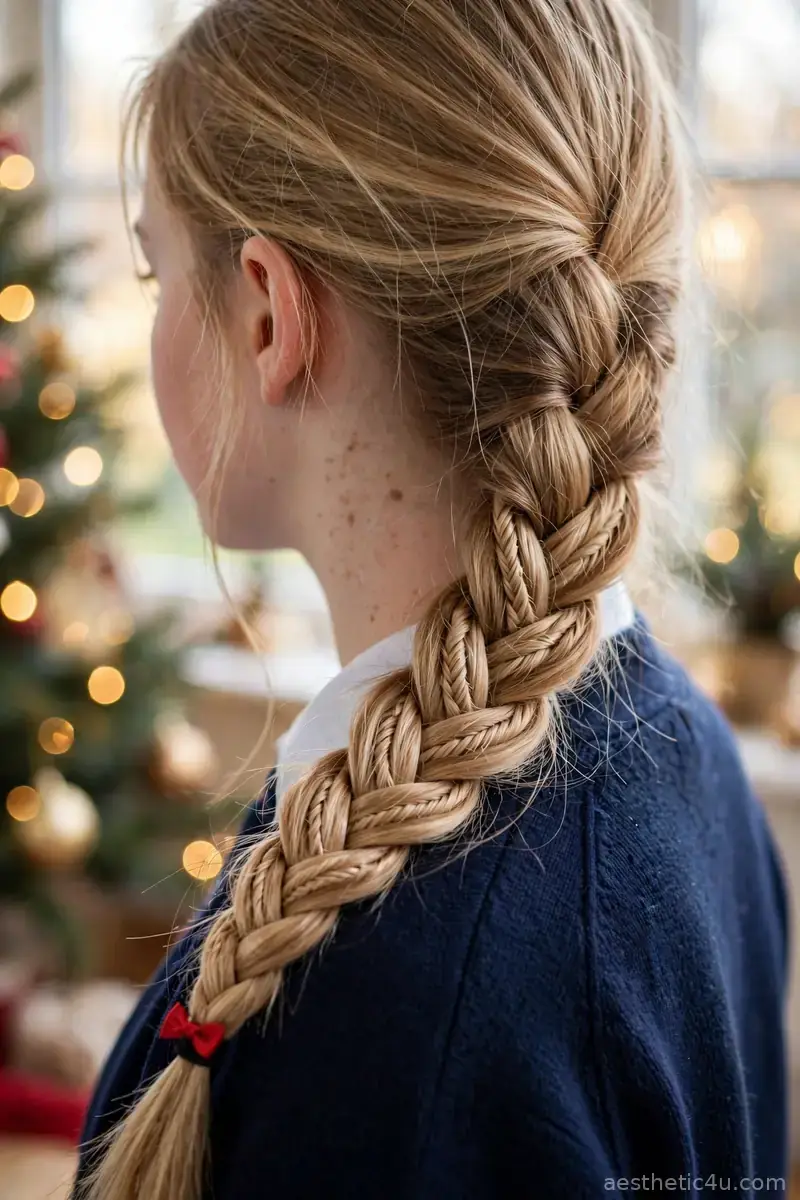
All the hair is swept over one shoulder and braided in a fishtail pattern, with a tiny bow clipped at the end of the braid. To fishtail, split the hair in two, then cross a thin strand from the outside of the left section over to the right, repeating side to side. Keep the strands thin for that intricate woven look. When you reach the end, secure with a clear elastic and clip the mini bow just above it. It takes about ten minutes and is medium difficulty the first time, easy after that.
The side placement flatters every face shape and the braid works on straight to wavy hair at shoulder length or longer. I would pick this when you want a style that looks far more skilled than it is, because people always assume fishtails take forever. My pro tip: pancake the braid by gently pulling the edges wider as you go, since a flat fishtail looks twice as thick and far more polished.
9. High Half-Up Ponytail with Gold Clips
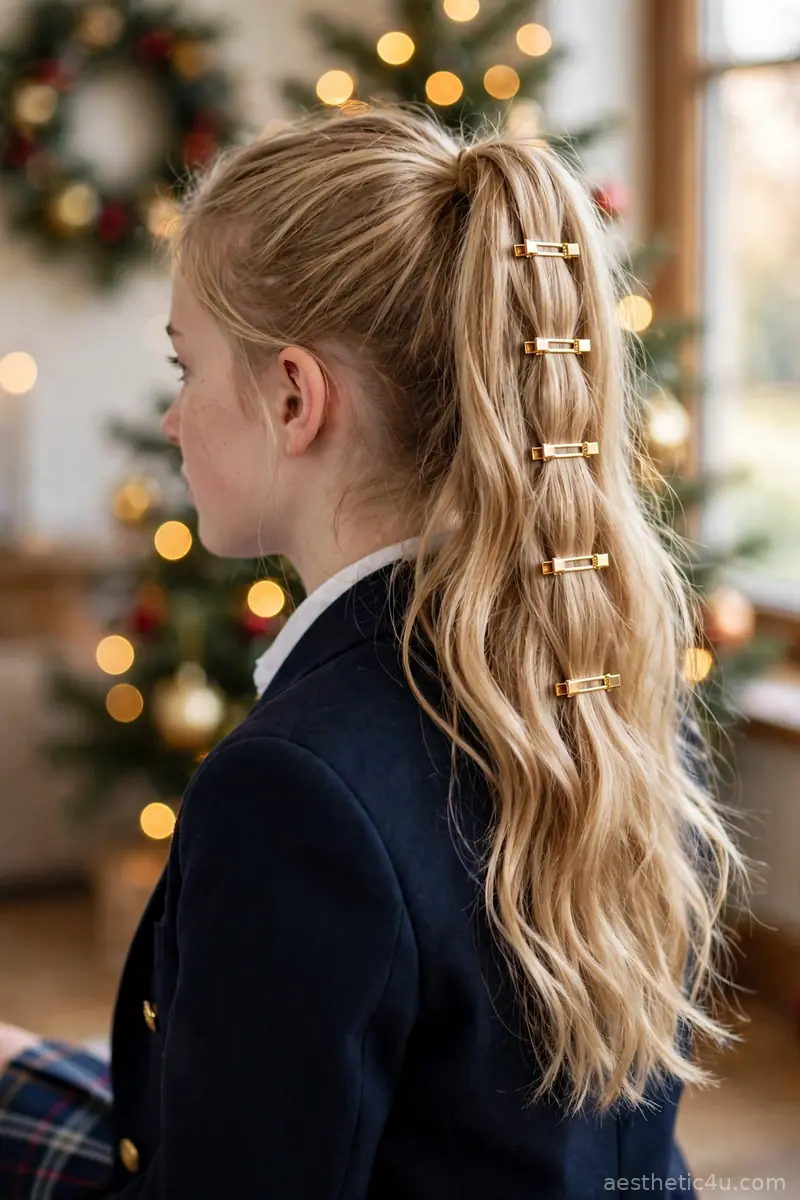
The top half of the hair is swept up into a high ponytail with a slight twist at the base, and a row of small gold barrette clips is lined down the length of the pony like jewelry, the bottom half left loose and wavy. Gather the top section from temple to temple, give it one twist for texture, and secure high with a small elastic. Then clip five to eight gold barrette clips down the ponytail at even intervals, angling each one slightly. It takes about eight minutes and is beginner-friendly.
This is lovely on oval, round, and heart-shaped faces because the height adds lift, and it suits wavy to straight hair past the shoulders. I would pick this for the school holiday party since the gold clips read festive without looking childish. The honest caveat is that too many clips can slide on silky hair, so give the ponytail a light mist of texturizing spray first and push each clip in firmly.
10. Low Chignon with a Plaid Bow
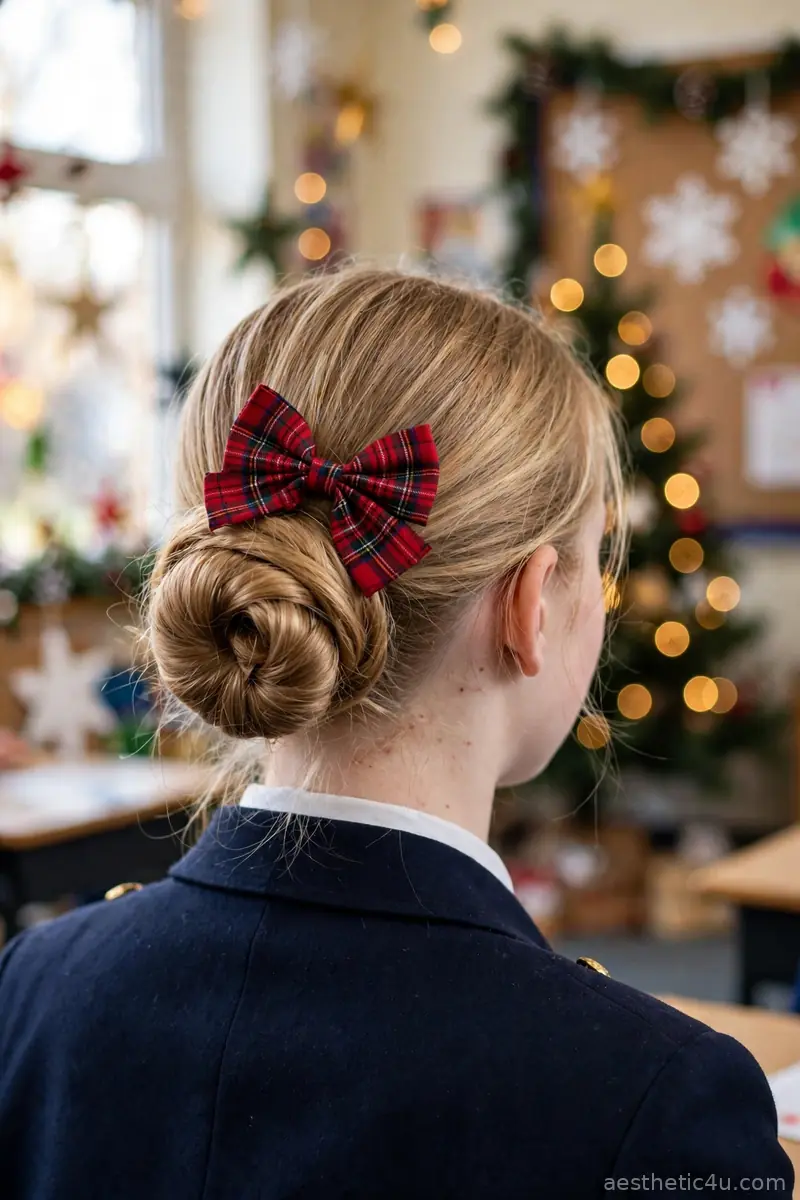
The hair is rolled into a neat low chignon at the nape, with a plaid bow pinned just above the bun for a seasonal finish. Brush the hair smooth, gather it low, and twist the tail upward, tucking the ends under as you roll it into a compact chignon. Pin it firmly with four to six bobby pins in an X pattern for hold. Position the plaid bow slightly off-center above the bun rather than dead center, which looks more modern. It takes about ten minutes and is medium difficulty because rolling a smooth chignon takes a little practice.
A low chignon suits oval, heart, and diamond faces beautifully and works on straight to wavy hair at medium length or longer. I would pick this for the school concert or any assembly where you want to look genuinely put-together. My pro tip: do this on day-old hair, since freshly washed hair is too slippery to roll neatly and the chignon will loosen by noon.
Keep exploring: Christmas Hairstyles with Bows
11. Space Buns with Holiday Scrunchies

The hair is parted down the middle and twisted into two buns on top of the head, each wrapped with a holiday-print scrunchie, with a few loose strands left around the face. Part cleanly down the center with a rattail comb, make two high pigtails, twist each tail, coil into a bun, and pin. Wrap a festive scrunchie around each bun base to hide the pins and carry the Christmas theme. Pull out two thin face-framing pieces. It takes about ten minutes and is easy once your center part is straight.
Space buns flatter oval and heart-shaped faces and work on all hair types, though very thick hair makes impressively big buns. I would pick this for spirit week or a holiday party at school because it is playful and stays put through anything. The honest caveat is that the look skews young, so for older teens I suggest keeping the buns small and neat rather than oversized.
12. Waterfall Braid with a Subtle Clip

A waterfall braid runs along one side of the head, dropping strands through the braid like falling water, with a small festive clip securing the end while the rest of the hair flows free. Start a French braid at the temple, but drop each bottom strand and pick up a new section behind it to create the waterfall effect. Braid across to the opposite side and pin the end under the hair with a festive clip. It takes about twelve minutes and is medium difficulty until the drop-and-replace rhythm clicks.
This is gorgeous on oval and long faces and works best on straight to wavy hair past the shoulders, since the dropped strands need length to show. I would pick this for a winter dance or any day you want something romantic and delicate. My pro tip: practice the waterfall pattern twice on a weekend before you need it, because the technique feels backwards the first time you try it.
13. Curly Ponytail with a Red Ribbon Tie
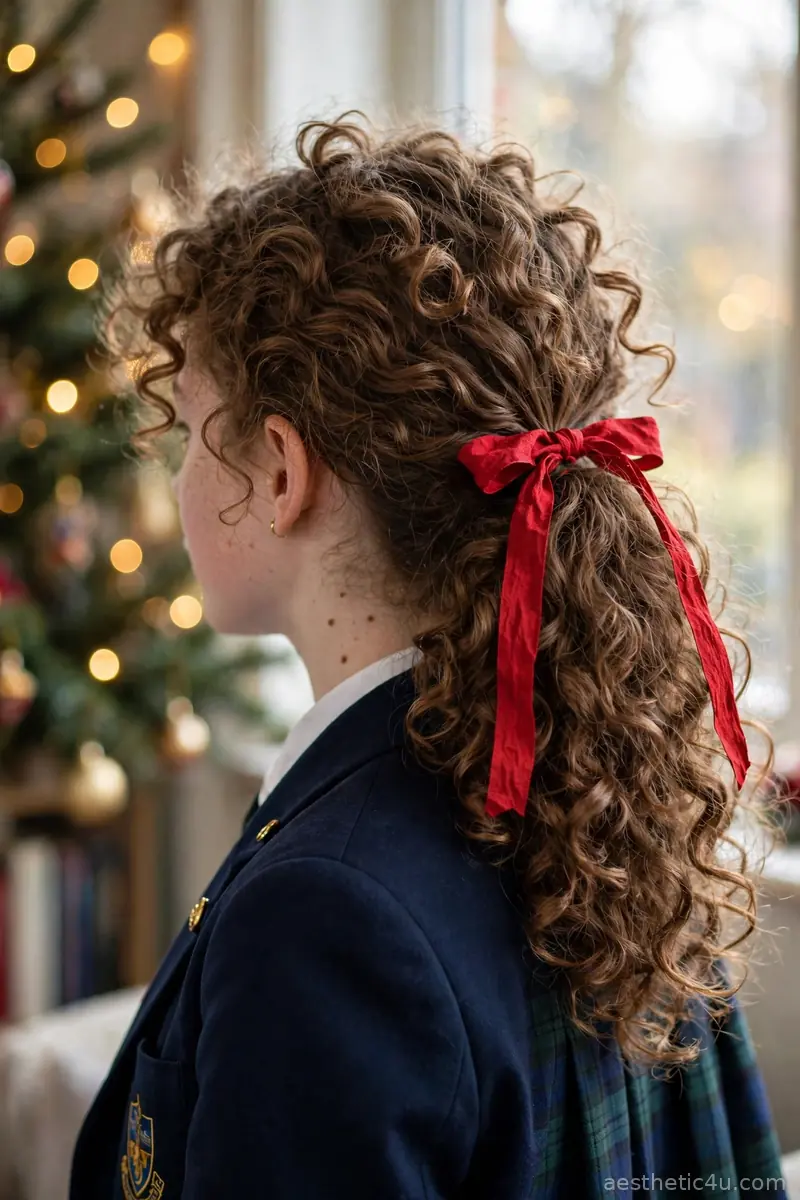
Natural curls or curled hair are gathered into a mid-height ponytail, with a red ribbon tied around the base in a bow while the curls bounce freely above and below the tie. Flip your head forward and gather the curls with your fingers to preserve their shape, securing at mid-height with a snag-free elastic. Tie the red ribbon over the elastic and let the ends hang long. Fluff the curls at the crown with your fingertips for volume. Five minutes, beginner level, and it is the best wash-and-go holiday style for curly hair.
This is made for curly and coily hair of any length that can gather into a ponytail, and it flatters every face shape since the volume sits up high. I would pick this if you have natural curls and want to show them off instead of fighting them. The honest caveat is that heavy ribbons can slide down curly ponytails, so tie the ribbon in a double knot and anchor it with one bobby pin.
14. Braided Headband into a Low Bun

A braid is woven across the crown like a headband using a section of your own hair, and the remaining hair gathers into a low bun at the back, so no accessories are needed at all. Take a two-inch section behind one ear, Dutch-braid it across the top of your head toward the other ear, adding hair only from the front hairline as you go. Pin the end behind the opposite ear. Gather everything else into a low bun and pin it. It takes about twelve minutes and is medium difficulty.
The braided headband flatters round and square faces because it adds height at the crown, and it works on straight to wavy hair at medium length or longer. I would pick this for the holiday school dance since it is elegant and everything stays locked in place while you move. My pro tip: pancake the braid slightly as you go so it looks like a real headband rather than a thin rope.
15. Loose Braid with Sparkly Bobby Pins

A relaxed three-strand braid falls over one shoulder, with a few sparkly bobby pins scattered along its length, and the loose texture keeps the whole thing casual and effortless. Sweep the hair to one side, braid loosely without pulling tight, and secure with a clear elastic. Then slide three to five sparkly bobby pins into the braid at random intervals, pushing them in at an angle so they grip. Gently pull the braid edges wider for fullness. Three minutes total, the easiest braided style here.
This suits every face shape and works on all hair types at shoulder length or longer. I would pick this for the absolute simplest festive style possible, the kind you can do in the hallway before first period. The honest caveat is that a loose braid on freshly washed hair can unravel by afternoon, so braid on second-day hair or add a light mist of texturizing spray first.
How to Choose the Right Christmas Hairstyle for School
Start with your face shape, because it decides which styles flatter you most. If your face is round, go for looks with height on top like the messy top knot or space buns, since vertical volume lengthens the face. Oval faces can wear almost anything, so pick based on mood. Heart-shaped faces look great with styles that add width at the jawline, like the side-swept waves or the fishtail side braid. Long faces benefit from horizontal details like the bubble ponytail or a wide headband that break up length.
Next, match the style to your hair type and your morning reality. Straight, fine hair holds sleek styles like the low ponytail and chignon beautifully but needs texturizing spray for braids and buns to grip. Thick or curly hair gives you gorgeous volume for buns and bubble ponytails with almost no effort, but sleek styles will take longer. Be honest about your time: if you regularly have under five minutes, stick to the messy top knot, the sleek ponytail, or the loose braid. Save the Dutch braids and waterfall braid for days when you can practice the night before. And consider the occasion, since spirit week welcomes the tinsel braids while picture day calls for the polished chignon.
Styling Tips & Common Mistakes to Avoid
Here is what I tell every student who sits in my chair before the holidays. First, style on second-day hair whenever you can, because freshly washed hair is slippery and braids and buns fall apart twice as fast. Second, invest in good bobby pins and replace them often, since old pins with worn tips slide out and scratch the scalp. Third, keep a mini emergency kit in your backpack with two clear elastics, three bobby pins, and a travel hairspray, because even the best style needs a rescue by sixth period sometimes.
Now the mistakes I see every December. The biggest one is using too much product in the morning, which makes hair look greasy under classroom lights by noon, so start with half of what you think you need. Another common error is placing festive accessories too low or too far back where nobody sees them, so always check your placement in a mirror from the front, not just the side. And please do not sleep in tight styles like top knots or braids night after night, since constant tension causes breakage around the hairline. Loosen everything before bed and your hair will thank you in January.
Final Thoughts
School-day holiday hair should be quick, comfortable, and just festive enough to make December feel special. Pick one of these christmas hairstyles for school that fits your morning routine, grab a bow or a scrunchie you love, and do not be afraid to practice a new braid on a lazy Sunday first. The best holiday hair is the kind you feel confident wearing, so choose the style that makes you smile in the mirror and enjoy the compliments all December long.
Follow Us On Pinterest: Easy To Find Next Style