Sana
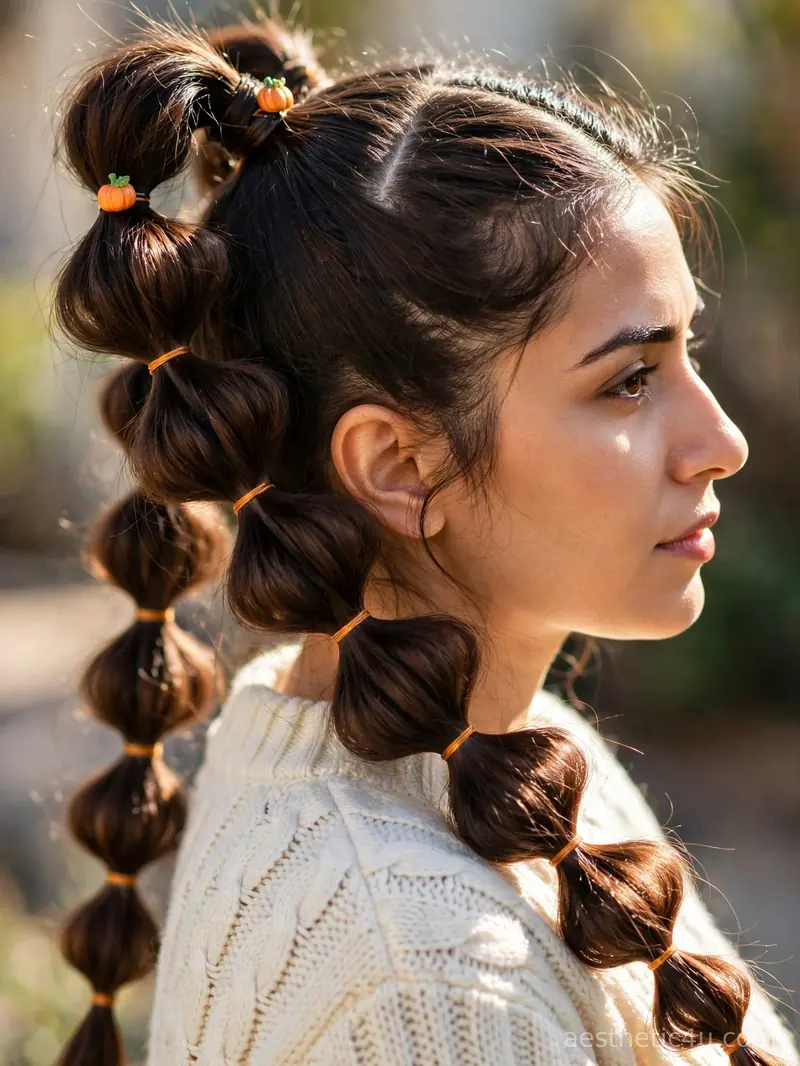
Cute Halloween braids are the easiest way to look festive without going full costume. I put together 23 adorable mini plait ideas, tiny accent braids, bubble pigtails, and little face-framing twists, all small, sweet, and quick to style. Whether you are heading to a party or just want a playful October look, there is a mini braid here for you. Mini braids are trending this Halloween because they are the lowest-commitment festive hair: they take minutes, they work on almost any hair length, and one tiny pumpkin clip or bat charm turns them into Halloween. No costume required, just cute.
Every idea here is small, sweet, and quick, which makes them perfect for busy October schedules, work-friendly Halloween, and anyone who wants festive without fuss. You will learn exactly how to build each mini braid, which tiny accessories sell the Halloween effect, how long each look takes, and the mistakes that make mini braids disappear or fall apart. As your stylist friend, I will tell you the truth: mini braids only work when they are deliberate, so I will show you how to make tiny details read as intentional. These twenty-three ideas prove small can be mighty. I will show you how to make every tiny detail count.
23 Adorable Mini Cute Halloween Braids to Try
Every look below is mini on purpose – small braids that add a cute detail instead of taking over your whole hairstyle. They work on short, medium, and long hair, and most of them need nothing more than a few elastics and a clip or two.
1. Double Dutch Bubble Pigtails
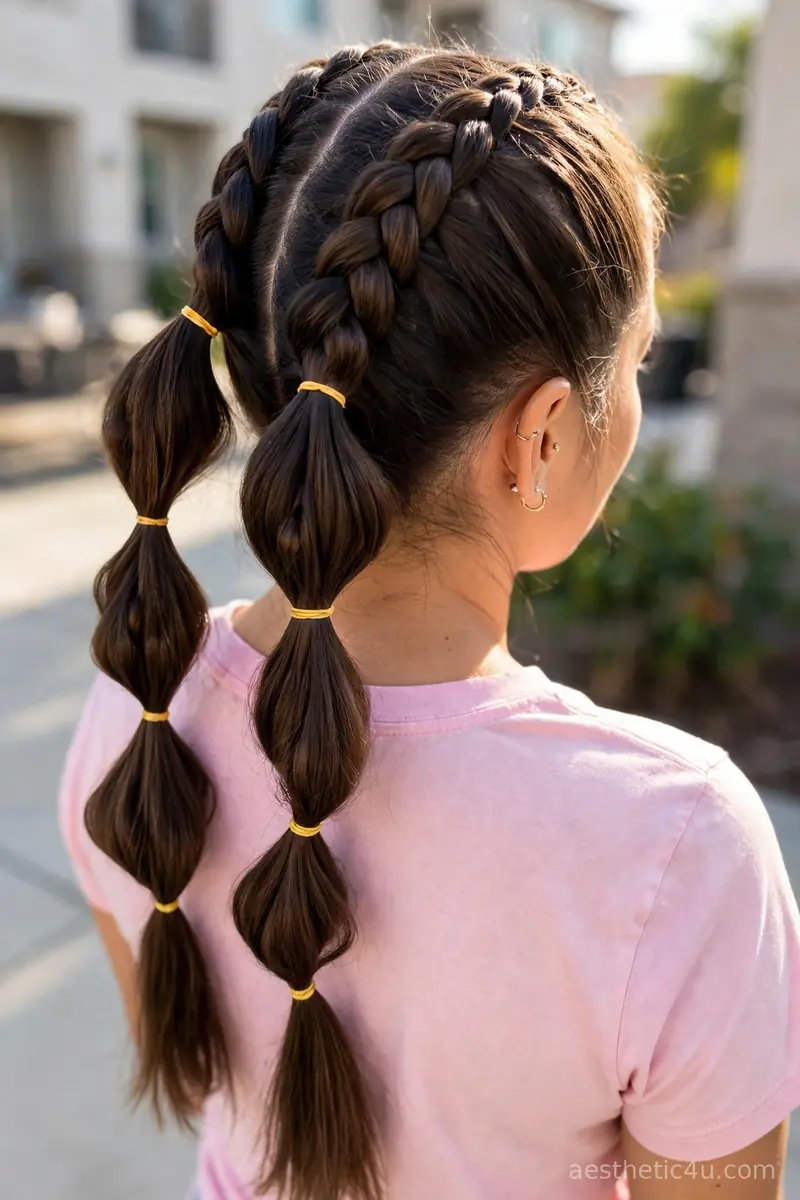
Two Dutch braids run along the scalp from the forehead, then each pigtail is sectioned into round bubbles with small elastics down its length. The result is bouncy and playful, part braid and part bubble, instantly Halloween-cute. To build them, Dutch braid two sections from the front to the back of the head, secure into pigtails, place small elastics every two inches down each tail, and tug each section outward into round bubbles. It takes about twelve minutes, difficulty easy to medium. Add two tiny pumpkin clips at the base and you are done.
I would choose this if you want the biggest cute payoff for the effort. The Dutch braids give it structure while the bubbles give it playfulness, and it photographs beautifully, so this is my top pick for party pictures. It suits medium to long hair. One honest caveat: tug each bubble gently and evenly, because aggressive tugging makes lopsided bubbles. Even, round bubbles look intentional. Take ten seconds per bubble and the whole style looks perfect.
2. Pumpkin Bubble Braids with Green Ribbons
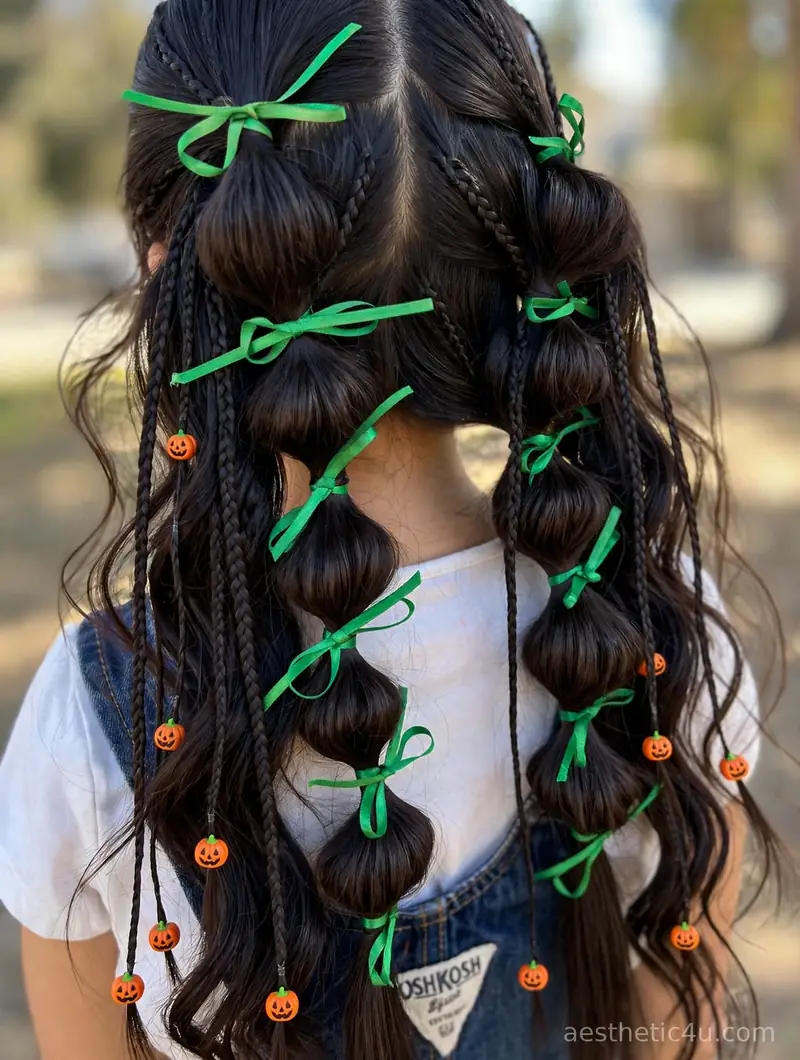
Two big bubble pigtails are tied with green ribbon bows at each bubble, with skinny accent braids dotted with tiny pumpkin charms hanging around them. The green bows read as pumpkin stems, which is the cutest trick here. To build them, secure two ponytails, place elastics every two inches and fluff into bubbles, tie small green ribbon bows at each section, then braid thin accent sections and clip on the pumpkin charms. It takes 15 minutes, difficulty easy to medium. The bubbles plus pumpkin charms are pure Halloween cuteness in miniature.
I love this one for maximum Halloween cuteness. The green bows turn the bubbles into pumpkins, and the tiny pumpkin charms on the accent braids add the festive detail. It suits medium to long hair and works beautifully for kids and teens too. One honest caveat: keep the ribbon bows small and tie them snugly, because loose bows slide off the bubbles. Snug small bows stay put and look adorable. That neatness is what sells the pumpkin illusion.
3. Mini Bat-Clip Face-Framing Plaits
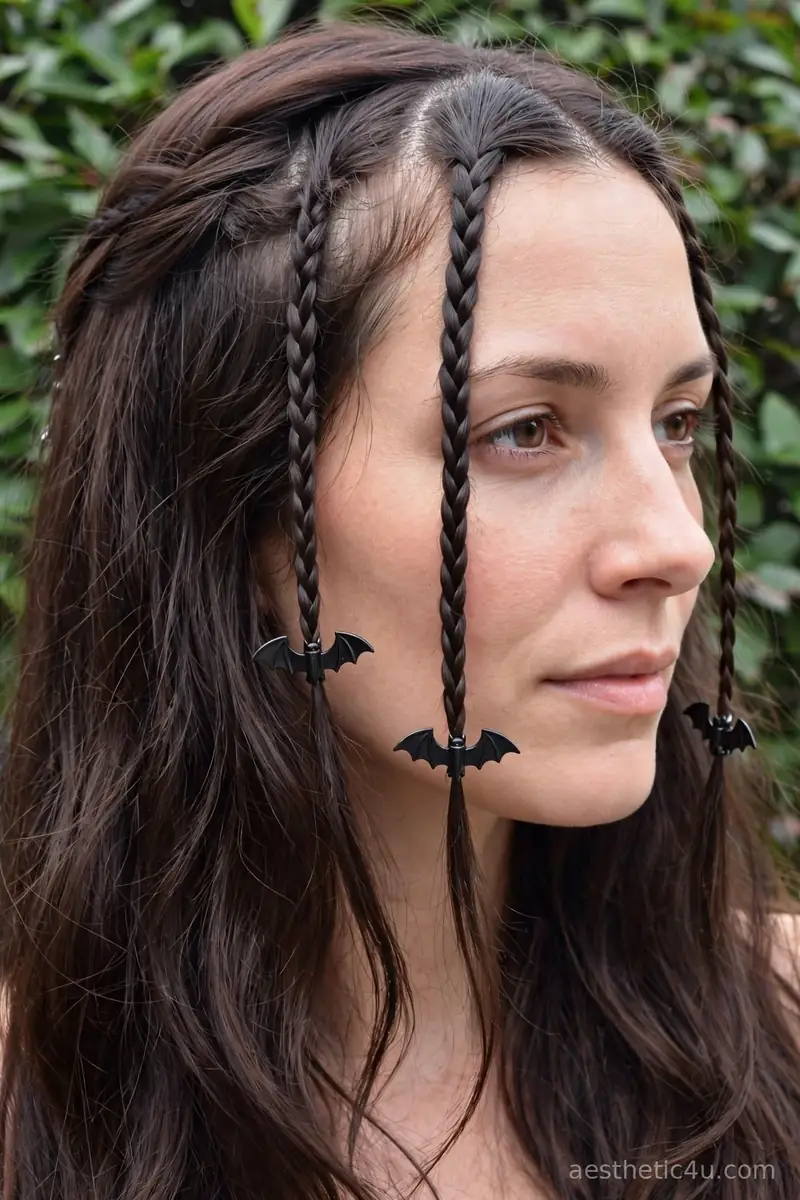
Two tiny braids frame the face, starting right at the temples and ending just past the chin. Each one is pinned back with a small black bat clip, so the bats look like they are flying along your hairline. The rest of the hair is worn loose, which keeps the focus on those two little plaits. To build them, braid two thin sections at the temples, secure, and pin back with the bat clips. It takes 5 minutes, difficulty easy. The face-framing braids soften the look, so it suits round and square face shapes really well.
I would pick this if you want something spooky but still pretty. The face-framing braids soften the look, so it suits round and square face shapes really well. This is one of the fastest ideas here, you can do both braids in five minutes. One honest caveat: pin the bat clips securely with a bobby pin behind each clip, because clips alone slide on fine hair. A pinned bat stays flying all night, an unpinned one ends up in your bag.
4. Double Dutch Braids

Two thick Dutch braids run from the front of the head down into pigtails, with the braids sitting raised on the scalp. The Dutch technique, crossing strands under instead of over, makes the braids pop outward with great texture. To build them, part cleanly down the middle, Dutch braid each side from the forehead to the nape, secure into pigtails, and continue braiding the tails. It takes 12 to 15 minutes, difficulty medium. The raised Dutch texture photographs beautifully and keeps hair out of your face all night, perfect for a Halloween party.
I recommend this one when you want cute with a little polish. The raised Dutch braids photograph much better than flat French braids, and they keep hair out of your face all night, which makes this perfect for a Halloween party. It suits medium to long hair. Honest caveat: keep the two braids even, because lopsided braids are very noticeable. And cross under consistently, because switching to over makes the braid sink. Even and consistent is the formula.
5. Tiny Spider-Charm Accent Braids

Three or four whisper-thin braids are scattered through the hair, and each one gets a tiny dangling spider charm at its tip. The spiders are small and cute, more jewelry than creepy. Against loose waves, the little braids read as delicate details until someone spots the spiders. To build them, braid thin sections, secure with tiny elastics, and attach spider charms with small clips. It takes 10 minutes, difficulty easy. This works beautifully on thick hair where the thin braids hide and pop out as you move.
I would choose this if you like Halloween details that reveal themselves slowly. This works beautifully on thick hair where the thin braids hide and pop out as you move. Use charms with small clips instead of glue so nothing damages your hair. One honest caveat: keep the charms tiny and light, because heavy charms pull thin braids out within hours. Jewelry-scale charms stay put, costume-scale ones do not. Small is the whole point here.
Keep exploring: 19 Easy Vampire Halloween Hairstyles: Quick Dark Looks
6. Mini Bubble Pony Braid
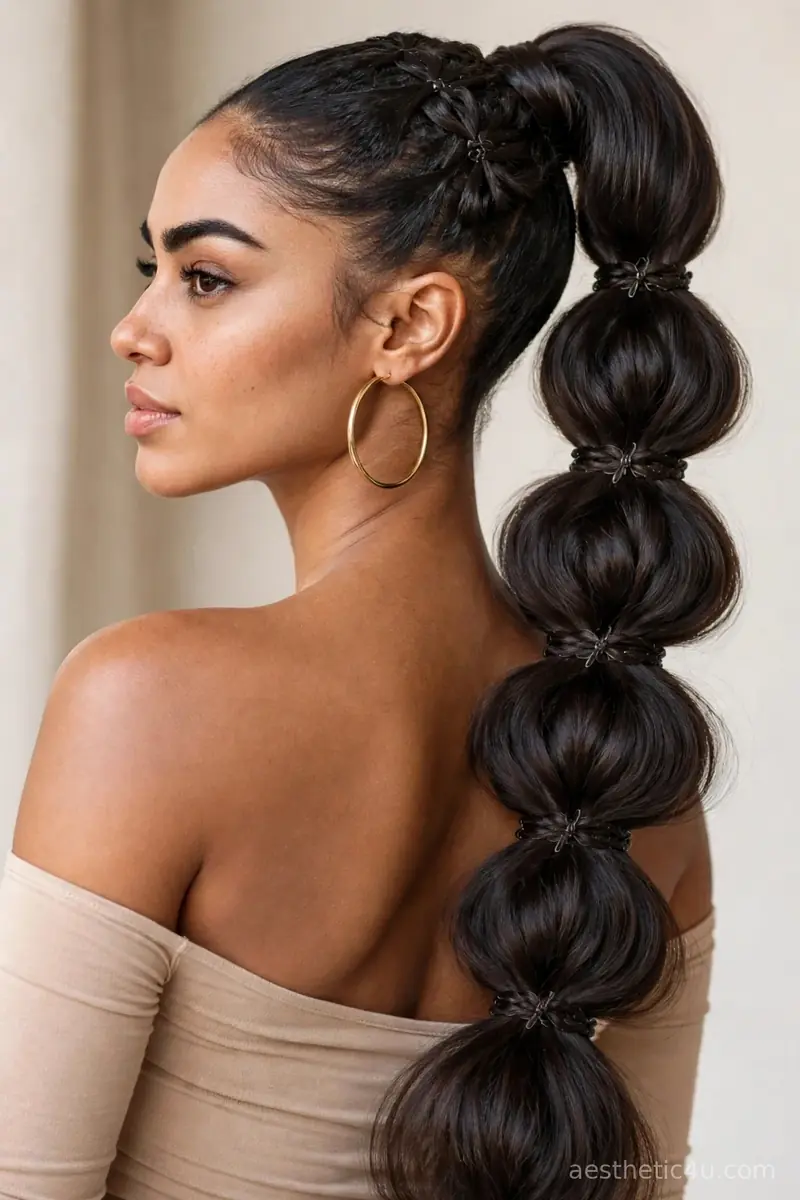
A single high ponytail is turned into a bubble braid with elastics spaced evenly down its length, and each bubble is fluffed for a round, full shape. A small black bow hides the base elastic. It is one ponytail doing all the work, which keeps the look clean and cute. To build it, secure a high pony, place elastics every two inches, fluff each bubble round. It takes 5 minutes, difficulty easy. I love this one for last-minute plans because it takes five minutes flat. This is also the best mini braid for a windy October night since everything is secured.
I love this one for last-minute plans because it takes five minutes flat. If your ponytail is on the thin side, tease each bubble gently before pancaking it, because you get twice the volume. This is also the best mini braid for a windy October night since everything is secured. Honest caveat: the base elastic must be tight, because a loose base makes the whole bubble column wobble. Two elastics at the base, then the bubbles. Solid foundation, cute result.
7. Ghost-Tie Braids with a Skeleton Clip
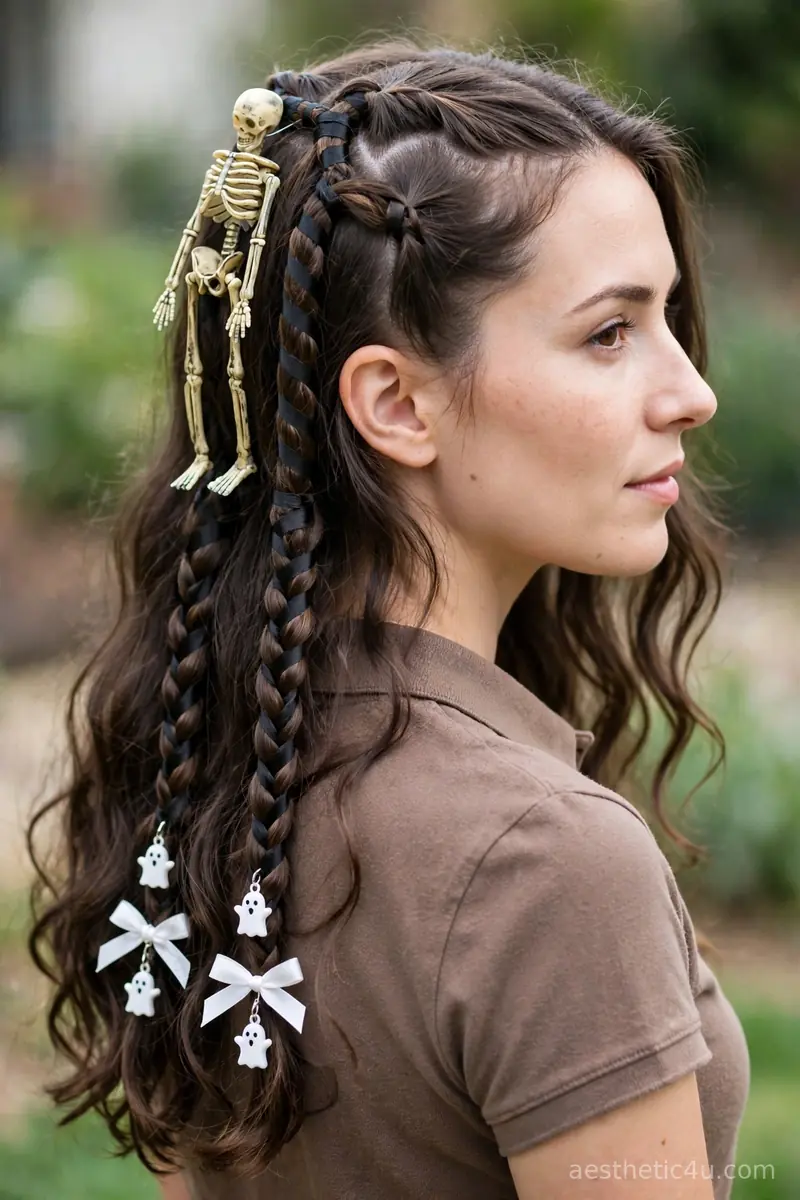
Two side braids are woven with black ribbon, tied off with white ribbon bows and tiny ghost charms, and a skeleton clip hangs at the top of one braid. The white bows read as little ghosts, and the skeleton is the surprise detail. To build them, braid two sections with black ribbon woven through, tie white bows and ghost charms at the ends, and clip the skeleton near the top. It takes 10 to 12 minutes, difficulty easy to medium. The black ribbon against the braids looks sleek, and the ghost bows keep it sweet rather than scary.
I would pick this if your hair is dark, because the white ghost bows stand out beautifully. This is a lovely choice for teens and anyone who wants Halloween cute without anything dark or creepy. The skeleton clip adds the playful spooky twist. My pro tip: white ribbon bows read as ghosts just as well as charms and they are cheaper and lighter. A tiny white bow, fluffed open, is the sweetest ghost. Sometimes the simplest version wins.
8. Mini Ribbon Pigtail Braids

Two small pigtail braids are woven with black satin ribbon laced through the strands, then tied into neat bows at the ends. The ribbon adds shine and a dressy finish that plain elastics cannot match. The braids sit at mid-head height, which keeps them cute instead of childish. To build them, add ribbon to one section before braiding each pigtail, braid, and tie bows at the ends. It takes 10 to 12 minutes, difficulty easy. I recommend this one for a Halloween dinner or a dressed-up party.
I recommend this one for a Halloween dinner or a dressed-up party. The black ribbon makes even a simple three-strand braid look intentional and elegant. It suits medium to long hair. If you want extra Halloween, swap one ribbon for orange, because the two-tone ends look festive. One honest caveat: weave the ribbon through the whole braid, not just tied at the end, because tied-on ribbon slides off. Woven ribbon stays put all night and looks far more polished.
9. Tiny Moon-Charm Accent Braids
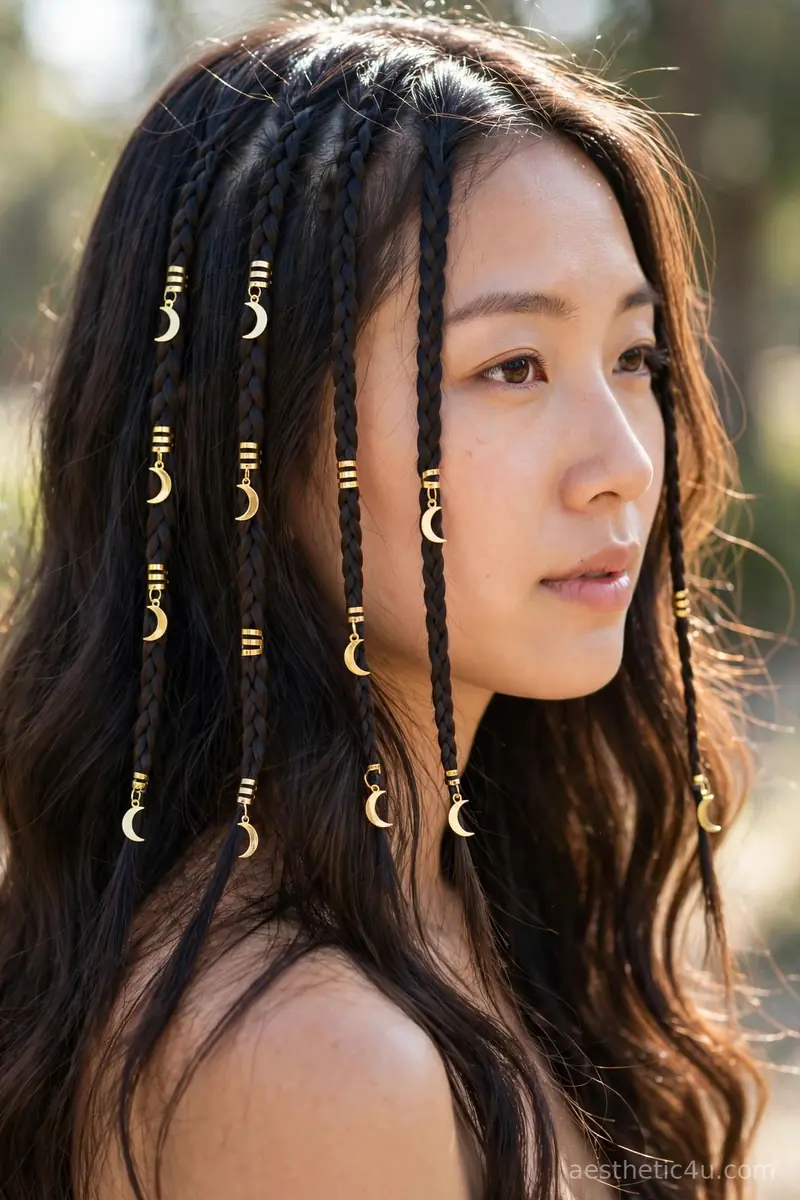
Many whisper-thin braids are scattered through the hair, each one finished with gold crescent moon charms and small gold cuffs. The moons catch the light as you move, giving the whole look a soft witchy glow. The rest of the hair is worn loose and softly waved. To build them, braid several thin sections scattered through the hair, secure with tiny elastics, and attach moon charms and cuffs along them. It takes 12 to 15 minutes, difficulty easy. The moon charms suit everyone, and they glow especially on dark hair. This is my pick for a Halloween date night.
I would choose this if you love the witchy aesthetic but want to keep it pretty. The scattered placement is what makes it special, because a spread of moons through the hair looks like a night sky. The moon charms suit everyone and the gold glows on dark hair. Honest caveat: keep the charms small and the braids thin, because the magic here is delicacy. Chunky braids with big moons lose the soft witchy glow. Delicate is the entire aesthetic.
10. Double Mini Bubble Braids

Instead of one big bubble braid, two slim bubble braids sit side by side, either as twin ponies or two bubbles running down the back of loose hair. The smaller scale keeps them dainty and adorable. Tiny black elastics disappear into the hair so the bubbles look seamless. To build them, create two slim ponytail sections, place tiny elastics down each, and fluff into mini bubbles. It takes 10 minutes, difficulty easy. I love this variation if full-size bubble braids feel too bold for you. The double-mini version reads younger and sweeter, and it holds up better on fine hair.
I love this variation if full-size bubble braids feel too bold for you. The double-mini version reads younger and sweeter, and it holds up better on fine hair. Add a tiny spider clip between the two braids for a Halloween wink. One honest caveat: keep the two bubble braids even in size and bubble count, because mismatched minis look accidental. Count your elastics: four bubbles on the left means four on the right. Symmetry sells the style.
Keep exploring: 21 Easy Halloween Ponytail Ideas: Cute High Ponies
11. Tiny Candy-Corn Accent Braids
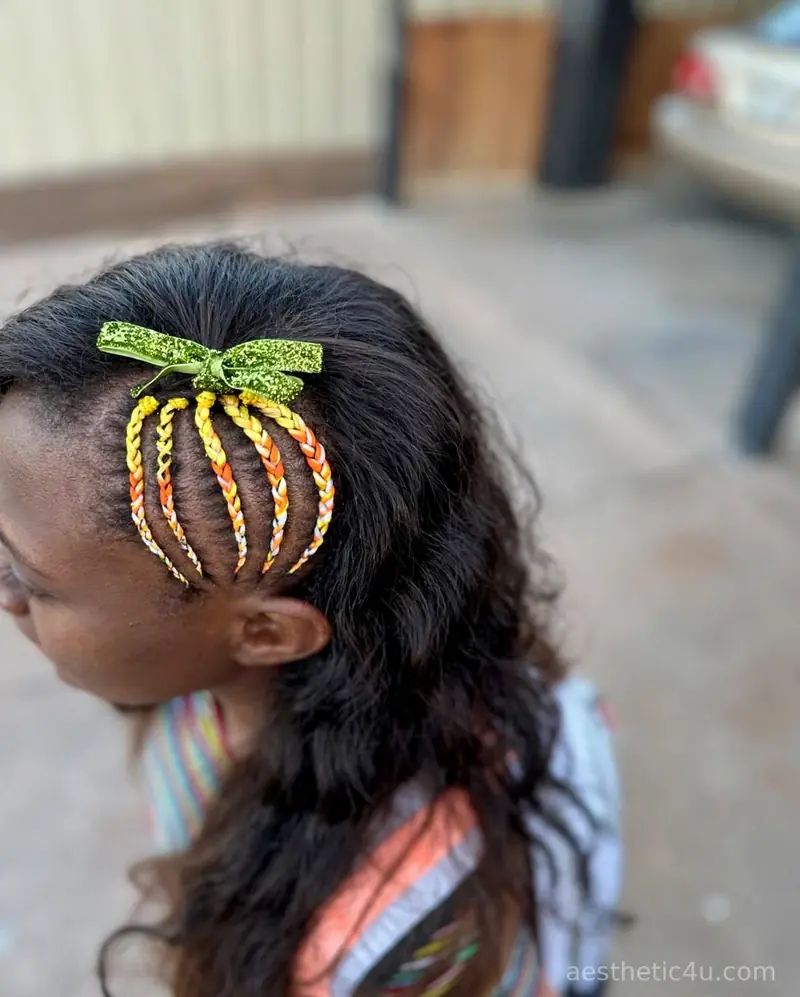
Mini braids are wrapped with yellow, orange, and white thread in candy-corn stripes, or finished with tiny candy-corn charms. The classic Halloween color trio sits right in the hair. They look best scattered through loose waves so the candy colors peek out unexpectedly. To build them, braid thin sections and wrap the ends with the three thread colors in stripes, or clip on candy-corn charms. It takes 10 to 15 minutes, difficulty easy. Thread-wrapped ends last all day, so this is a solid pick for a long party night.
I would choose this if you want the most Halloween-coded accent of the bunch. The candy-corn colors suit warm skin tones beautifully. Thread-wrapped ends last all day, so this is a solid pick for a long party night. My pro tip: wrap the thread snugly in clean stripes, yellow, orange, white, because messy wrapping just looks like tangled thread. Crisp stripes read as candy corn instantly. Neatness is what makes the reference land.
12. Mini Ribbon-Woven Side Braids
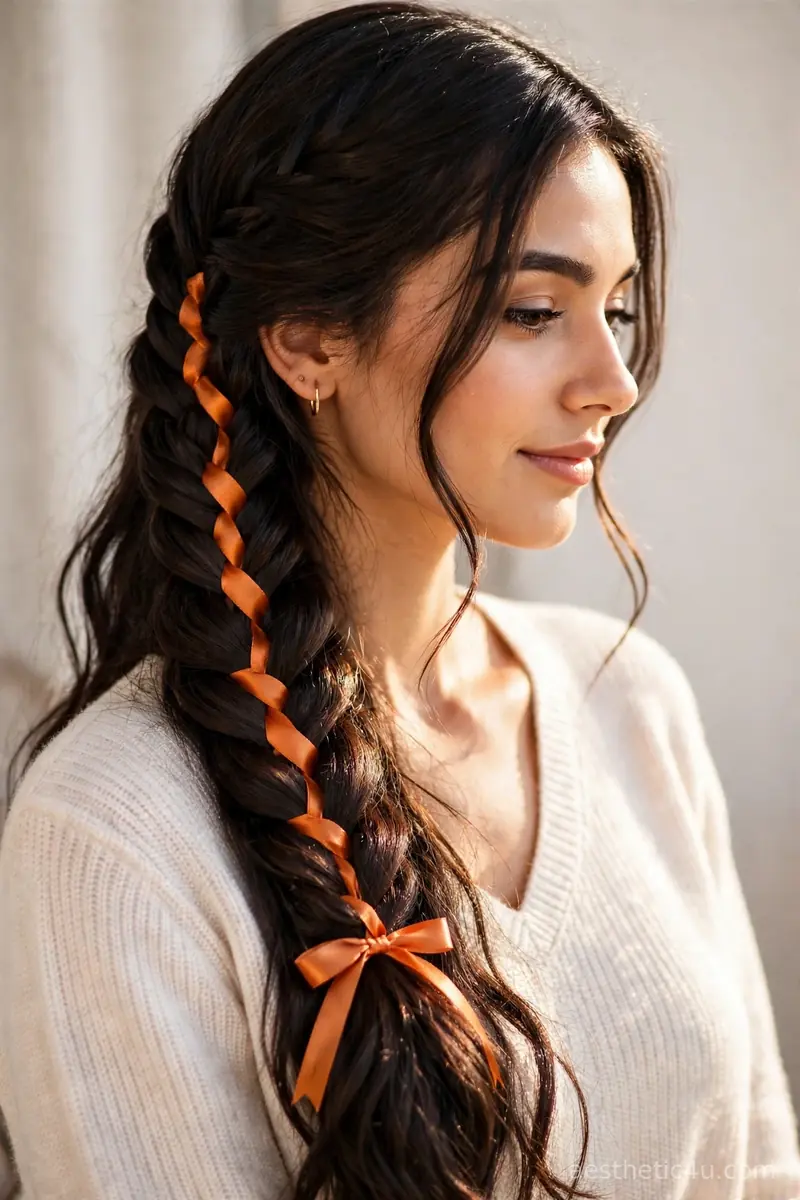
A slim side braid runs from one temple toward the back of the head with a thin orange ribbon woven through the strands. The ribbon shows in little flashes between the hair sections. The braid is pinned under the loose hair at the back so it looks like a hidden detail. To build it, braid a slim section from the temple with orange ribbon woven in, and pin the end under the loose hair. It takes 8 minutes, difficulty easy. From the front it reads as a normal side braid, and the orange ribbon only shows from certain angles.
I recommend this one when you want cute but office-friendly. From the front it reads as a normal side braid, and the orange ribbon only shows from certain angles. If your hair is short, this is one of the few mini braids that works beautifully on a bob. Honest caveat: pin the end really well under the hair, because a popped-out pin ruins the hidden-detail illusion. Two crossed bobby pins, hidden completely. The secret must stay secret.
13. Tiny Star-Clip Accent Braids

A couple of pencil-thin braids get tiny gold star clips snapped along their length, like constellations in your hair. The stars add sparkle without any Halloween darkness, so the look stays sweet. The braids sit near the crown where the stars catch the most light. To build them, braid two thin sections near the crown and snap star clips along each. It takes 3 minutes, difficulty easy. This is the easiest idea here: braid, clip, done in three minutes. The gold stars suit all hair colors, but they glow especially on dark hair.
I love this one for anyone who wants festive hair without a costume vibe. The gold stars suit all hair colors, but they glow especially on dark hair. This is the easiest idea here, braid, clip, done in three minutes. One honest caveat: place the stars along the braid, not clustered at one spot, because a constellation needs spread to read. Three to four stars spaced along each braid looks like a night sky. Clustering looks like you dropped the box.
14. Mini Dutch Accent Braids

Two tiny Dutch braids, braided under so they pop outward, trace the hairline on each side and disappear into loose hair. Because Dutch braids sit on top of the hair, even these mini ones show great texture. They frame the face like a delicate headband made of your own hair. To build them, Dutch braid two thin sections along the hairline and pin the ends under the loose hair. It takes 10 minutes, difficulty medium. Keep them close to the hairline so they read as an accent, not a full style.
I would pick this if you want your mini braids to actually show up in photos. The raised texture of a Dutch braid photographs much better than a flat three-strand. Keep them close to the hairline so they read as an accent, not a full style. Honest caveat: Dutch braiding small sections is fiddly, so use a little styling cream for grip. Cream tames the flyaways that make mini Dutch braids look fuzzy. Neat minis photograph, fuzzy ones do not.
15. Pumpkin-Charm Bubble Pigtails

Two bubble-braid pigtails are dotted with tiny pumpkin charms and small green ribbon bows at each bubble. The pumpkins are miniature and cute, giving the playful bubbles a Halloween twist. The pigtails are kept slim so the whole look stays dainty. To build them, secure two ponytails, place elastics every two inches and fluff into bubbles, tie green bows at the sections, and clip pumpkin charms along each. It takes 10 to 12 minutes, difficulty easy. I recommend this one for trick-or-treating or a casual Halloween hangout, and it is adorable on kids.
I recommend this one for trick-or-treating or a casual Halloween hangout. The bubbles keep hair tidy while you are out and about, and the pumpkin charms do all the festive talking. The green bows are the clever detail, because they read as pumpkin stems. One honest caveat: keep the pumpkins miniature, because full-size charms overwhelm slim bubbles and pull them down. Miniature pumpkins on slim bubbles, that scale match is the whole look.
Keep exploring: 20 Halloween Hairstyles for Short Hair: Pixie to Bob Ideas
16. Mini Rope-Twist Pigtails
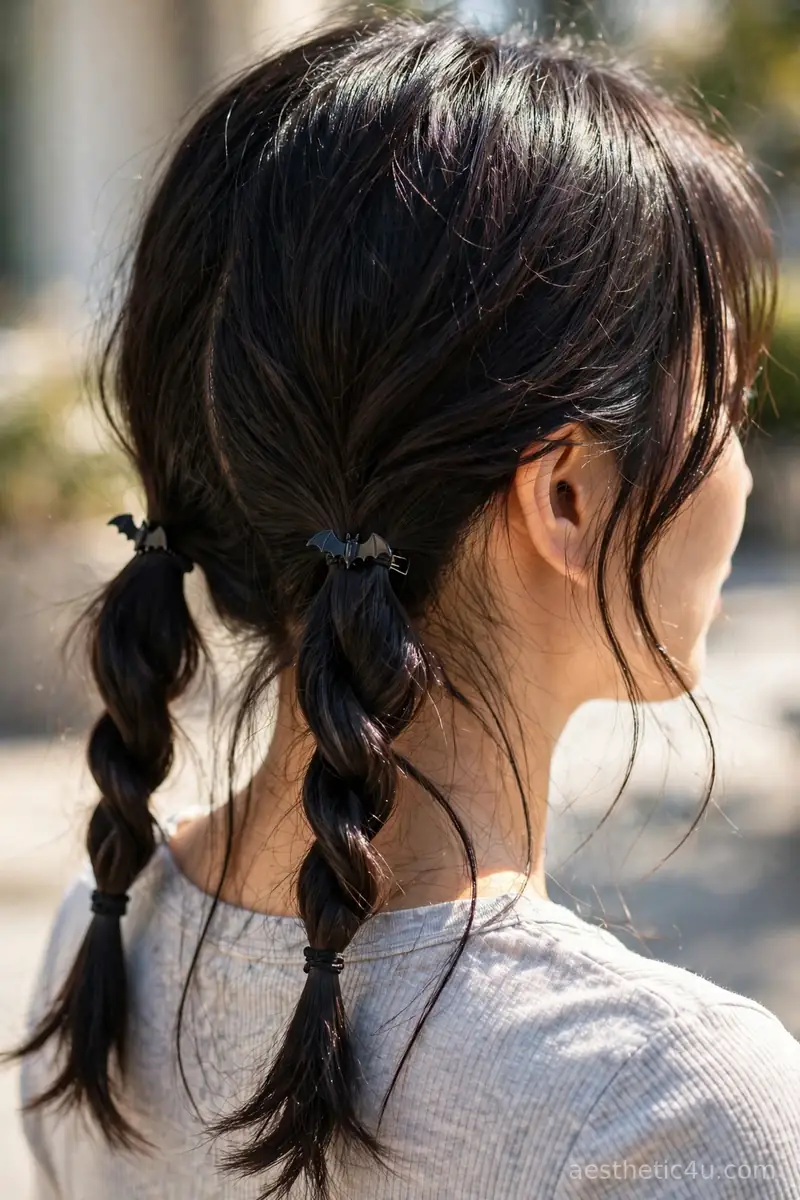
Each pigtail is made of two sections twisted around each other into a rope twist, then secured with a small black elastic. Rope twists look like braids but take half the time and hold better on silky hair. The twisted texture catches the light beautifully. To build them, divide each pigtail in two, twist each section one way, coil the other way, secure. It takes 8 minutes, difficulty easy. Add one tiny bat clip per pigtail and these are fully Halloween-ready. They unravel into pretty waves the next day, a bonus.
I would choose this if your hair is slippery and normal braids fall apart. Rope twists grip much better and they unravel into pretty waves the next day. Add one tiny bat clip per pigtail and these are fully Halloween-ready. Honest caveat: remember the opposing-twist rule, twist sections one way, coil the other way, or the rope unravels. Get the rhythm once and it is muscle memory. And secure the ends well, because rope twists slip faster than braids.
17. Tiny Spiderweb-Clip Accent Braids
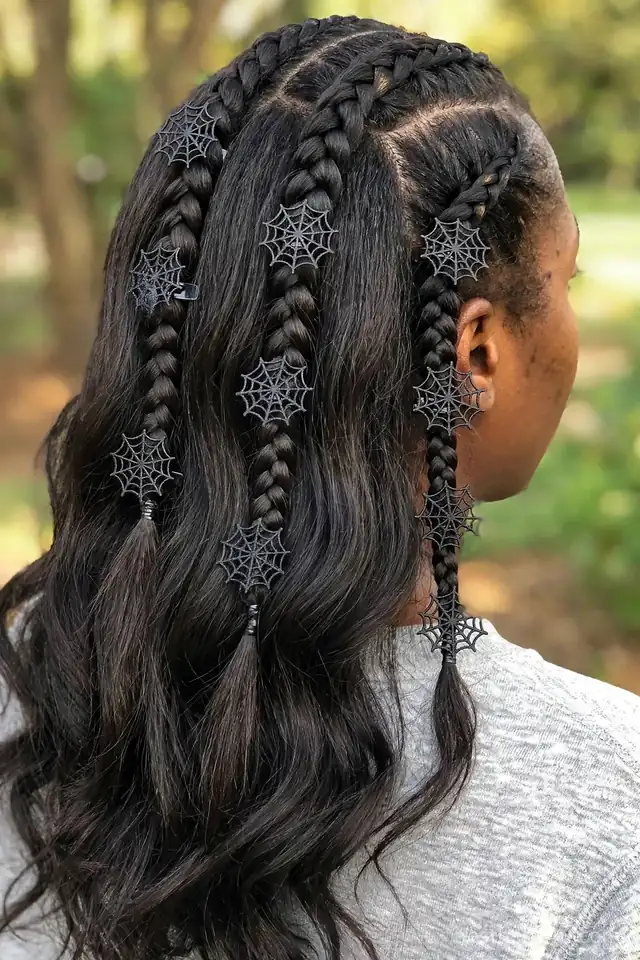
Skinny accent braids are pinned with small spiderweb-shaped clips that stretch across them like tiny webs. The web clips are delicate and lacy rather than scary. Placed near the temples, they frame the face with a pretty-spooky detail. To build them, braid thin accent sections near the temples and pin the web clips across them. It takes 8 minutes, difficulty easy. Keep the braids thin, because the webs need a slim base to sit on properly. The web clips suit dark hair best, where the silver or black webbing shows up clearly.
I love this one for a Halloween look that is more pretty than creepy. The web clips suit dark hair best, where the silver or black webbing shows up clearly. Keep the braids thin, because the webs need a slim base to sit on properly. One honest caveat: web clips need to lie flat against the braid, so pin them at both ends. A clip pinned at one end flips and twists. Two tiny pins, flat and secure.
18. Mini Pull-Through Bubble Braid
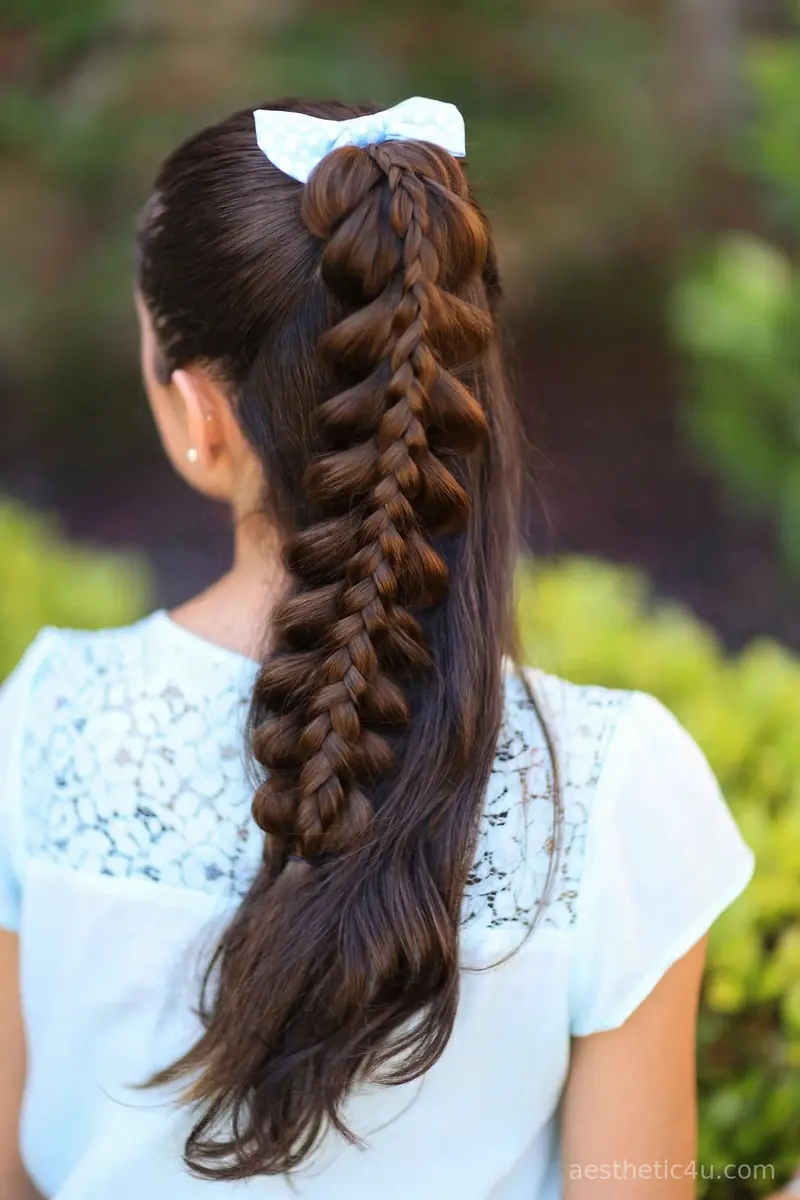
A pull-through braid runs down the back in small, even bubbles made by looping sections through each other, no actual braiding needed. Done mini, it looks like a string of little pearls down your hair. The technique sounds fancy but it is just ponytails stacked inside each other. To build it, stack small ponytails down the back, loop each through the one above, and fan gently into mini bubbles. It takes 12 to 15 minutes, difficulty easy. This is my top pick for beginners who still want a wow detail, because pull-through is genuinely foolproof.
I recommend this one if you cannot braid to save your life. Pull-through is genuinely foolproof and the mini scale makes it look delicate instead of bulky. This is my top pick for beginners who still want a wow detail. Honest caveat: fan each bubble before moving to the next, because going back disturbs the stack. Work top to bottom, fan as you go. And use tiny clear elastics, because big elastics show and ruin the pearl illusion.
19. Tiny Bow Accent Braids
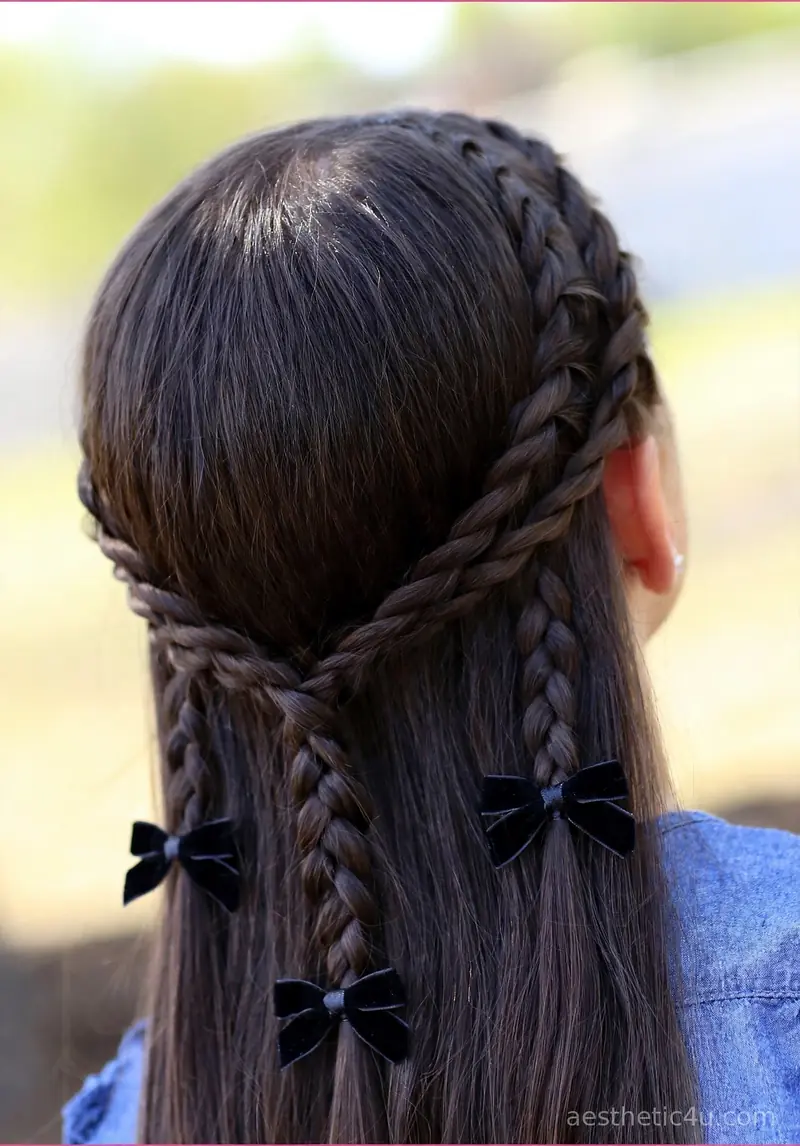
Two or three mini braids are tied off with tiny black velvet bows at their ends. The velvet bows add a soft, dressy texture that reads Halloween without any spooky motifs. The braids are scattered, one at each temple and one at the back, so the bows peek through the hair. To build them, braid thin sections at the temples and back, secure, and tie tiny velvet bows at each end. It takes 10 minutes, difficulty easy. Black velvet bows look expensive and they suit every hair color. This is a lovely choice for a Halloween wedding or any dressed-up October event.
I would pick this if you want cute Halloween hair with zero spook. Black velvet bows look expensive and they suit every hair color. This is a lovely choice for a Halloween wedding or any dressed-up October event. One honest caveat: tie the bows snugly, because loose bows slide right off braid ends. A snug knot plus a tiny elastic underneath is bulletproof. And keep the bows truly tiny, because scale is what keeps this chic instead of childish.
20. Tiny Braided Face Framers with Orange Clips
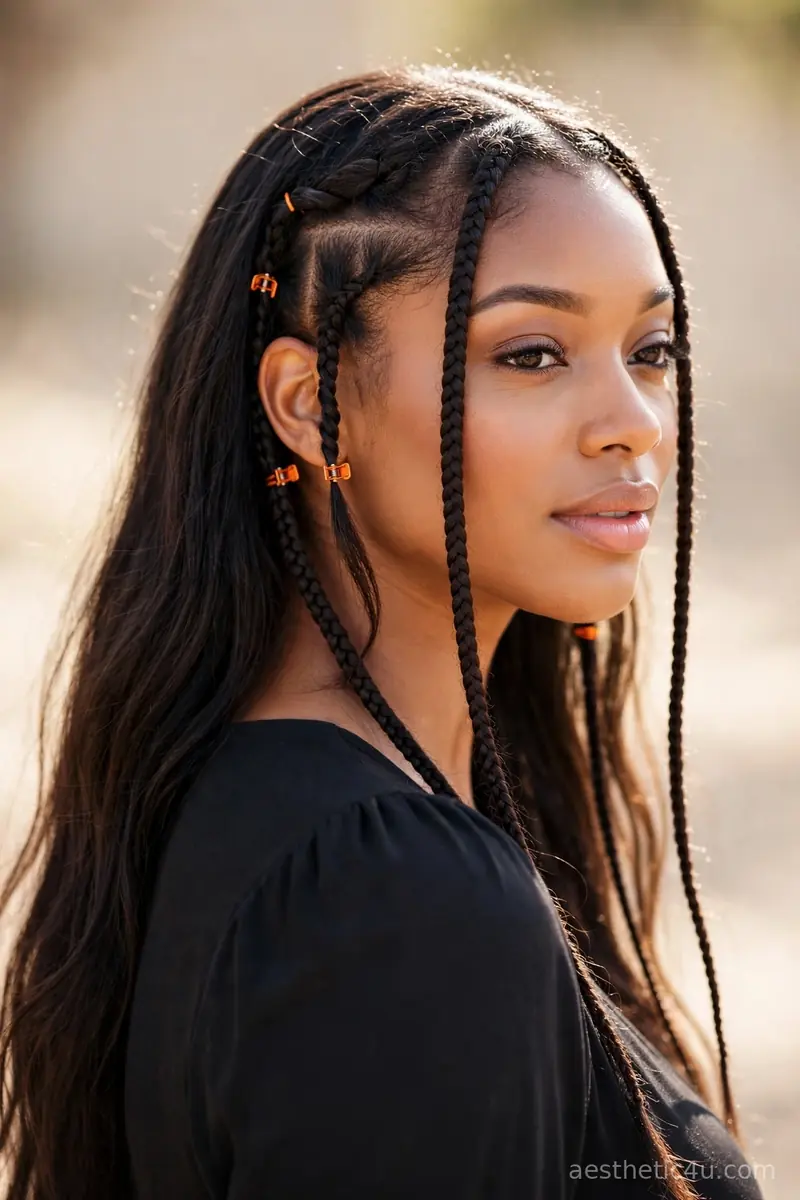
Small braided sections at each temple frame the face, each one secured with tiny orange clips. The braids keep the front pieces neat all day, which is perfect if your face-framing layers always fall out. To build them, braid small sections at each temple, secure with tiny elastics, and snap on the orange clips. It takes 8 minutes, difficulty easy. The braids give more texture than plain clips, and the orange clips add the Halloween touch. The framing placement flatters oval and heart-shaped faces especially well.
I love this one because the braids keep the front pieces neat all day. If your face-framing layers always fall out, braid them, because a braid grips much better than a twist or a clip alone. The orange clips are optional, but they make the Halloween intent clear. Honest caveat: keep the braids slim and the clips tiny, because chunky braids lose the delicate face-framing effect. Slim braids with tiny clips, delicate and neat all day.
Keep exploring: 26 Halloween Hairstyles for Long Hair: Dramatic Lengths for the Night
21. Tiny Crown Accent Braids
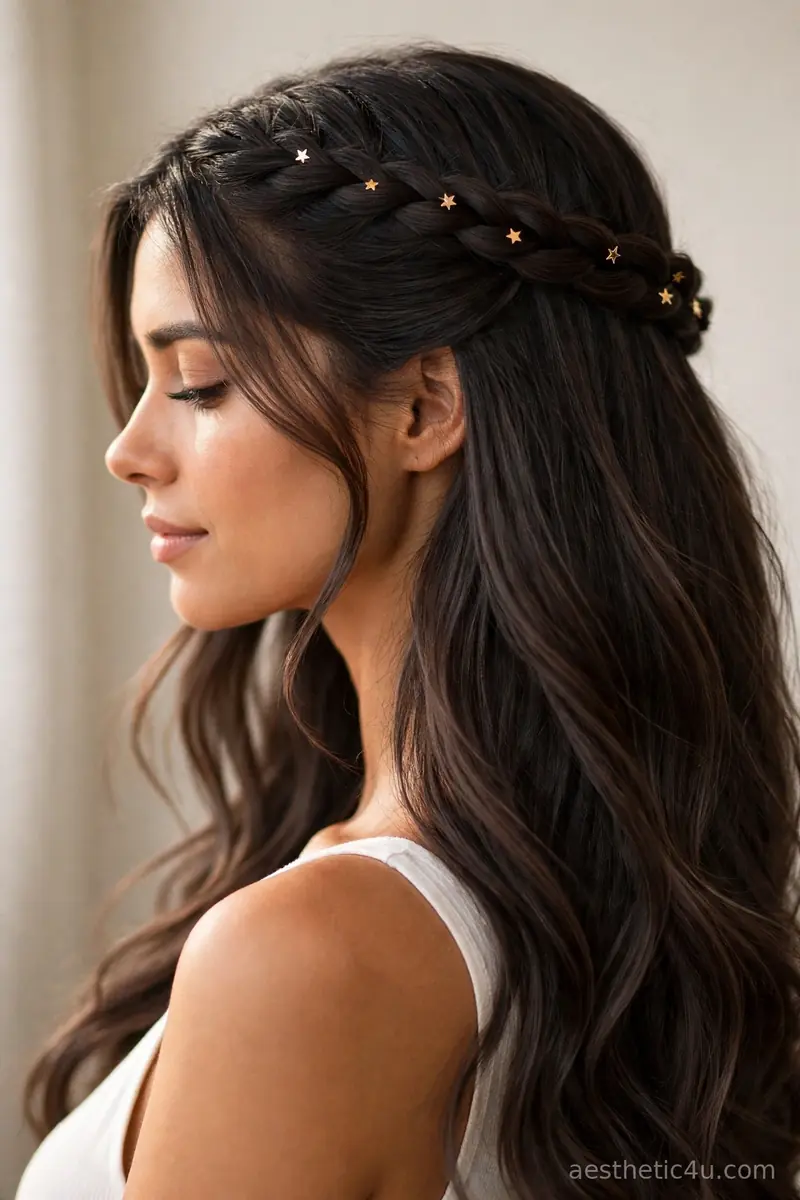
A slim braid arcs across the crown like a mini tiara, pinned from ear to ear over loose hair. It is not a full crown braid, just one delicate plait sitting on top. A tiny gold crown clip or a few star pins along it make it feel like Halloween royalty. To build it, braid a slim section and arc it across the crown, pinning ear to ear. It takes 8 to 10 minutes, difficulty easy. The single crown braid lifts the front of the hair and shows off your face, which photographs beautifully.
I would choose this if you are dressing as anything royal or witchy-pretty. The single crown braid lifts the front of the hair and shows off your face, which photographs beautifully. Keep it loose so it looks soft, not severe. One honest caveat: pin the arc at several points, not just the ends, because a crown pinned only at the ears sags in the middle. Three to four pins along the arc keep it floating perfectly. Support the whole arc.
22. Mini Candy-Stripe Pigtail Braids
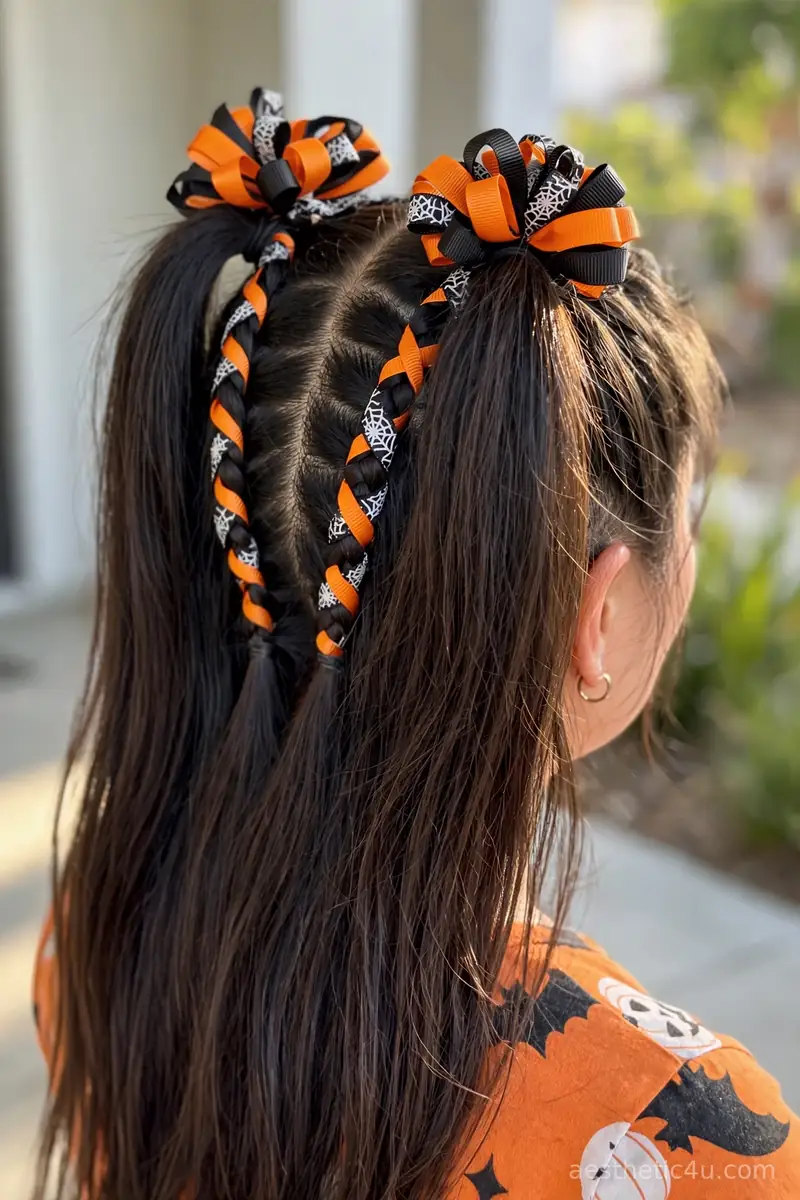
Small pigtail braids are striped with alternating black and orange ribbon woven through the strands, like Halloween candy stripes. The two-color weave looks intricate but it is just ribbon laced as you braid. The ends are tied with matching striped bows. To build them, add both ribbons to the braiding sections, braid with the ribbons woven in, and tie striped bows. It takes 12 to 15 minutes, difficulty easy to medium. The ribbons do all the visual work, even a basic three-strand braid looks amazing striped. This is a favorite for kids and teens too, since the colors are so fun.
I recommend this one for maximum Halloween cuteness with minimum skill. The ribbons do all the visual work, even a basic three-strand braid looks amazing striped. This is a favorite for kids and teens too, since the colors are so fun. Honest caveat: keep the ribbon tension even with the hair tension, because ribbon pulled tighter than hair puckers the braid. Even, gentle tension on everything. That evenness is what makes the stripes look clean.
23. Tiny Pumpkin-Spice Bubble Accent Braids

The cutest combo of the list: mini bubble sections are stacked on top of skinny accent braids, with tiny pumpkin clips dotting the bubbles. You get the texture of a braid and the roundness of bubbles in one small package. They sit at the sides of the head like little pumpkin-spice details. To build them, braid thin accent sections, then add tiny elastics down each to create mini bubbles, fluff, and dot with pumpkin clips. It takes 12 to 15 minutes, difficulty easy to medium. It mixes two techniques but each one is simple, and together they look adorable.
I saved this one for last because it is my personal favorite. It mixes two techniques but each one is simple, and together they look adorable. If you only try one idea from this list, make it this one, it is pure Halloween cuteness in miniature. One honest caveat: build the braid first, then add the bubbles, because trying to do both at once tangles. Braid, secure, then bubble. Sequential steps keep it clean and cute.
How to Choose the Right Cute Halloween Mini Braid for You
Start with your time and skill. True five-minute styles like star-clip accent braids, bat-clip face framers, and simple pigtail braids need almost no technique, just braid and clip. Ten-minute styles like bubble pigtails, pull-through minis, and ribbon-woven braids need a little more assembly but still suit beginners. Do not pick the combo styles for your first attempt on party night, because even simple techniques layered together need one practice run.
Next, match the vibe to the room. Sweet and subtle options like velvet bow braids, moon charms, and star clips work for office Halloween, school, and weddings. Playful options like candy-corn braids, pumpkin charms, and candy-stripe pigtails suit parties and trick-or-treating. Finally, match to your hair: mini braids show best on medium to long hair with some length to work with, and fine hair should keep minis few and loose so they do not disappear. Pick the mini that fits your schedule, your venue, and your hair, and cute will carry the day.
Styling Tips & Common Mistakes to Avoid
Mini braids are all about precision, so my first tip is to work with small, clean sections. A rattail comb for sectioning and small clear elastics are essential, because mini braids need neat bases to read as intentional. Second, texture spray is your best friend: tiny braids on silky hair unravel in minutes, but a little grit makes them hold all day. Third, place accessories deliberately and sparingly, because one tiny pumpkin clip is cute while ten is cluttered. Restraint is what keeps mini braids chic.
The mistakes that ruin mini braids are about scale and security. First, braids that are too tiny to see, because a mini braid should still be visible. Pencil-thin is the lower limit. Second, charms that are too heavy for thin braids, which pull them out. Match charm weight to braid size. Third, skipping the elastic or pin, because mini braids unravel faster than big ones. One honest caveat: mini braids take longer than they look when you do several, so budget time per braid. Five minutes each times six braids is thirty minutes. Plan honestly and you will love the result.
Final Thoughts
Cute Halloween mini braids prove that festive hair does not need to be big or complicated. Whether you went sweet with velvet bows or playful with candy-corn stripes, you picked tiny details that make a big impression.
Try one this week, keep a little kit of mini clips and charms, and enjoy the compliments. Happy Halloween, and may your minis stay cute all night. Keep a little kit of mini clips and charms handy, and have fun. You have got this.
Follow Us On Pinterest: Easy To Find Next Style