Sana
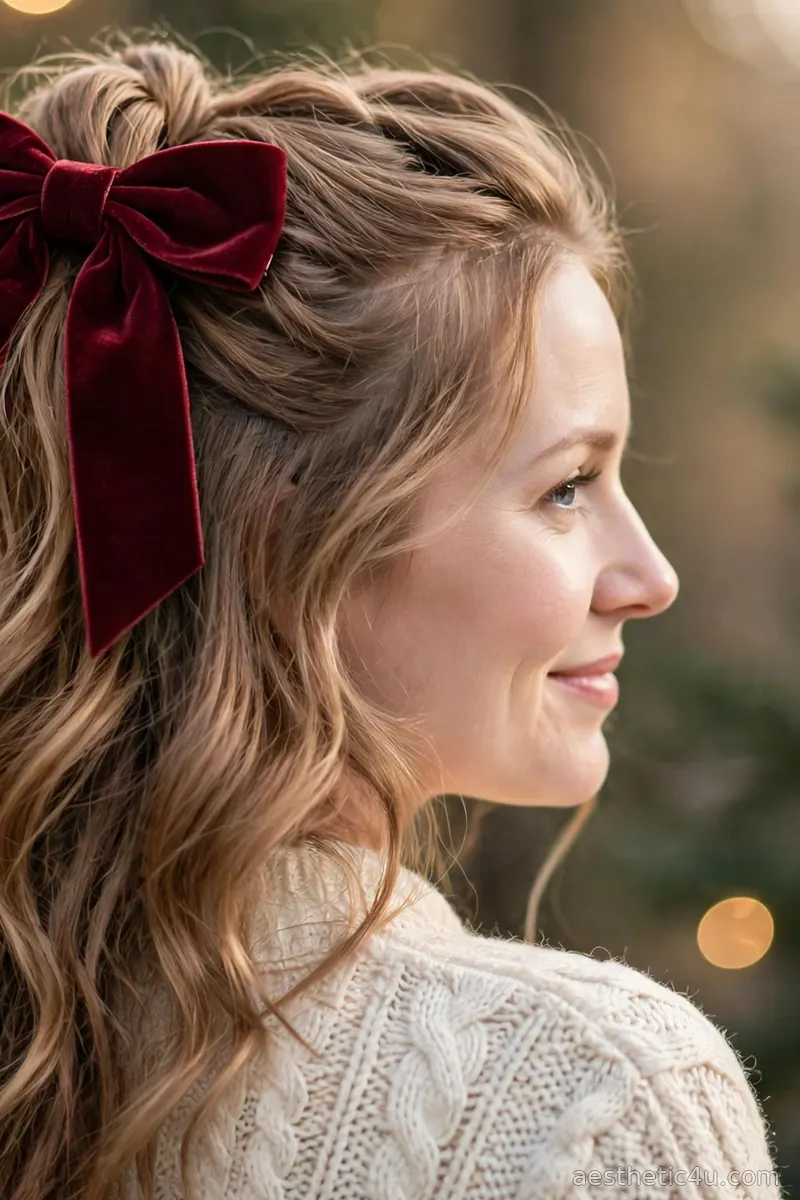
Velvet bows are the fastest way to make any hairstyle feel expensive, and they are everywhere this Christmas. The soft, light-catching texture turns even the simplest ponytail or bun into something straight out of a holiday editorial, which is exactly why searches for velvet hair accessories spike every December. Unlike plastic clips or fussy pins, velvet feels soft, photographs beautifully in warm holiday lighting, and instantly adds that rich, old-money finish to your look. I have styled dozens of holiday heads this season, and the moment a velvet bow goes in, the whole mood changes from everyday to festive.
This guide is for anyone who wants a luxury Christmas hairstyle without spending an hour in front of the mirror. Whether your hair is long and thick, short and fine, stick-straight or naturally curly, there is a velvet bow look here for you, and most of these take 15 minutes or less. Beginners can start with the low ponytails and half-up styles, while the French twists and braided crowns give more practiced hands something to play with.
Below you will find 19 complete velvet bow hairstyles, each with exact styling steps, the tools I reach for, and honest advice on who each look suits best. I also added a guide to choosing the right bow style for your face shape, plus the mistakes I see most often so you can skip them. My rule of thumb is simple: let the bow be the star and keep everything else calm. Ready to find your bow? Let’s go.
1. Oversized Emerald Velvet Bow Half-Up
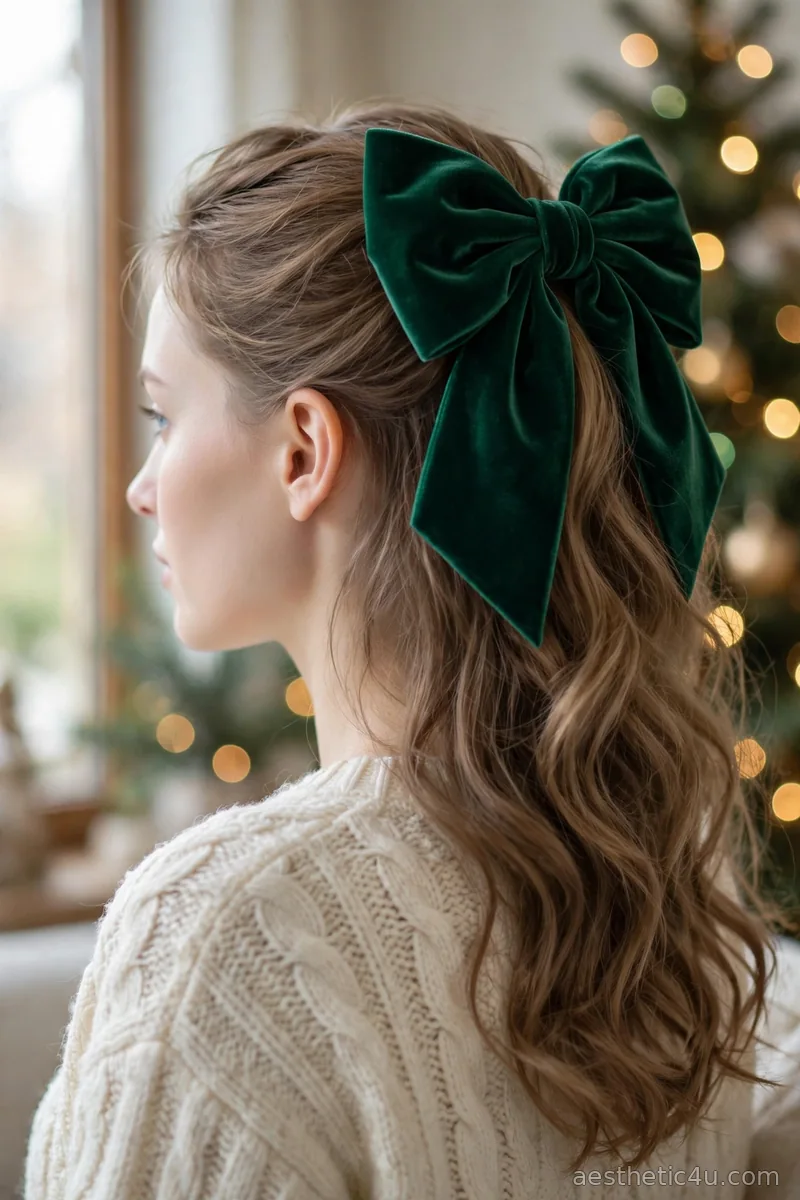
Start by gathering the top half of your hair from temple to temple and sweeping it back to the crown, then secure it with a clear mini elastic. Clip your oversized emerald velvet bow directly over the elastic so the base stays completely hidden. Curl the bottom half with a 1.25-inch curling iron, working in two-inch sections and leaving the last inch of each section straight for a relaxed wave. Mist with flexible-hold hairspray and finger-comb the curls to soften them. The whole look takes about 20 minutes and sits at an easy-to-medium difficulty.
This look suits every face shape, but I love it on long and oval faces because the crown volume balances the proportions. It works on medium to long hair of all textures, though very fine hair needs a little texturizing spray at the roots for grip. I’d pick this for cocktail parties and Christmas dinners; just cross two bobby pins underneath on silky hair so the oversized bow stays put all night.
2. Deep Red Velvet Bow Low Ponytail
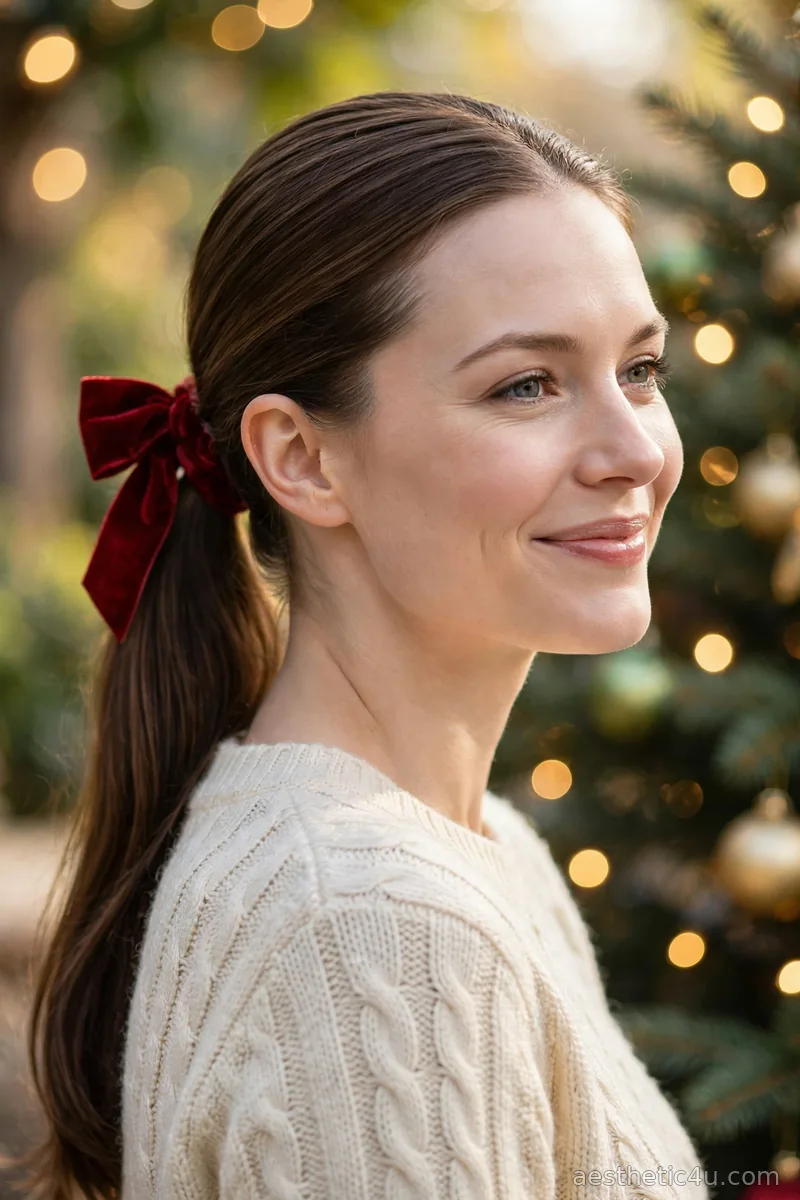
Smooth your hair into a low ponytail at the nape using a boar-bristle brush for a glassy finish, and lock it with a snug elastic. Wrap a deep red velvet bow around the base so the elastic disappears completely, then straighten the ponytail with a flat iron for extra polish. Tame any flyaways with a pea-sized drop of smoothing serum warmed between your palms. If your hair is very layered, twist the shorter pieces under and pin them. This takes about 10 minutes, making it the easiest style on this list and ideal for mornings when time is tight.
I’d call this quiet luxury: it flatters round and heart-shaped faces since the sleek sides keep everything neat. It suits straight to wavy hair best, any length that gathers into a pony. I reach for this for the office party and Christmas dinner alike because it looks intentional without trying too hard. One tip from my chair: match the bow’s red to your lipstick for a polished, pulled-together finish.
3. Burgundy Velvet Bow Sleek Bun
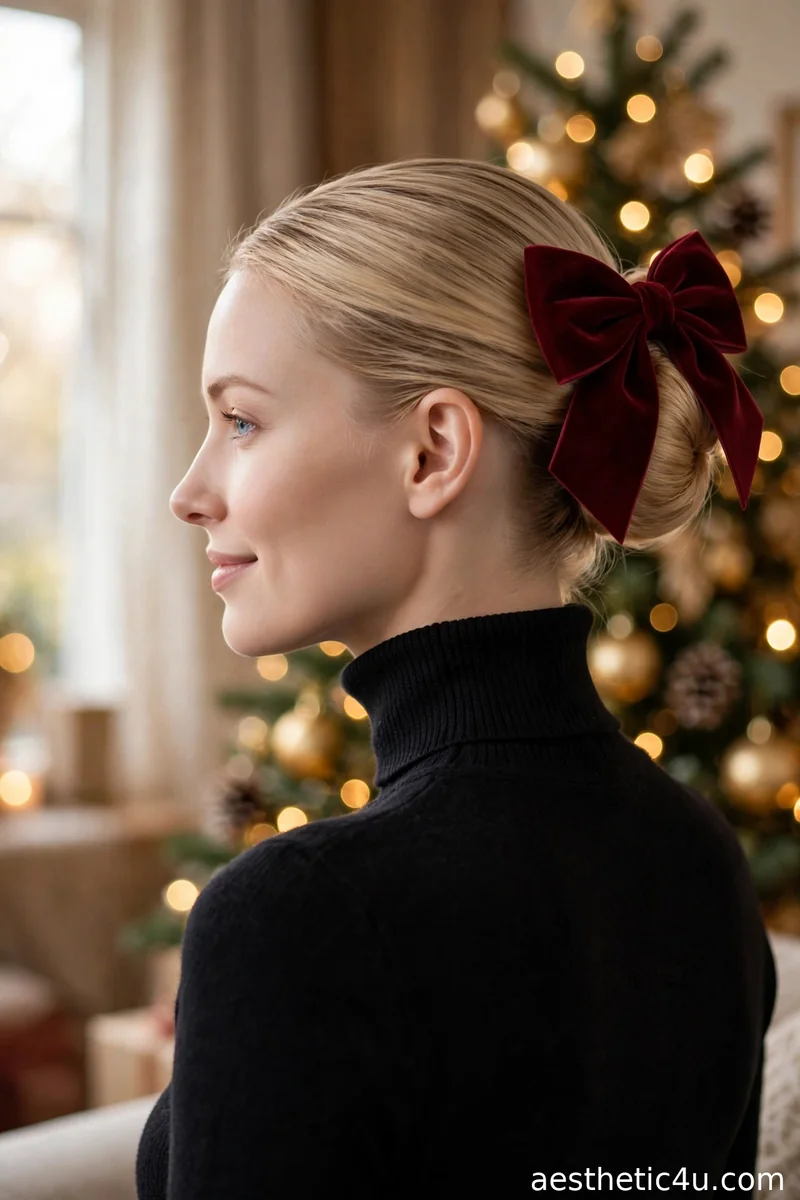
Brush all your hair back into a low ponytail at the nape, then twist the ponytail into a coil and wrap it into a smooth bun, pinning as you go with strong-hold bobby pins. Press a smoothing cream through the lengths first so every strand lies flat for that mirror finish. Pin a burgundy velvet bow at the side of the bun, slightly off-center for a modern feel. Set everything with a firm-hold hairspray from 10 inches away. Plan on 15 to 20 minutes; the difficulty is medium because sleek buns punish bumps, so brush as you wrap.
Sleek buns with velvet bows look so expensive, and the burgundy reads perfect for evening events. This style suits oval, square, and heart faces beautifully, though it shows off strong jawlines, so soften it with two thin face-framing pieces if that is your concern. I’d pick this for formal dinners and black-tie nights. Honest caveat: second-day hair holds a sleek bun better than freshly washed hair, so skip the shampoo or add dry shampoo first.
4. Black Velvet Bow High Half-Up Ponytail
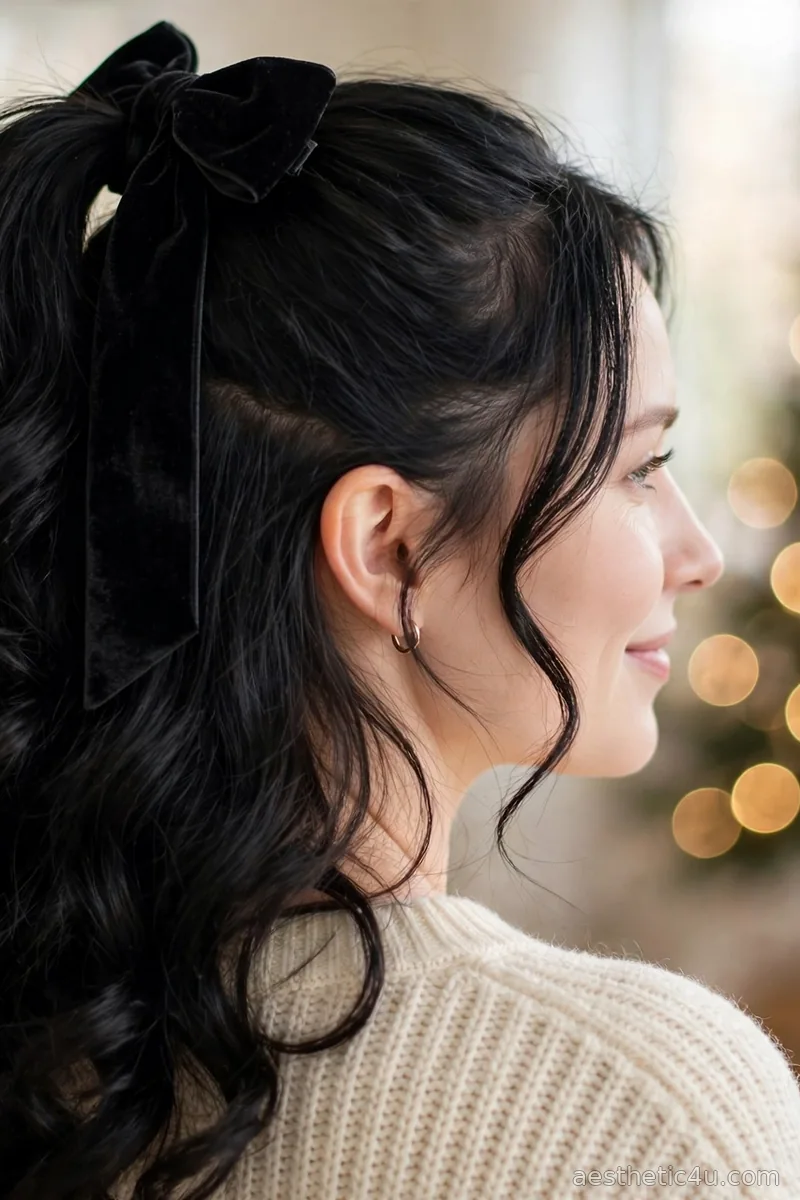
Gather the top half of your hair from temple to temple and pull it into a high ponytail at the crown, securing it with a strong elastic, because height is everything here. Tease the underside of the ponytail lightly with a fine-tooth comb, then smooth the top layer over it for bouncy, full volume. Tie a large black velvet bow around the base and let its tails fall over the ponytail. Leave the bottom half down and curl everything with a 1-inch curling iron for extra movement. You need about 15 minutes; the difficulty is easy once you nail the high placement.
Black velvet is endlessly chic, and this half-up style looks dressed up with zero effort. It suits long and oval faces best, since the height elongates the face, and works on thick or fine hair alike. I love it for Christmas Eve because it stays put through hugs, dancing, and photos. One fix I always share: if the pony sags by midnight, hide a second elastic halfway down the tail for hidden support.
5. Forest Green Velvet Bow Braid Wrap
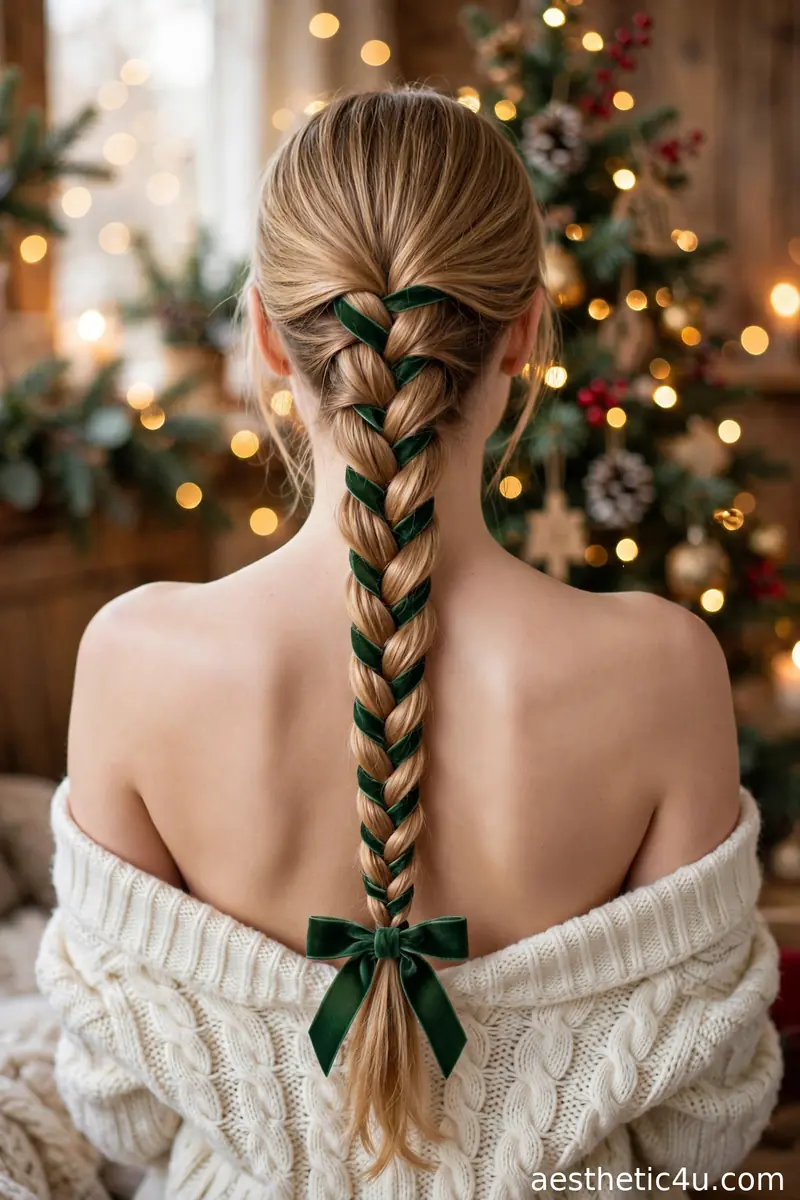
Part your hair down the middle or to the side, then braid a classic three-strand braid down the back. As you braid, weave a long forest green velvet ribbon through the sections, alternating over and under so it peeks out evenly. Tie the braid off with a clear elastic, then knot the ribbon into a full bow at the end. Gently pancake the braid by tugging the edges to make it look thick and rich. This takes 15 to 20 minutes and is beginner-friendly if you can already do a basic braid.
Forest green velvet woven through a braid is gorgeous, like a gift wrapped up for the holidays. It suits long hair and thick hair best, though medium lengths can manage with a little texturizing spray for grip. I’d pick this for daytime holiday gatherings and school or office parties. Pro tip: use a ribbon at least an inch wide, because skinny ribbon gets lost in the braid and the bow ends up looking skimpy.
Keep exploring: Elegant Christmas Hairstyles
6. Wine Velvet Bow Side Chignon
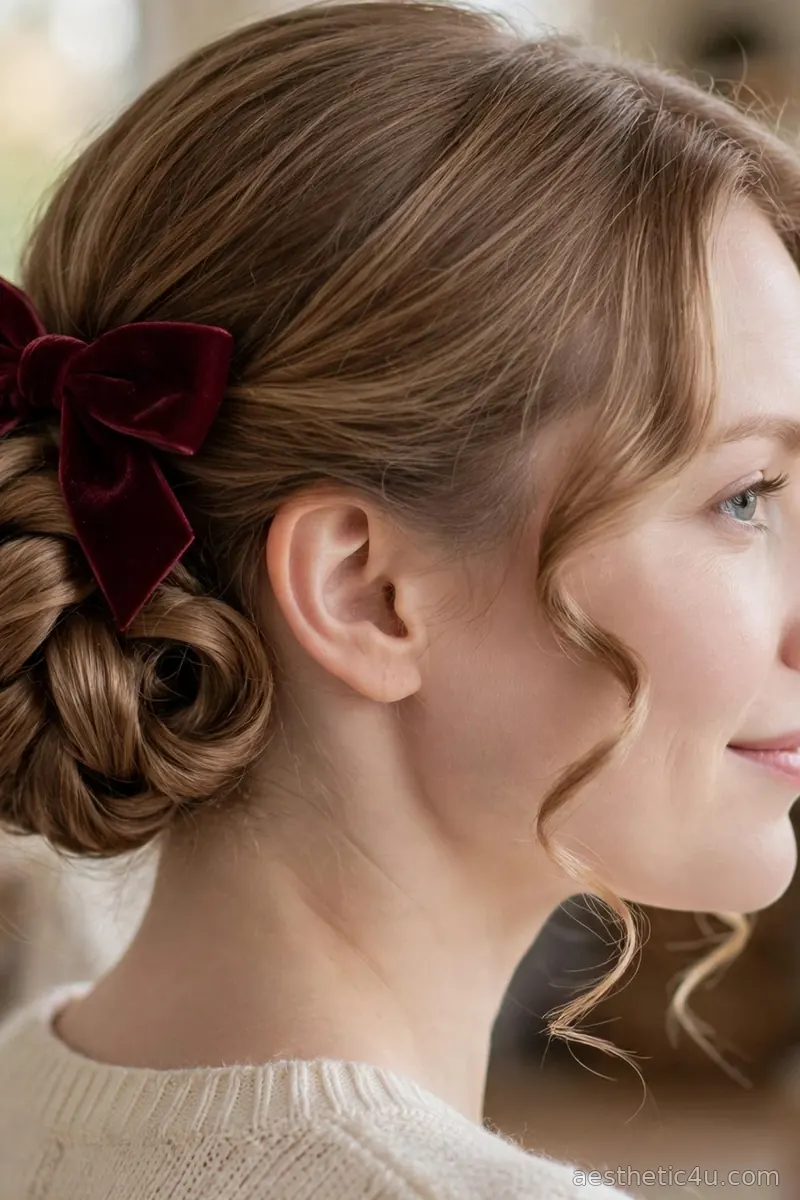
Sweep all your hair to one side and gather it into a low side ponytail behind the ear, securing it with an elastic. Twist the ponytail loosely, coil it into a chignon, and pin it with U-shaped hairpins, leaving the shape soft rather than tight. Pull out two thin tendrils around your face and curl them with a half-inch curling iron for romance. Finish by pinning a wine-colored velvet bow just above the chignon. Allow 20 minutes; this is medium difficulty because asymmetry takes a little practice to balance.
Side chignons feel so special, and the wine bow adds holiday richness that reads expensive in photos. This flatters every face shape and is one of my top picks for formal dinners. It works best on medium to long hair. I’d choose this when you want romantic but not fussy. One honest note: heavy chignons pull, so if your hair is very thick, use a hair donut underneath for support instead of pinning everything flat.
7. Champagne Velvet Bow Soft Waves
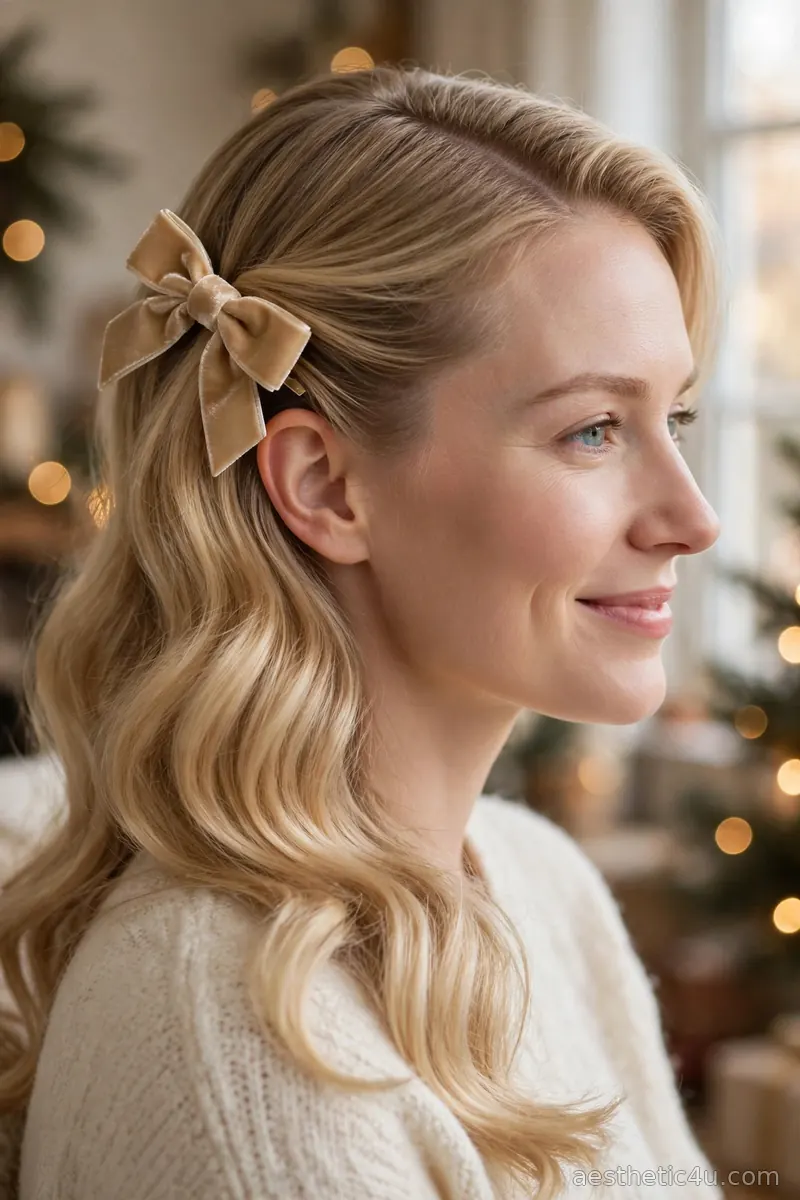
Create loose waves with a 1.5-inch curling iron, alternating the direction of each section so the waves look natural instead of uniform. Once cool, brush through them with a paddle brush to turn the curls into soft, touchable waves. Deep-part your hair to one side, sweep the heavier side back, and pin it with a champagne velvet bow clip. Mist lightly with flexible-hold spray so the waves keep moving. This takes 25 minutes and is easy as long as you are comfortable with a curling iron.
Champagne velvet is subtle and stunning, catching the light without shouting. This suits all hair lengths from lob to long, and the soft waves flatter round faces especially well. I’d pick this when you want luxury without bold color, like an elegant brunch or a family Christmas morning. Caveat: champagne velvet shows up best on darker hair; on very blonde hair, choose a slightly deeper gold-toned bow so it doesn’t wash out.
8. Navy Velvet Bow Braided Bun
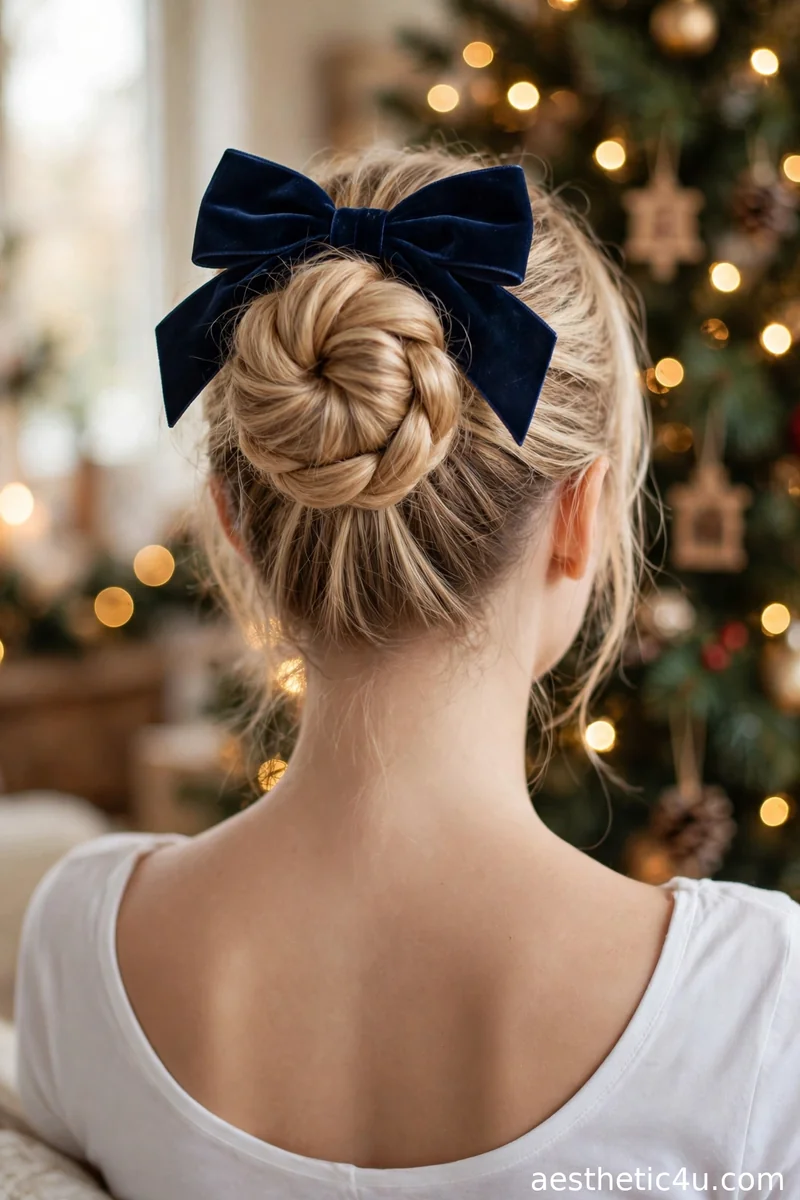
Gather your hair into a high ponytail at the back of the head and secure it firmly with a strong elastic. Braid the ponytail into a thick three-strand braid all the way down and tie off the end. Coil the braid around its base into a full, textured bun, pinning it in a circle with U-shaped pins as you go. Overlap the braid layers so the shape looks intricate and full. Leave a few pieces out around the hairline for softness. Pin a navy velvet bow at the front of the bun, centered where it meets the head. Finish with medium-hold hairspray. Set aside 25 to 30 minutes; this is medium difficulty, so do a trial run before the event night.
Navy is an unexpected Christmas color, and against the braided bun it reads as midnight luxury. This bun suits medium to long hair and flatters oval and long faces, since the softness around the face balances the height. I’d choose it for evening events where everyone else wears red. Honest tip: take a photo of the back before you leave, because braided buns loosen unevenly and you want to know where to re-pin at midnight.
9. Ruby Velvet Bow Bubble Ponytail
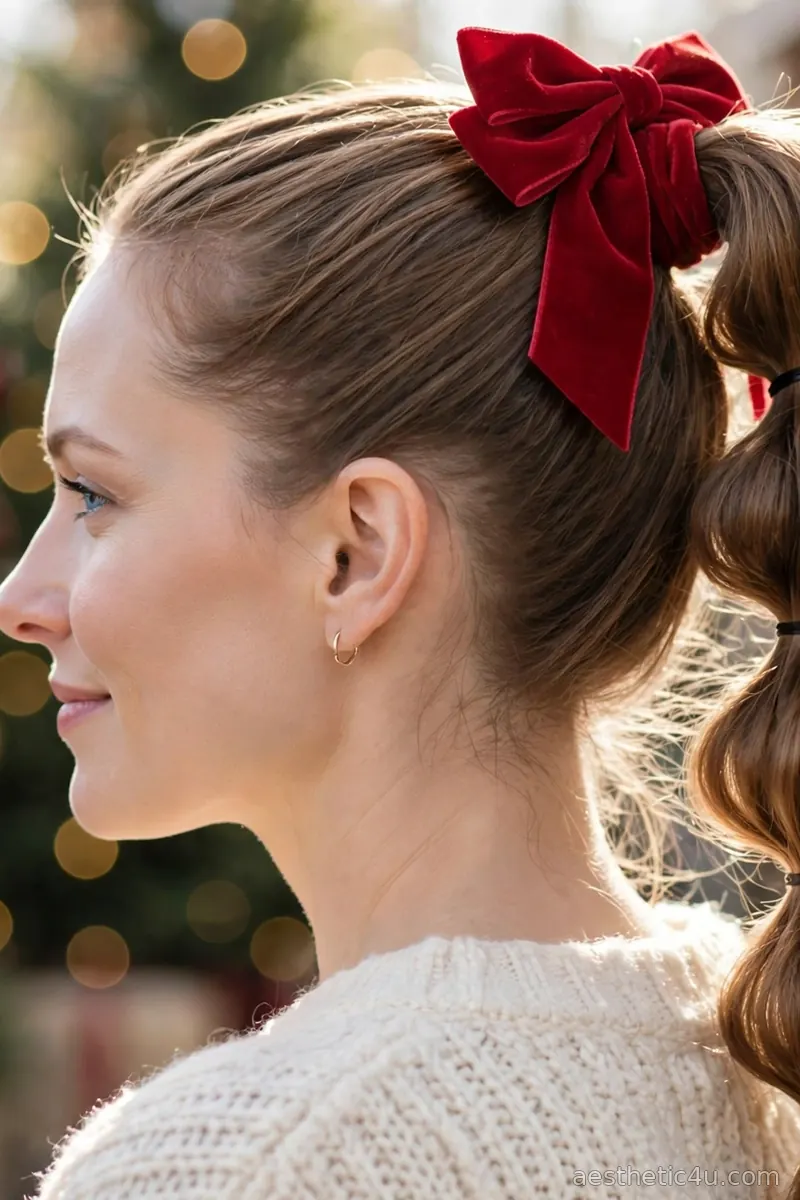
Pull your hair into a high ponytail and secure it firmly with two elastics stacked for extra hold. Add thin elastics every two inches down the tail, then gently tug each section outward to puff it into round bubbles. Wrap a ruby velvet bow around the base to hide the top elastic. Curl the very ends or tease them slightly for fullness. This takes about 15 minutes and is easy, though it works best on hair that is at least shoulder length so the bubbles have room to form.
Bubble ponytails are playful, but the velvet bow makes them luxe, and ruby red is the ultimate Christmas color. This suits long and oval faces and thick hair best, since fine hair bubbles can fall flat without texturizing spray. I’d pick this for parties where you want fun and fancy in one look. One fix: if a bubble collapses, pinch the elastic above it and re-puff; the elastics shift, they don’t break.
10. Emerald Velvet Bow Chunky Side Braid
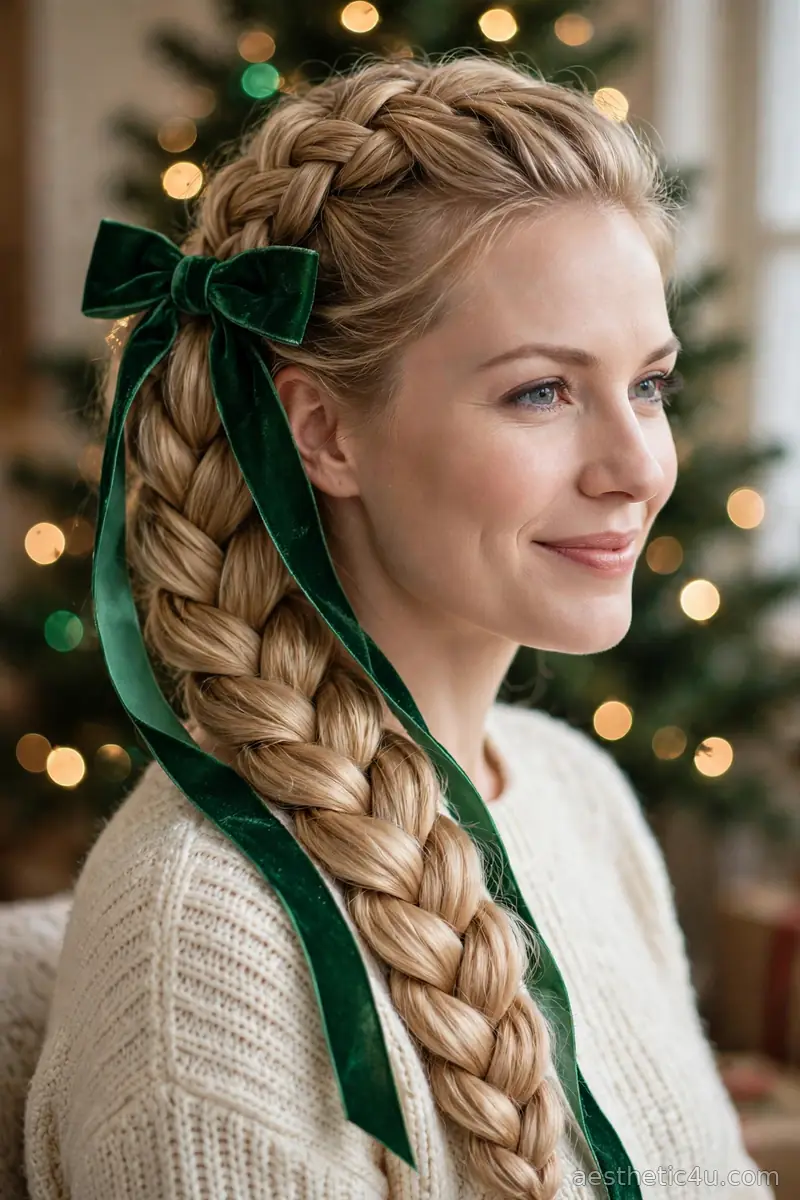
Sweep your hair over one shoulder and braid a chunky three-strand braid, keeping the sections wide and even for that bold, full texture. Keep the braid fairly tight at the top so it anchors well, and gently pancake the edges once you reach the end for maximum fullness. Secure with a clear elastic and tie an emerald velvet bow at the top of the braid, right where it starts, letting its tails fall along the braid. This takes 15 to 20 minutes and is beginner-friendly if you can already do a basic three-strand braid; chunky braids are far more forgiving than fishtails.
Chunky braids and velvet bows are a dream pair, and the emerald green pops in photos. This suits long and thick hair best and flatters round and heart faces because the diagonal line slims the face. I’d pick this when you want texture that looks expensive but took real technique. Caveat: chunky braids loosen on silky hair, so braid on day-old hair or mist each section with texturizing spray as you go.
Keep exploring: Christmas Hairstyles with Bows
11. Plum Velvet Bow Braided Top Bun
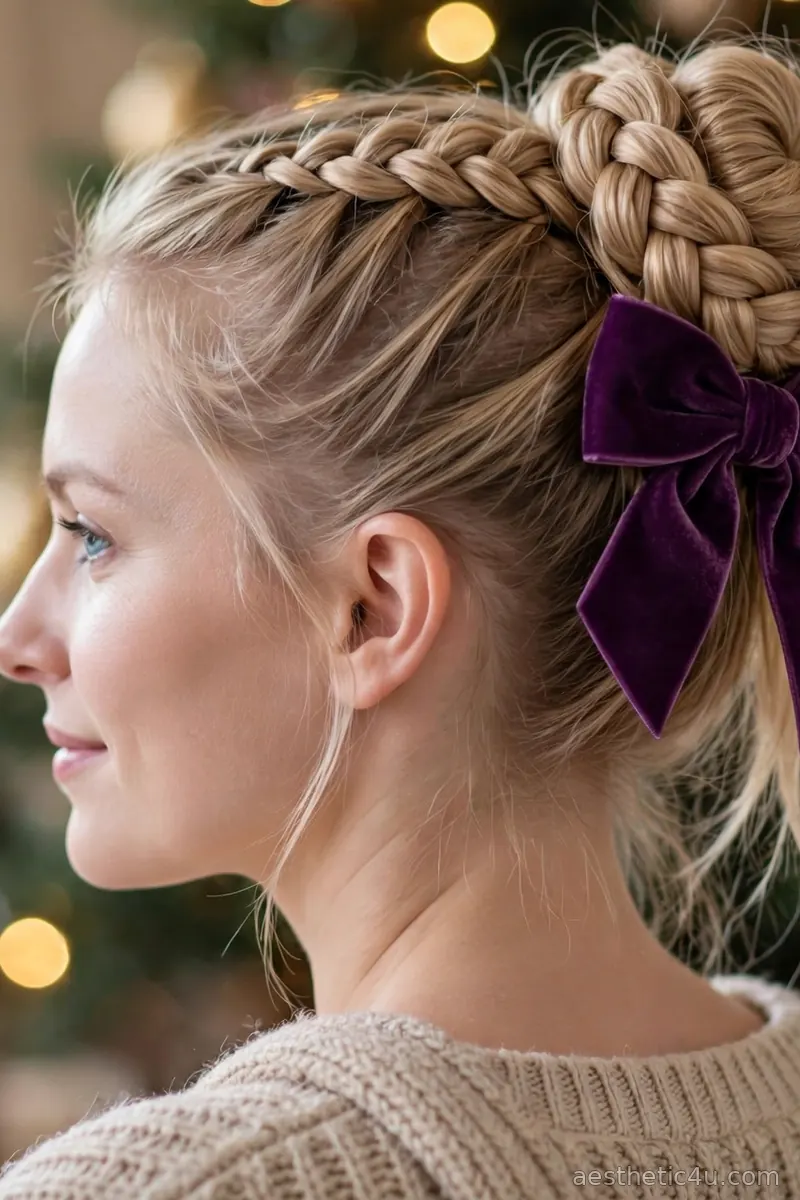
Gather your hair into a high ponytail at the crown and secure it firmly with a strong elastic. Braid the ponytail into a thick three-strand or Dutch braid all the way down and tie off the end. Coil the braid around its base into a top bun, tucking the end underneath and pinning it in a circle with U-shaped pins. Smooth the surface with a boar-bristle brush and a touch of pomade for a polished finish. Pin a plum velvet bow at the side of the bun, slightly off-center for a modern feel. Allow 20 to 30 minutes; this is medium difficulty, so practice the coil once before the event night.
Braided buns are pure sophistication, and the plum bow modernizes the look for Christmas. This suits medium to long hair and flatters long necks and oval faces beautifully. I’d pick this for black-tie holiday events where you want old-Hollywood drama with staying power. Honest caveat: use enough pins, because a braided bun that loosens at midnight ruins the drama – I use at least six U-pins, not regular bobby pins.
12. Garnet Velvet Bow Loose Curls
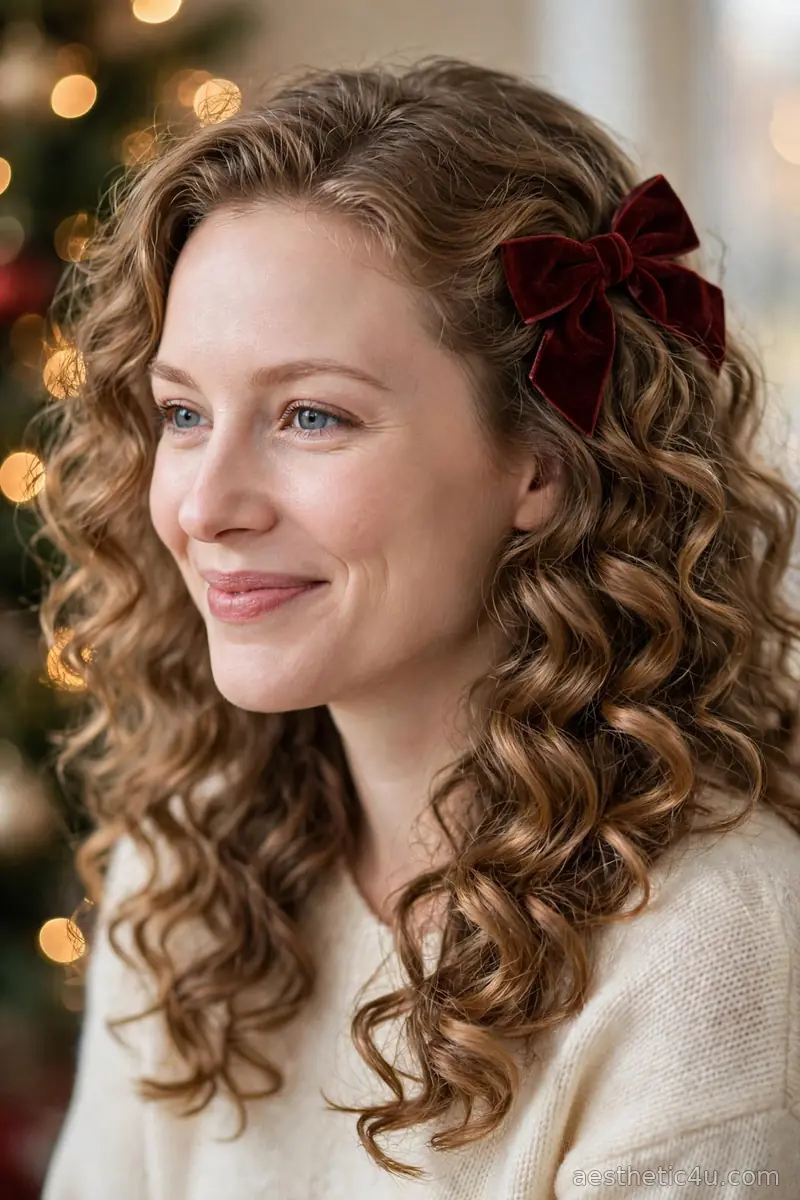
Curl your whole head with a 1.25-inch curling iron, wrapping medium sections away from your face and clipping each curl to cool so it holds longer. Once cool, release the clips and rake through with your fingers, never a brush, to keep the curls big and loose. Leave the hair falling naturally over both shoulders and pin a garnet velvet bow clip above one ear so it sits like jewelry in the curls. Mist with flexible-hold hairspray. This takes 30 minutes and is medium difficulty; the payoff is salon-level volume.
Loose curls with a velvet bow are effortlessly glamorous, and garnet is such a rich, photo-friendly shade. This suits medium to long hair and flatters every face shape. I’d pick this for Christmas portraits and family photos. Pro tip: curl the day before and sleep in a loose pineapple, then refresh with the bow in the morning for half the effort.
13. Midnight Velvet Bow Sleek Blowout
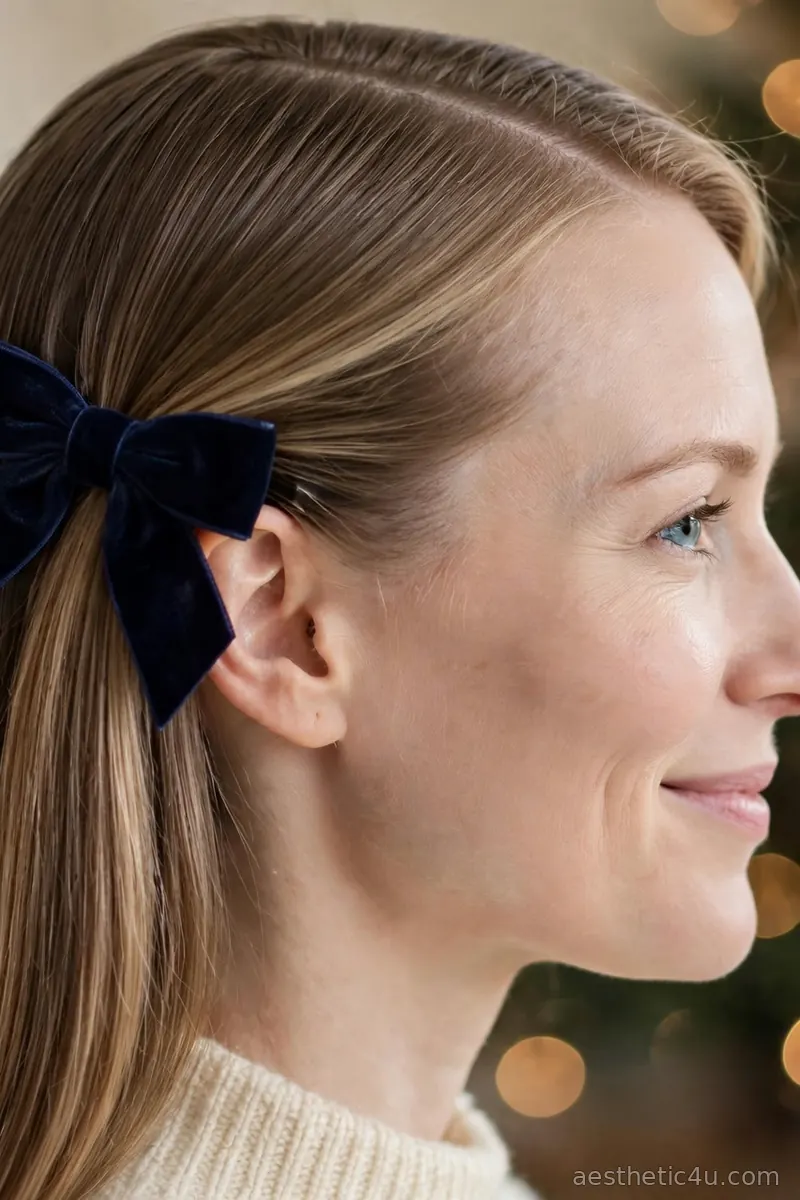
Blow-dry your hair smooth with a round brush, working in sections and aiming the nozzle down the hair shaft for maximum shine. Create a deep side part, then flat-iron the lengths for a glass-like finish. Tuck the lighter side behind your ear and pin it flat with a midnight blue velvet bow. Run a drop of shine serum over the surface to kill frizz. This takes 30 to 40 minutes and is medium difficulty; the blowout is the hard part, the bow is the easy reward.
A perfect blowout needs only one accessory, and the midnight bow is the jewelry for your hair. This suits straight to wavy hair and flatters oval and heart faces with its sleek lines. I’d pick this for the holidays when your outfit is already doing a lot. Caveat: humidity is the enemy, so finish with an anti-humidity spray and keep a mini bow clip in your bag for touch-ups.
14. Crimson Velvet Bow Milkmaid Braids
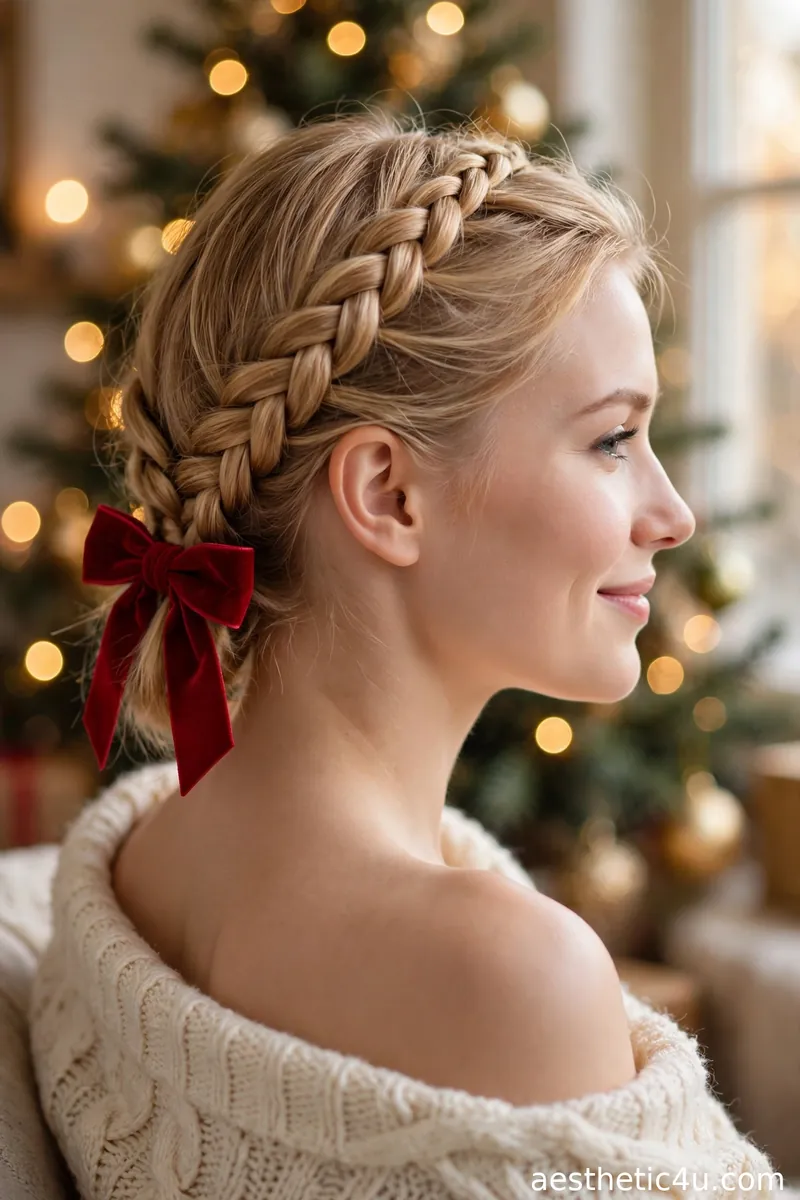
Part your hair down the middle and braid each side into a classic three-strand braid, securing the ends with clear elastics. Cross the braids over the top of your head like a headband, tucking the ends underneath, and pin everything firmly with bobby pins. Pancake the braids slightly for a soft, full look. Join the braids at the back with a crimson velvet bow. This takes 20 minutes and is easy-to-medium; the pinning is the only fiddly part.
Milkmaid braids with a velvet bow are so charming, and the crimson makes them Christmas-ready. This suits medium to long hair and flatters round and square faces because the crown height adds length. I’d pick this for daytime holiday looks and Christmas markets. One tip: if your braids feel tight across the crown, loosen the center pins slightly; comfort matters more than perfection here.
15. Forest Velvet Bow Top Knot
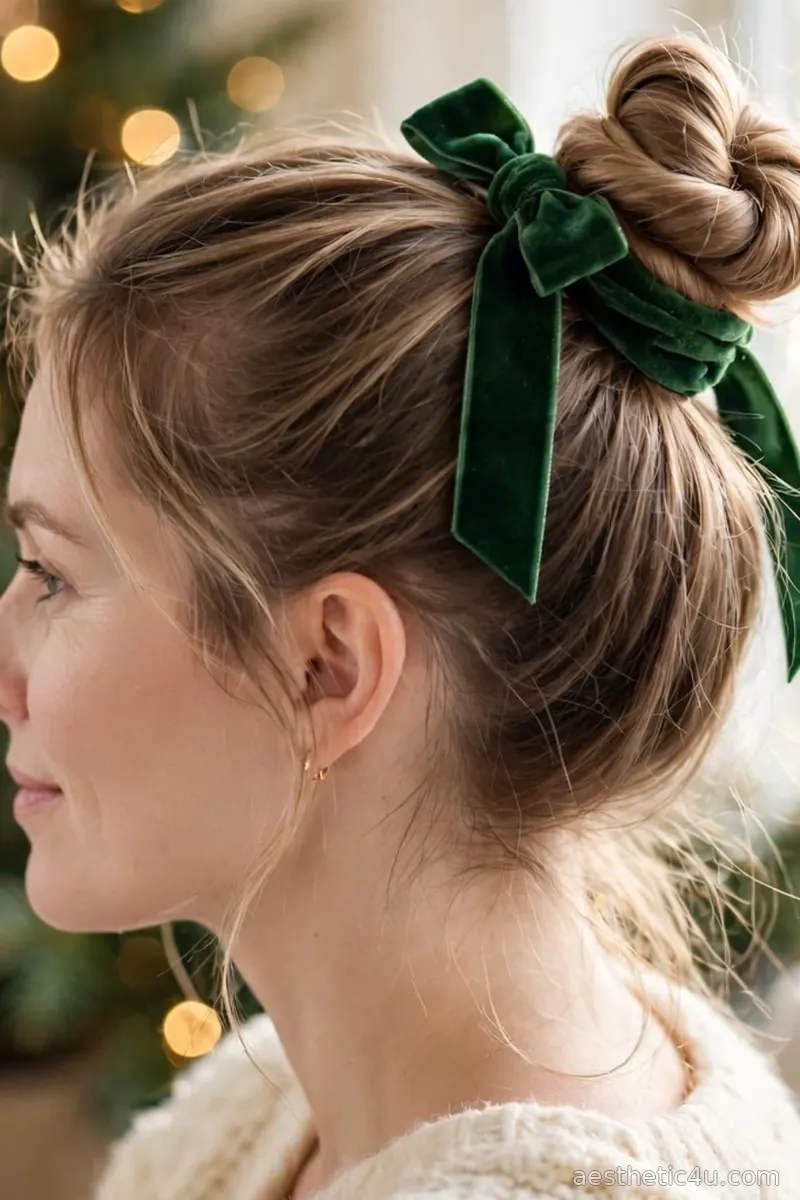
Pull your hair into a high ponytail at the crown and secure it with a strong elastic. Twist the ponytail loosely and wrap it around the base into a soft top knot, pinning as you go and leaving the shape slightly undone for a modern feel. Pull out a few pieces around the hairline for softness. Wrap a forest green velvet bow around the base of the knot. This takes 10 to 15 minutes and is easy; messy is the goal, so perfectionists should relax their standards.
Top knots go luxe with velvet, and the forest green is festive without being loud. This suits all hair lengths that reach a pony and flatters oval and long faces best. I’d pick this for day-to-night Christmas plans when you need one style to do everything. Caveat: very heavy hair pulls the knot down, so on thick hair, use a second elastic in an X across the base for extra grip.
Keep exploring: Christmas Hair Accessories
16. Burgundy Velvet Bow Dutch Braids
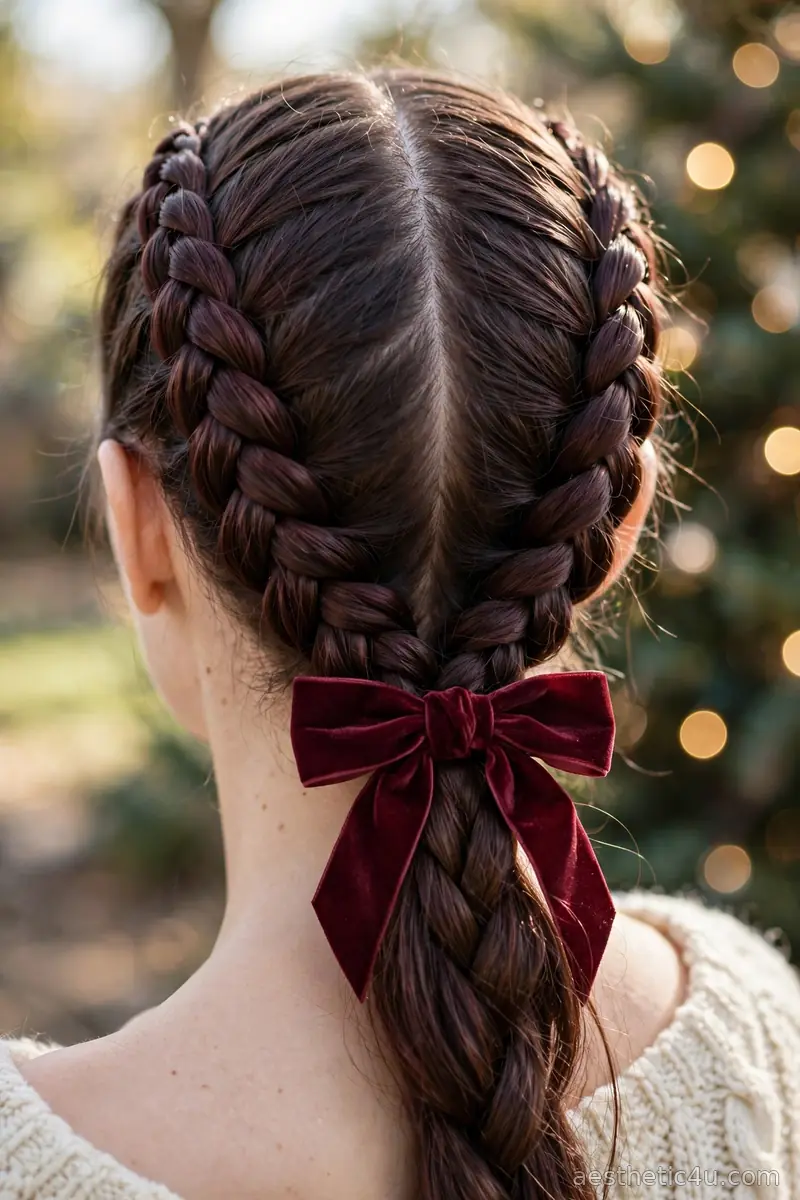
Part your hair down the middle and Dutch-braid each side, crossing the outer strands under the middle so the braid sits on top of the hair. Braid back to the nape, then gather both braids into a low ponytail secured with an elastic. Pancake the braids for fullness, then tie a burgundy velvet bow around the base of the ponytail. This takes 20 to 25 minutes and is medium difficulty; Dutch braiding takes practice but looks impressive.
Dutch braids keep it youthful while the bow keeps it luxe, and burgundy ties it all together. This suits long and thick hair best and flatters round faces because the center part and raised braids add structure. I’d pick this for any age, from teens to grandmas, since it reads sporty and festive at once. Pro tip: braid on slightly damp hair with a little mousse for extra grip and cleaner sections.
17. Crimson Velvet Bow Braided Ponytail
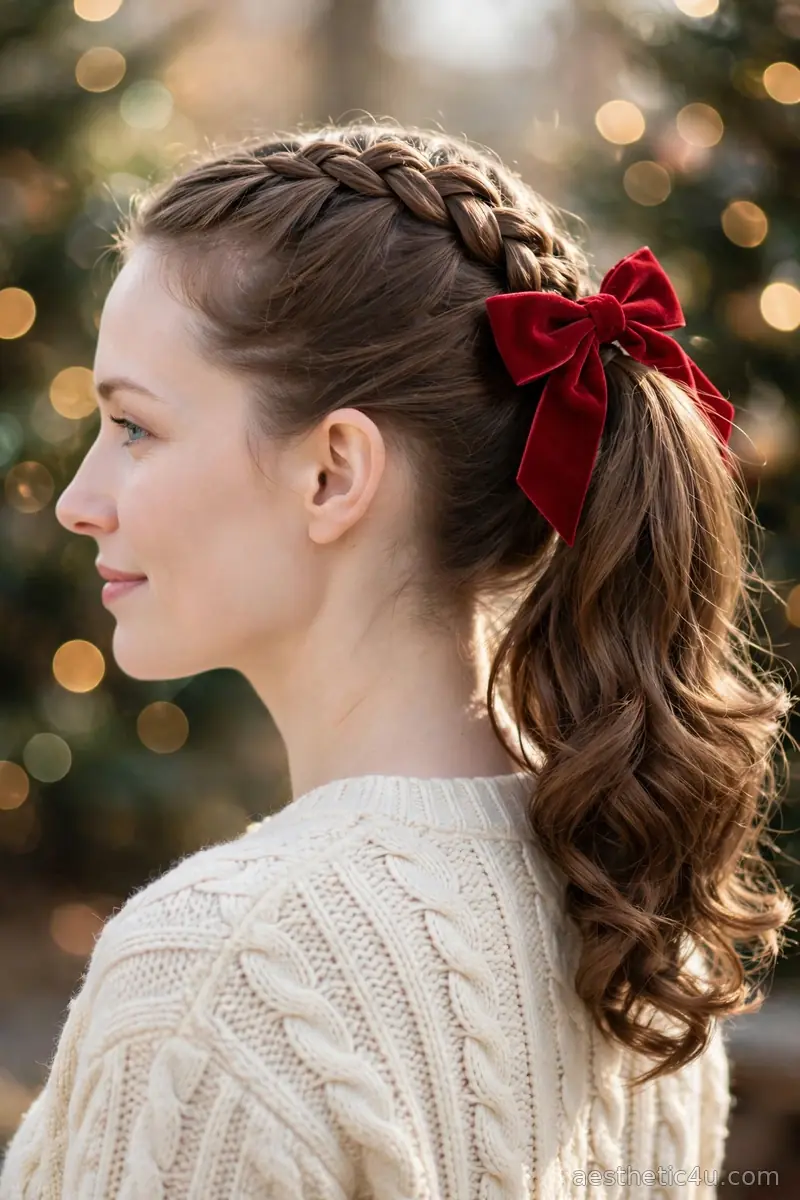
Start a three-strand braid at the crown and feed it into a high ponytail, securing everything with a strong elastic at the back of the head. Pancake the braid for texture, then tie a crimson velvet bow at the base where the braid meets the pony. Curl the ponytail ends with a 1-inch iron for movement. This takes 15 to 20 minutes and is medium difficulty; the tricky part is keeping the braid centered as you transition into the pony.
The braid-to-pony combo has so much movement, and the crimson bow anchors it all. This suits medium to long hair and flatters oval and heart faces with its lifted crown. I’d pick this when you want texture that looks amazing in motion, like at a party where you’ll be dancing. One fix: if the braid slides to one side, anchor it with a hidden bobby pin at the crown before you add the ponytail elastic.
18. Black Velvet Bow Retro Hollywood Curls
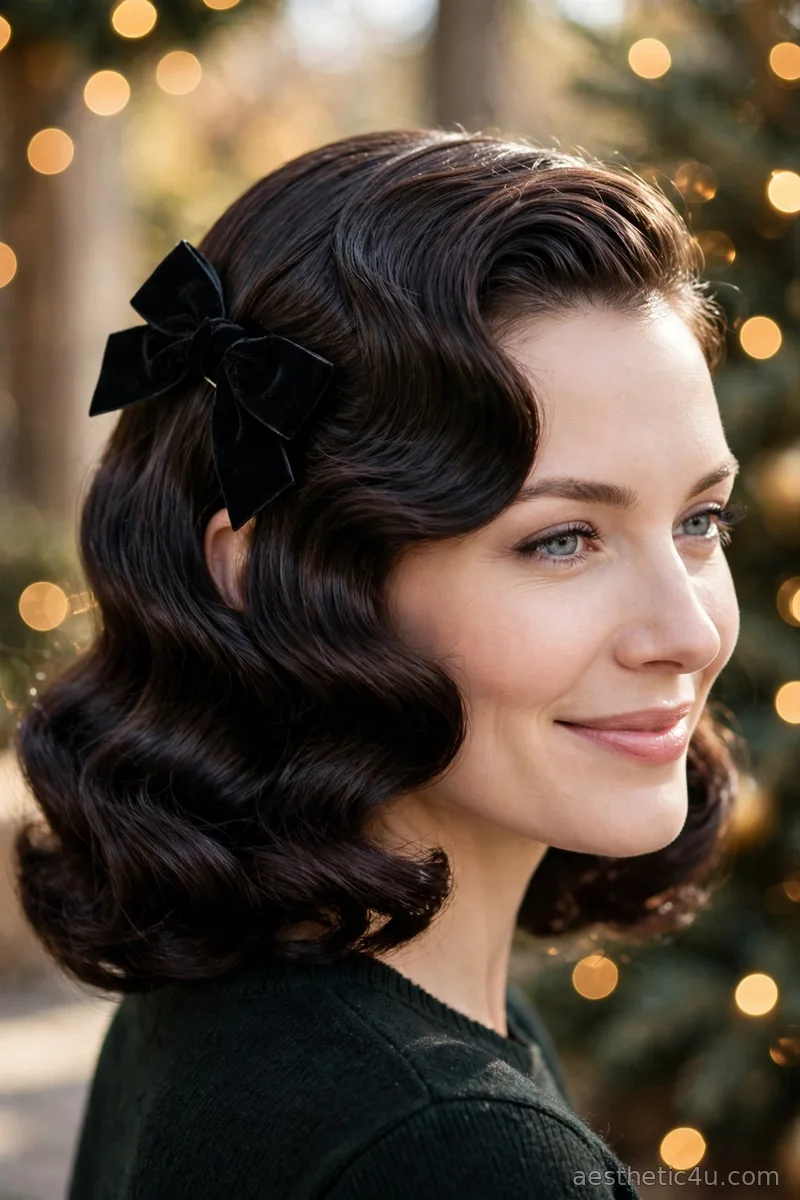
Set your hair in large curls with a 1.5-inch curling iron, wrapping all sections in the same direction and pinning each curl to cool. Once cool, release and brush through gently with a soft-bristle brush to form smooth, vintage waves. Create a deep side part, pin back the lighter side with a black velvet bow, and set everything with strong-hold hairspray. This takes 40 to 45 minutes and is hard difficulty, but the result is pure old-school glamour.
Retro curls with a black velvet bow are timeless; it is giving holiday movie star. This suits medium to long hair and flatters every face shape, especially with the deep side part adding drama. This is my pick for the fanciest night of the season. Honest caveat: this style demands patience and a lot of pins, so start early and do your makeup first to avoid rushing.
19. Red Velvet Bow Wrapped Braid Crown
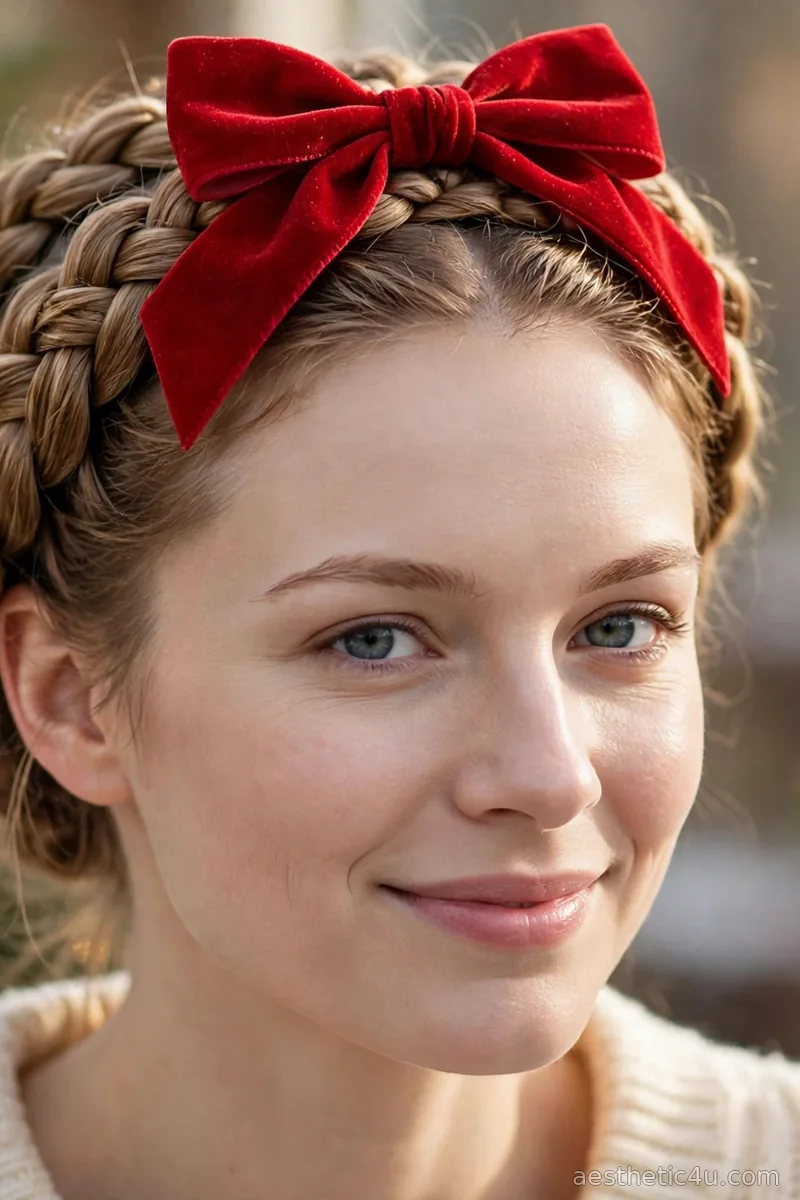
Braid your hair into one or two three-strand braids, then wrap them around your head like a crown, pinning securely with bobby pins all the way around. Tuck the ends under and pancake the braid for a full, regal look. Position a red velvet bow at the front of the crown like a gift topper, pinning it through the braid for security. This takes 25 to 30 minutes and is medium-to-hard difficulty; wrapping evenly takes practice.
A braid crown with a velvet bow is the finale this list deserves; it looks like a crown jewel. This suits long and thick hair best and flatters every face shape thanks to the lifted crown. I’d pick this for Christmas Day itself when you want to feel regal. Pro tip: this is the one style where I’d use a few extra pins without shame; a crown that survives dinner is worth it.
How to Choose the Right Christmas Velvet Bow Hairstyle for You
Start with your face shape, because the bow’s placement changes how your features read. Round faces do best with height on top, like the high ponytail or top knot, which adds length. Long faces suit side-swept styles and low chignons that add width. Oval faces can wear almost anything, while square faces soften with waves and face-framing tendrils around a sleek bun or twist.
Next, match the style to your hair type and length. Thick hair holds braids and updos beautifully but needs stronger elastics and extra pins. Fine hair does best with half-up styles and texturizing spray at the roots for grip, since heavy bows can slide. Short hair is not out of the game: bows clipped at the side of a blowout or over a mini twist look just as festive.
Finally, be honest about the occasion and your skill level. Office parties call for the low ponytail or sleek bun, while Christmas Eve invites the retro curls or braid crown. If a style is labeled hard, do a trial run two days before, not the morning of. My rule: pick the fanciest style you can do confidently in under 30 minutes, because a relaxed you always looks better than a stressed perfect updo.
Styling Tips & Common Mistakes to Avoid
My top tips after styling dozens of holiday heads: first, always secure the bow with bobby pins, never rely on the clip alone, because velvet is heavier than it looks. Second, place the bow last, after your hairspray, so the velvet stays clean and plush. Third, choose a bow size that matches your hair volume; oversized bows overwhelm fine, short hair, while tiny bows disappear in thick, long hair. Fourth, keep the rest of your styling simple so the bow stays the star.
The most common mistake I see is placing the bow too far back on the head, where it vanishes in photos. Fix it by positioning the bow where it is visible from the front: slightly above and behind the ear for side styles, or right at the crown for updos. The second mistake is overloading the look with extra accessories; one velvet bow plus maybe simple studs is plenty. If you catch yourself adding a headband too, step away from the mirror.
The third mistake is skipping grip products on clean hair. Freshly washed hair is slippery, so mist the bow area with texturizing spray or dry shampoo before pinning. And if your bow keeps sliding, cross two bobby pins in an X underneath it; that little trick holds through dancing, hugs, and a full Christmas dinner.
Final Thoughts
These 19 velvet bow hairstyles prove that luxury is in the details. One rich velvet bow can turn the simplest hair into a holiday statement, and now you know exactly how to style it, who it suits, and which mistakes to skip. My advice is to pick the color that makes you feel something, do one confident trial run, and then wear it like you were born with it. Christmas only comes once a year, so make your hair part of the celebration. Pick your bow and shine all season.
Follow Us On Pinterest: Easy To Find Next Style