Sana
Bows are officially the accessory of the season – and honestly, they never really left. Scroll Pinterest in November and bows are everywhere: on ponytails, on braids, on buns, even scattered through loose waves. A bow can turn the simplest hairstyle into a Christmas moment in about three seconds, which is exactly why they dominate holiday searches year after year. No other accessory delivers this much festive impact for this little effort or money.
I have styled bows on every hair length and texture, from pixie-length bobs to waist-length waves, and the rule is simple: let the bow be the star. Keep the hair simple, pick your bow, and you are done. In this guide you will find 21 bow hairstyles from sweet and subtle to full statement, plus how to choose the right bow size and fabric for your hair, how to keep a bow anchored all day, and the mistakes that make bows look childish instead of chic. My honest stylist take: the difference between a bow that looks expensive and one that looks like a costume is entirely in the hair underneath – sleek, intentional hair elevates any bow.
So whether you are dressing for the office party, Christmas morning, or a formal dinner, there is a bow moment here with your name on it. Let us find it.
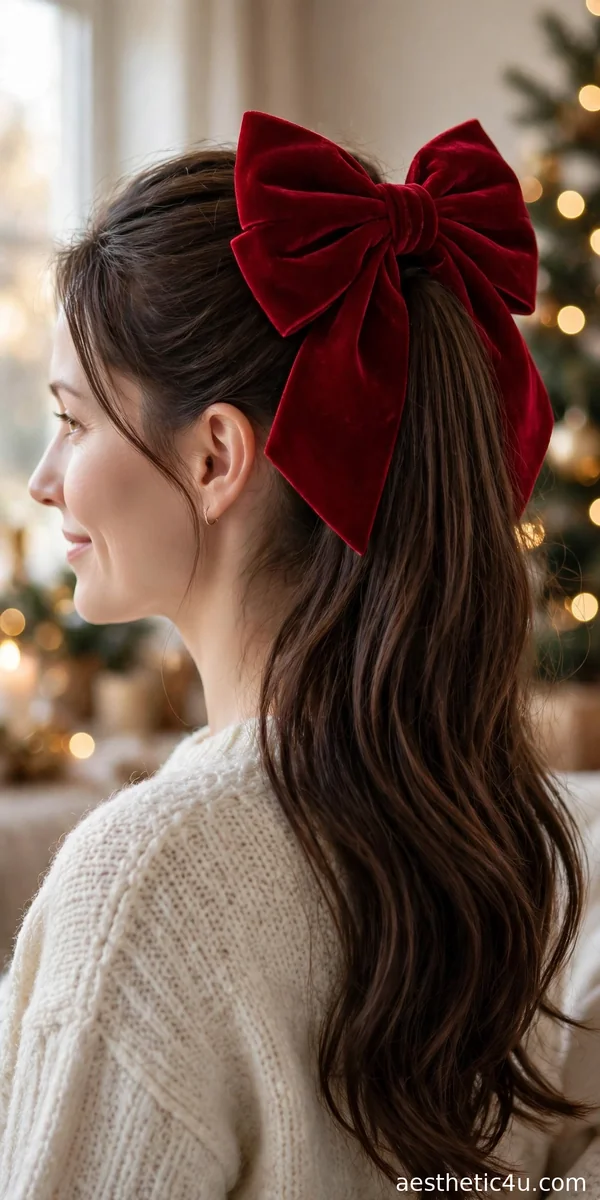
1. Oversized Velvet Bow on a High Ponytail
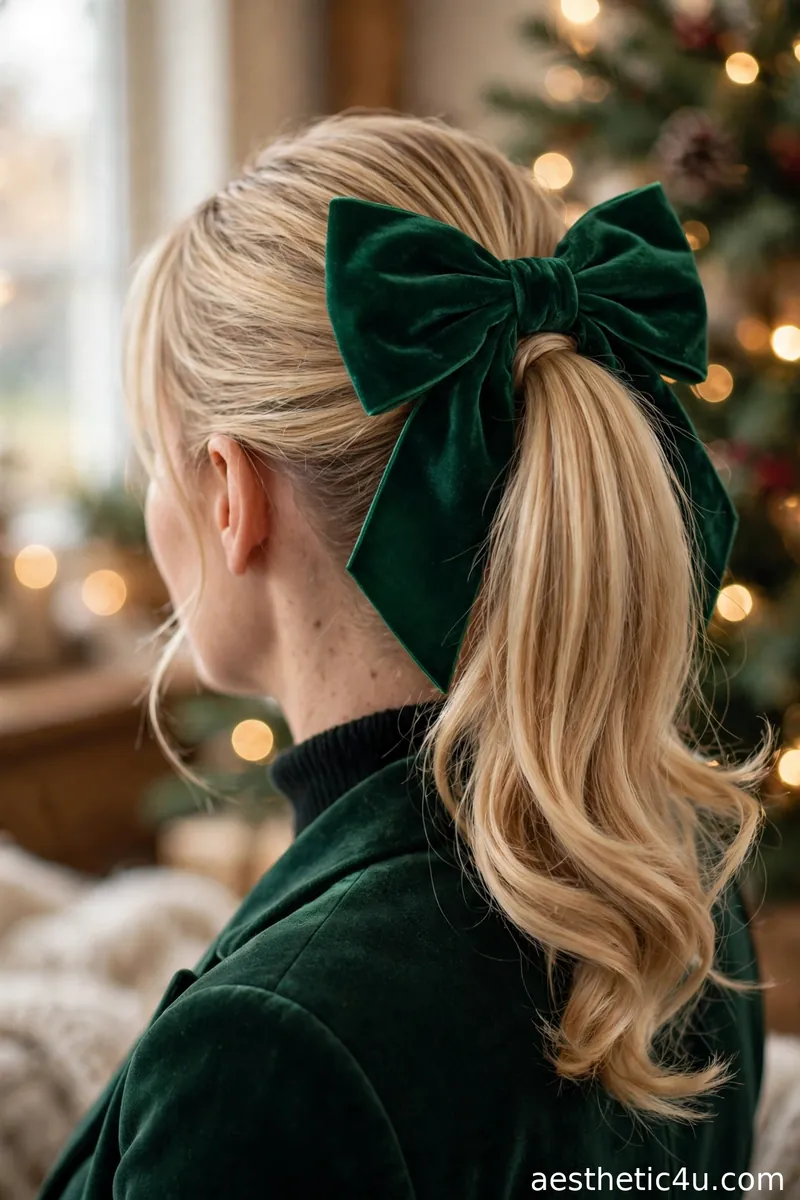
A smooth high ponytail finished with a huge velvet bow clipped or tied at the base – the bigger the bow, the better; this is not the time for subtle. Build a sleek high pony: brush up with a boar bristle brush, secure with two stacked elastics, smooth the crown with serum, and curl the tail lightly with a 1.25-inch iron. Attach the bow with its built-in clip directly over the elastic, then anchor it with a bobby pin through the bow’s back loop so it cannot rotate. Takes 15 minutes, easy – the bow does the styling work.
The look that started the whole bow trend, and it still wins – I love the sleek-pony-meets-plush-bow contrast. It suits oval and long faces and needs medium to long hair to balance the bow’s scale. If you buy one hair accessory this December, make it this one. Caveat: oversized bows are top-heavy – skip windy outdoor events unless pinned hard, or the bow spins sideways mid-photo.
2. Double Mini Bows on Space Buns
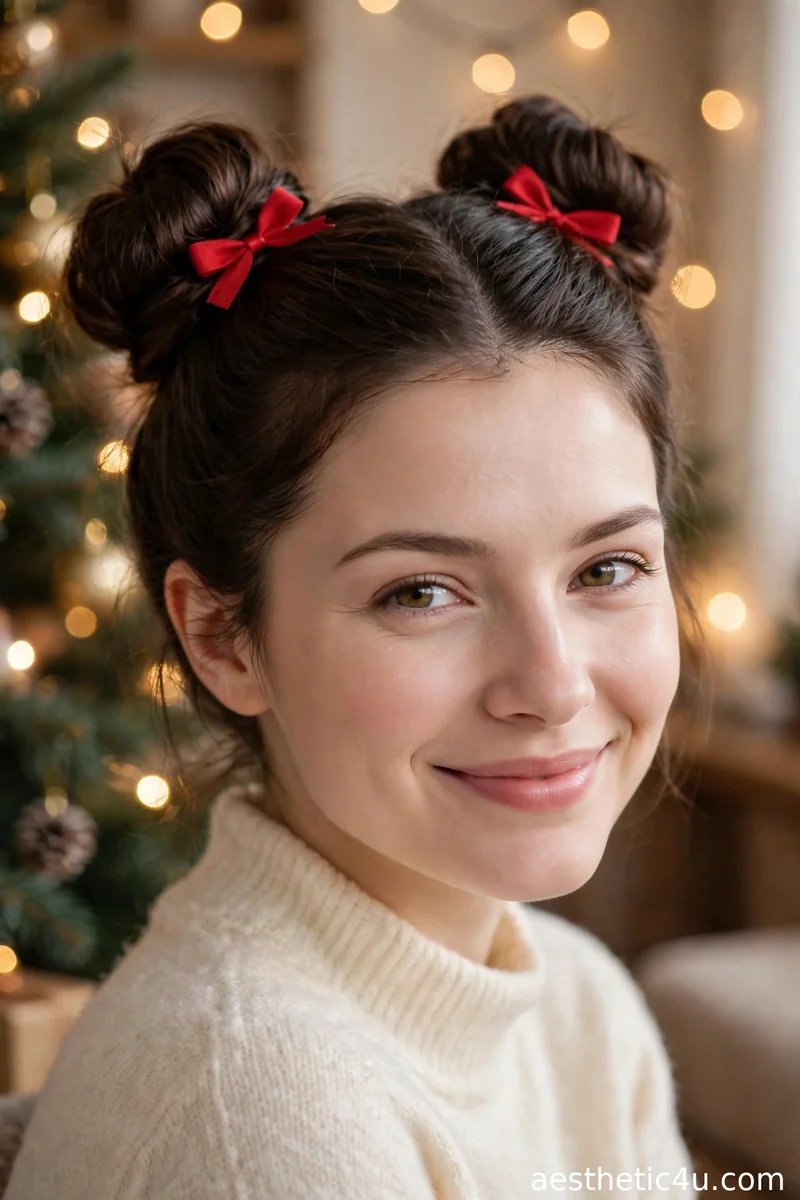
Two high space buns, each topped with a small bow – matching or mixed colors. Playful, youthful, and very festive. Part down the middle with a rat-tail comb. Twist each half into a high bun – coil the hair around its own base and pin generously, leaving the buns slightly textured rather than perfect. Clip a mini bow onto the front of each bun, positioning them symmetrically; check in the mirror, because lopsided buns are immediately obvious. Takes 15 minutes, easy to medium – matching the two buns takes one practice run. A little texturizing spray gives the buns grip.
Space buns plus bows is maximum cute, and I make no apologies for loving it. This suits round and heart faces – the height and symmetry balance softness – and works on medium to long hair. Perfect for casual holiday plans: tree decorating, Christmas movie nights. Pro tip: keep the buns slightly messy and the bows small – oversized bows on space buns tip the look from cute to costume, while minis keep it wearable for adults.
3. Satin Bow Half-Up Hairstyle
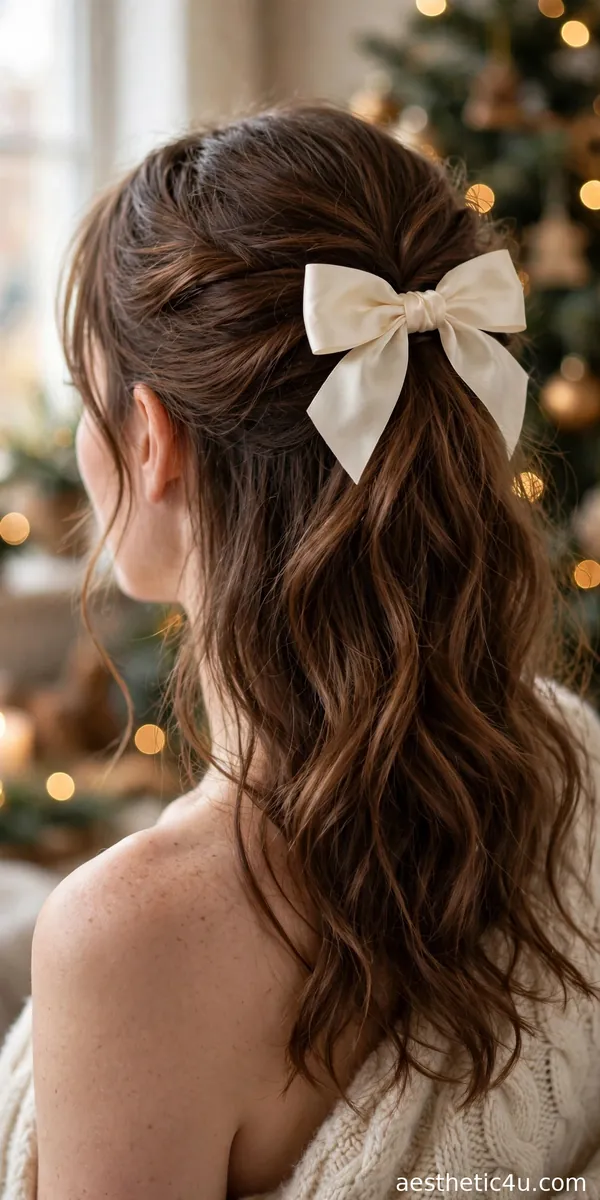
The top section of hair pulled back into a half-up style and secured with a satin bow, the rest flowing loose underneath, straight or waved. Section from temple to temple, smooth the top back with a brush, and secure at the crown with a small elastic – neat but not scraped. Clip the satin bow over the elastic, tilting it slightly. Style the loose lengths with soft waves from a 1.25-inch wand, alternating directions for natural movement. Takes 12 minutes, easy – the most forgiving bow style here, since the loose hair hides any imperfection in the sectioning.
Half-up with a bow is my most-requested holiday style, and I understand why – feminine, easy, works on almost everyone. It suits oval, round, and heart faces, and all hair types and lengths past the shoulders. The satin finish feels dressy enough for evening plans. Pro tip: choose a bow with an alligator clip rather than a barrette – it grips the elastic directly and will not slide down the loose hair underneath by midnight.
4. Velvet Bow Low Ponytail
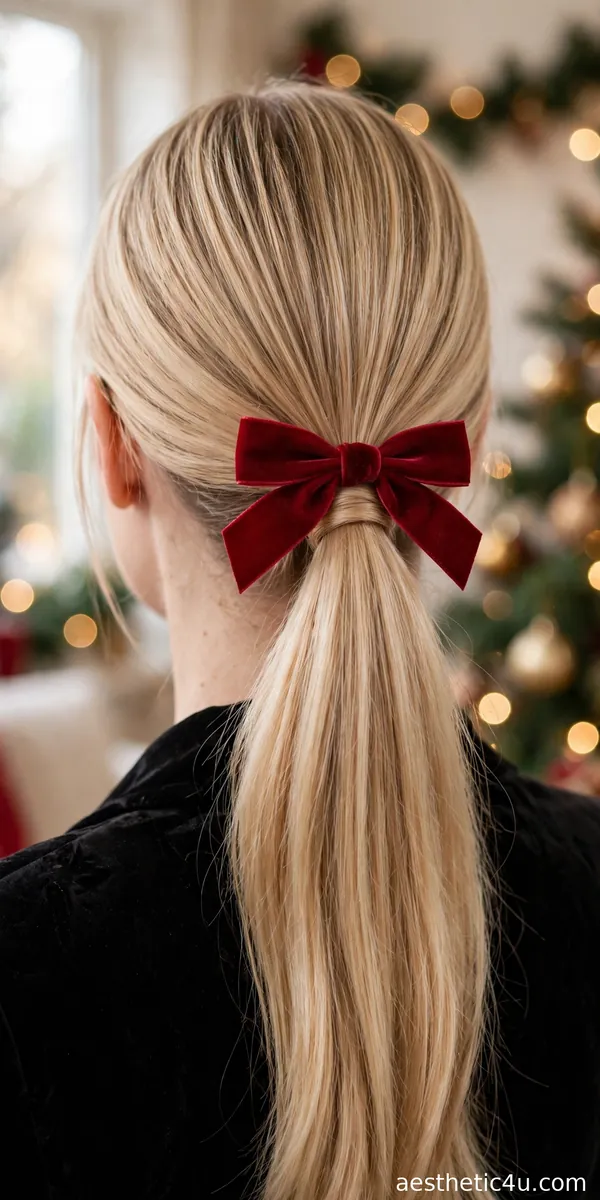
A low, polished ponytail at the nape with a medium velvet bow tied right above the elastic. Understated and elegant. Brush hair smooth with a paddle brush – a center or side part both work. Secure low with a snag-free elastic, smooth a drop of serum over the crown, then tie the velvet bow around the base, knotting it over the elastic so no hardware shows. Adjust the loops to sit evenly and let the tails drape down the pony. Takes 10 minutes, easy – the only skill is tying a neat bow, and wired ribbon makes that foolproof.
Proof that bows are not just for big statements. This one is refined – I would wear it to work holiday events or a nice dinner. It suits every face shape and is especially good on straight, fine hair that cannot support heavy accessories. Caveat: velvet shows every fingerprint, so store the bow flat and steam it if wrinkled – a creased bow reads cheap instantly.
5. Bow Clip on Side-Swept Waves
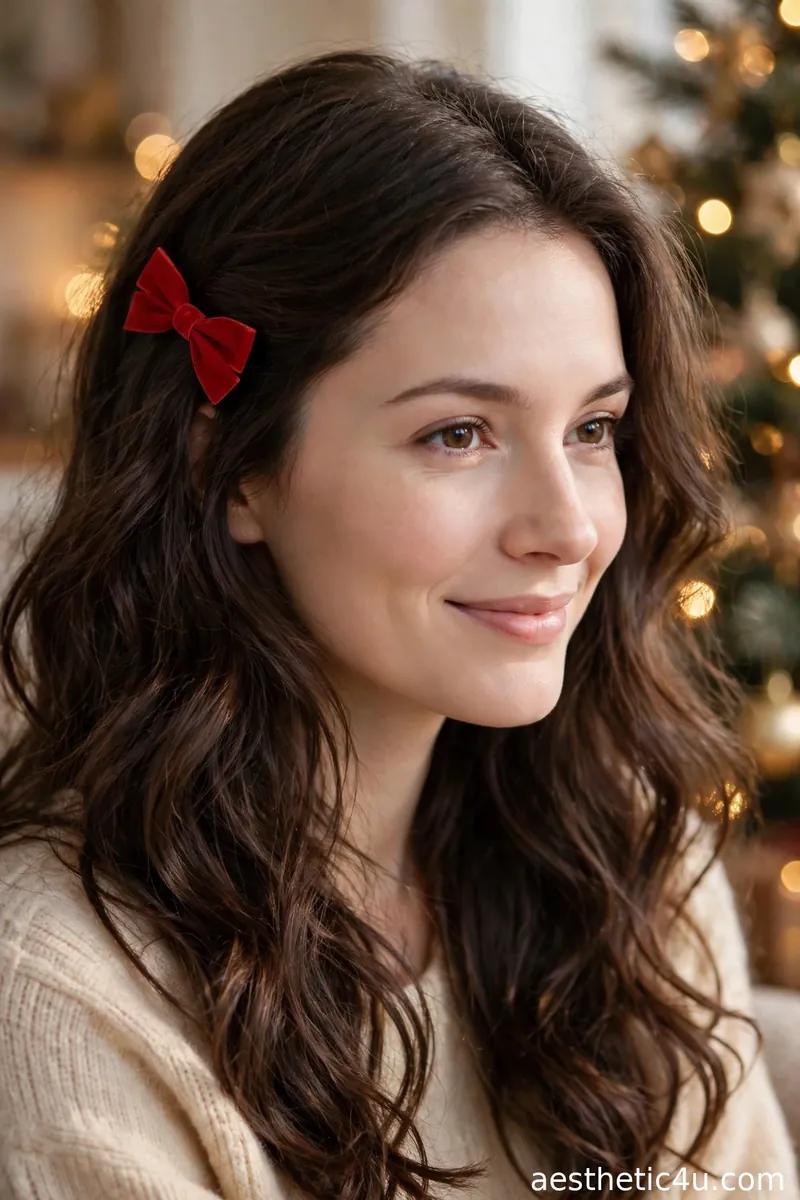
Loose waves swept to one side, with a bow clip pinning back the heavier side – the bow sits just above the ear like jewelry. Curl all the hair with a 1.25-inch iron, alternating directions, then brush through for softness. Create a deep side part and sweep everything over. Gather the heavier side loosely behind the ear and clip the bow barrette over the tucked section, letting a few face pieces fall free in front. Takes 15 minutes, easy – curl, sweep, clip, done. A flexible-hold spray keeps the waves touchable.
The easiest bow hairstyle on the list. I love how it dresses up simple waves for a party, and it is brilliant for growing-out bangs or layers – the bow pins back exactly the pieces that misbehave. It suits oval and heart faces, softening a wide forehead. Pro tip: place the bow on the side with more hair volume, not less – it needs hair to grip, and on the thin side it slides toward your ear by dessert.
Keep exploring: 18 Christmas Hairstyles for Work That Mean Business (and Festive)
6. Giant Tulle Bow on a Top Knot
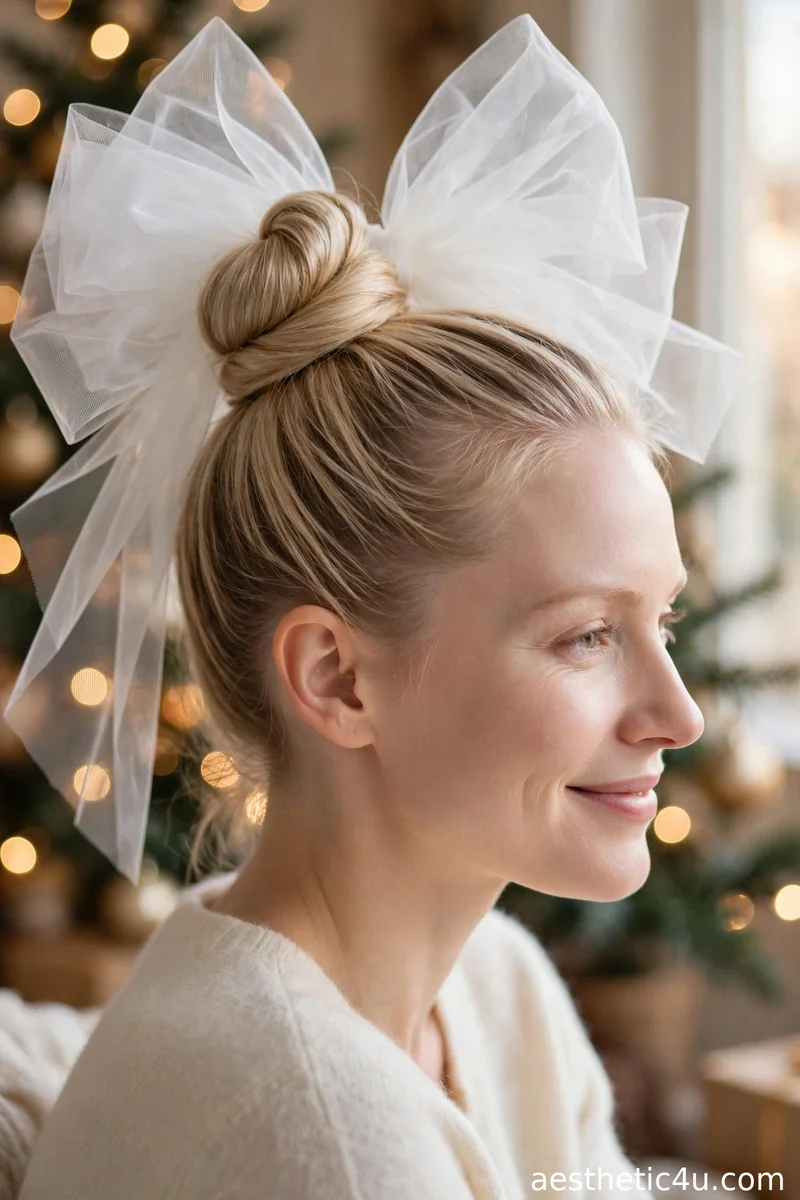
A sleek top knot with an enormous tulle bow perched on top or behind it – the sheer tulle looks like a gift-wrapping bow come to life. Pull hair into a tight, smooth high pony, twist into a neat knot, and pin flat – the knot should be compact so the bow dominates. Position the tulle bow behind or atop the knot, securing with its clip plus two crossed bobby pins for insurance. Arrange the tulle loops so they stand out rather than collapse. Takes 15 minutes, easy – the knot is basic, and the bow arrives pre-made.
A statement, and I mean that as a compliment. The tulle keeps it light and airy despite the size and weighs almost nothing. Wear it when you want to be the most festive person in the room. It suits oval and long faces. Caveat: tulle snags on everything – wool coats, jewelry, tree branches – so put the bow on last, after your coat is settled, and carry it in a bag rather than wearing it in the car.
7. Bow Barrette on a Sleek Low Bun
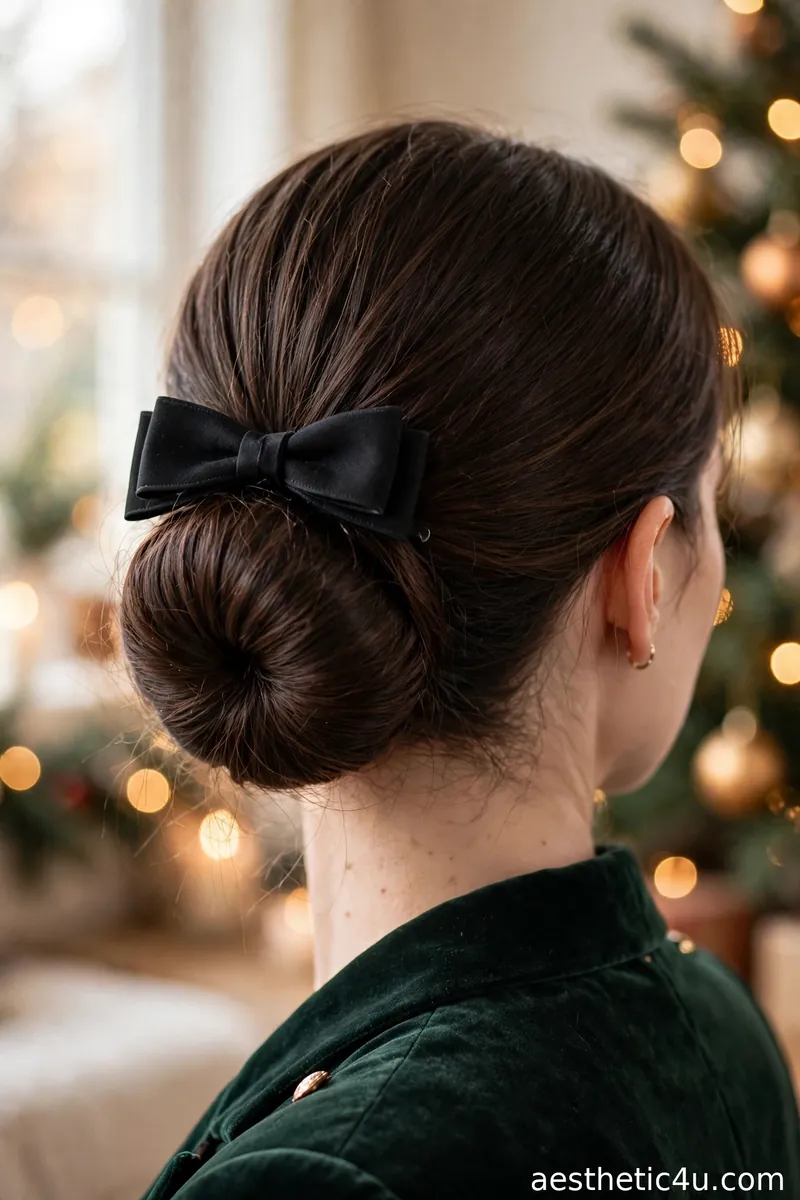
A smooth, polished low bun with a structured bow barrette clipped just above or to the side of the bun. Classic and clean. Brush hair back sleekly – no part, or a clean center part – and twist into a low bun at the nape, pinning until completely smooth. Tame flyaways with a toothbrush and a drop of gel along the hairline. Clip the structured bow barrette just above the bun, centered or slightly to one side. Takes 15 minutes, easy to medium – the bun must be genuinely smooth, since sleekness is the whole contrast that makes this work.
The low bun does the elegance, the bow does the Christmas. I think this is the most sophisticated bow look here – perfect for formal dinners or a holiday wedding. It suits oval and square faces, the low line calming strong features. Pro tip: a structured, tailored bow (not floppy ribbon) is what keeps this grown-up – save the soft, oversized bows for casual styles and keep this one crisp.
8. Double French Braids with Matching Bows
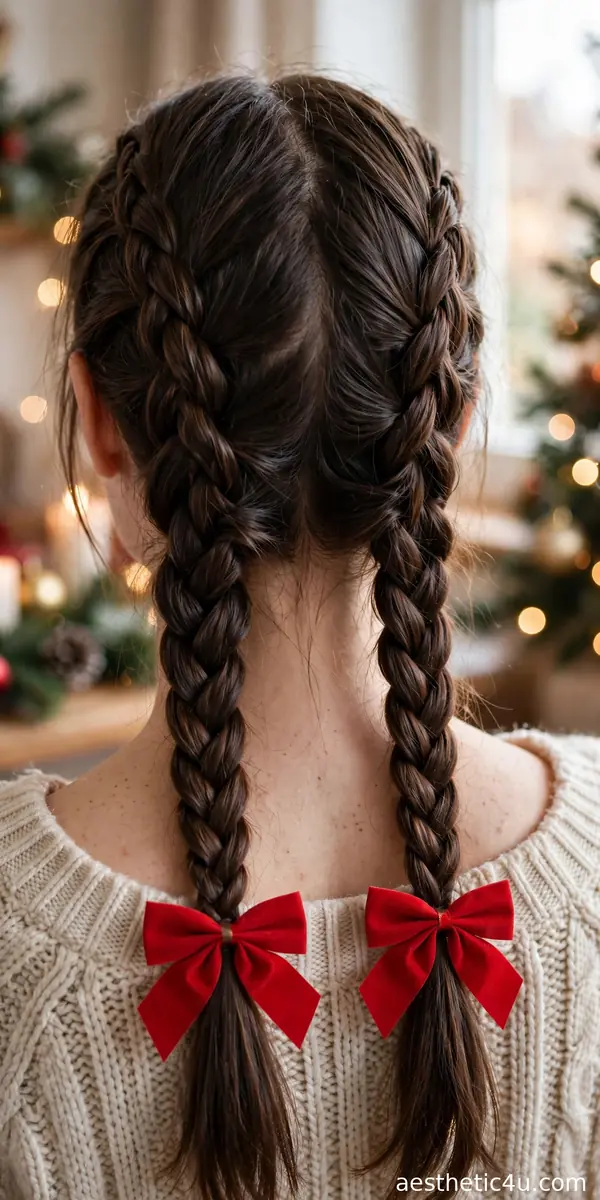
Two neat French braids down the back, each tied off with a matching bow at the end – the bows replace plain elastics for instant charm. Part cleanly down the middle. French braid each side from the hairline to the nape, then continue as a regular three-strand down the length. Tie off with a small elastic, then tie a matching bow over each elastic – wired ribbon holds the bow shape through the day. Keep braids sleek and close to the scalp. Takes 20 minutes, medium – two symmetrical braids are the challenge, not the bows.
Matching bows on braids will never not be cute. I love this for daytime holiday plans – sweet without being childish when the braids stay sleek. Red bows on dark hair is my favorite combo; the contrast is striking. It suits younger faces and heart shapes. Caveat: this reads youngest of all the bow styles, so for evening events, keep the braids tight and the bows small – scale is what separates festive from juvenile here.
9. Bow Headband with Loose Curls
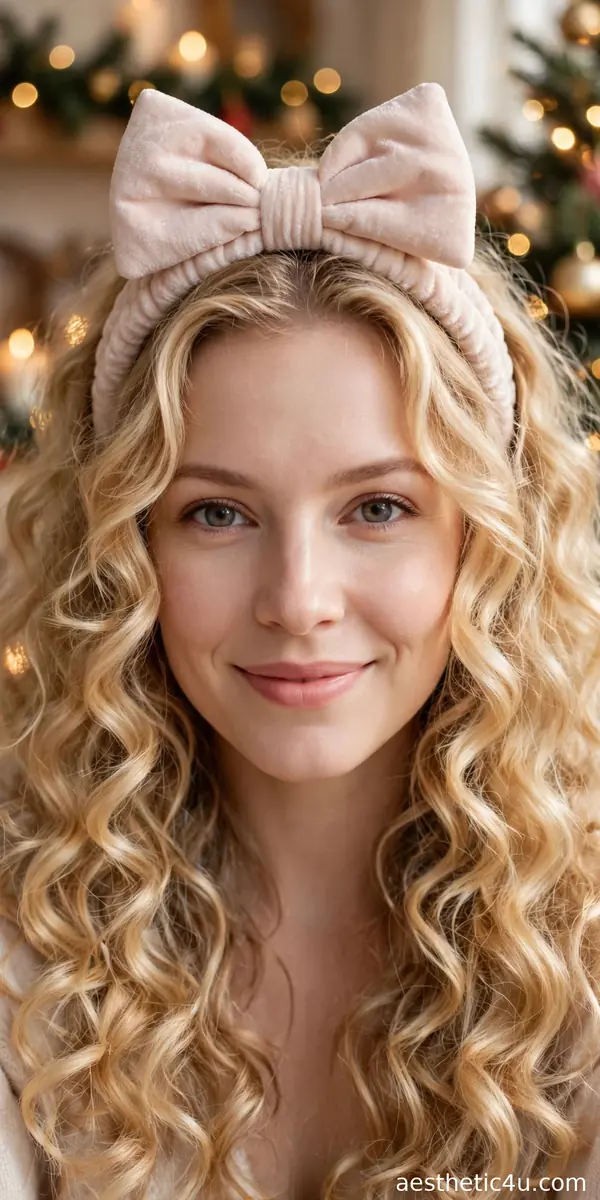
A padded bow headband worn over loose, bouncy curls, the bow sitting at the top of the head like a crown. Curl all the hair with a 1.25-inch iron for bounce, brush through lightly, and set the part where you want it. Slide the headband on about an inch behind the hairline – not right at it, which looks costumey – and let the curls fall naturally around it. Arrange a few front pieces over the band’s sides to blend it in. Takes 12 minutes plus curling, easy – the fastest transformation on this list.
Curl your hair, pop on the headband, done – I keep one of these in my December emergency kit. It saves bad hair days like nothing else and suits every face shape, since the curls do the framing. Pro tip: padded headbands slip on silky hair, so mist texturizing spray at the roots first, or choose a band with a velvet underside – the texture grips and it stays put through an entire evening.
10. Mini Bow Accents in a Fishtail Braid
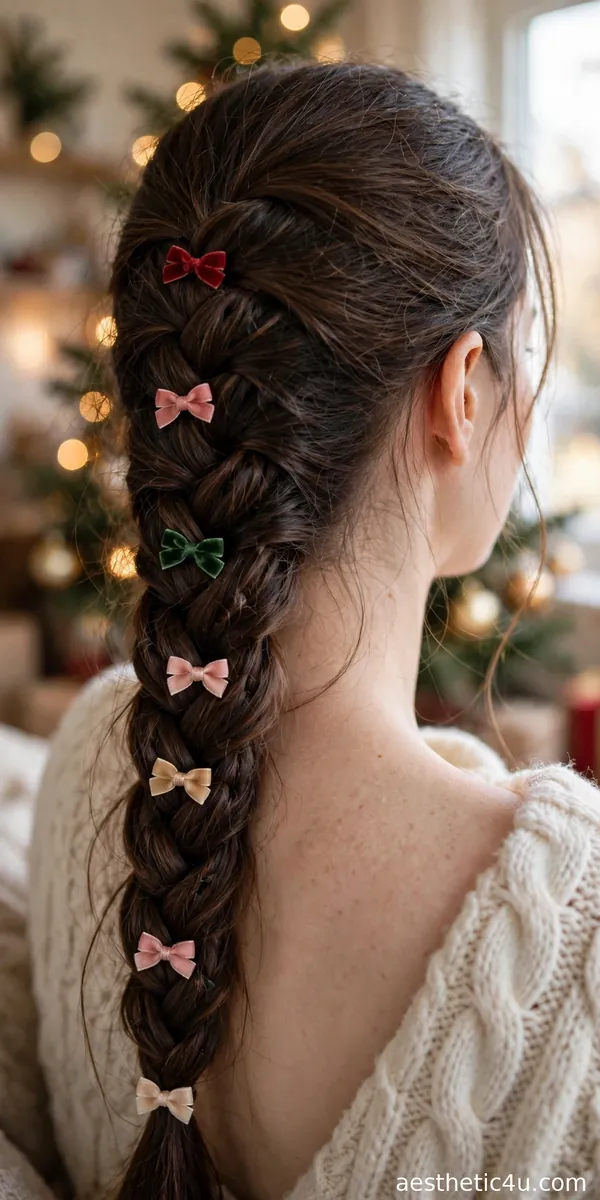
A loose fishtail braid dotted with several tiny bow clips down its length. Delicate, detailed, and very pretty. Braid a loose fishtail over one shoulder – two sections, crossing thin strands alternately – and pancake it gently for width. Tie off with a clear elastic. Clip 4 to 6 mini bow clips along the braid’s edges at even intervals, alternating sides for balance. Keep the clips small; they should read as jewelry, not hardware. Takes 18 minutes, medium – the fishtail is the time investment, and placing clips evenly takes an eye for spacing.
Multiple mini bows feel more modern than one big bow, in my opinion – they turn a simple braid into something special. This one gets compliments from people who notice details. It suits oval and heart faces and needs medium to long hair. Caveat: mini clips have tiny teeth that catch and snap fine hair – open them fully before sliding in, and never yank one out; unclip gently or you will take hairs with it.
Keep exploring: 26 Christmas Hairstyles for Long Hair That Show Off Every Inch
11. Bow on a Bubble Ponytail
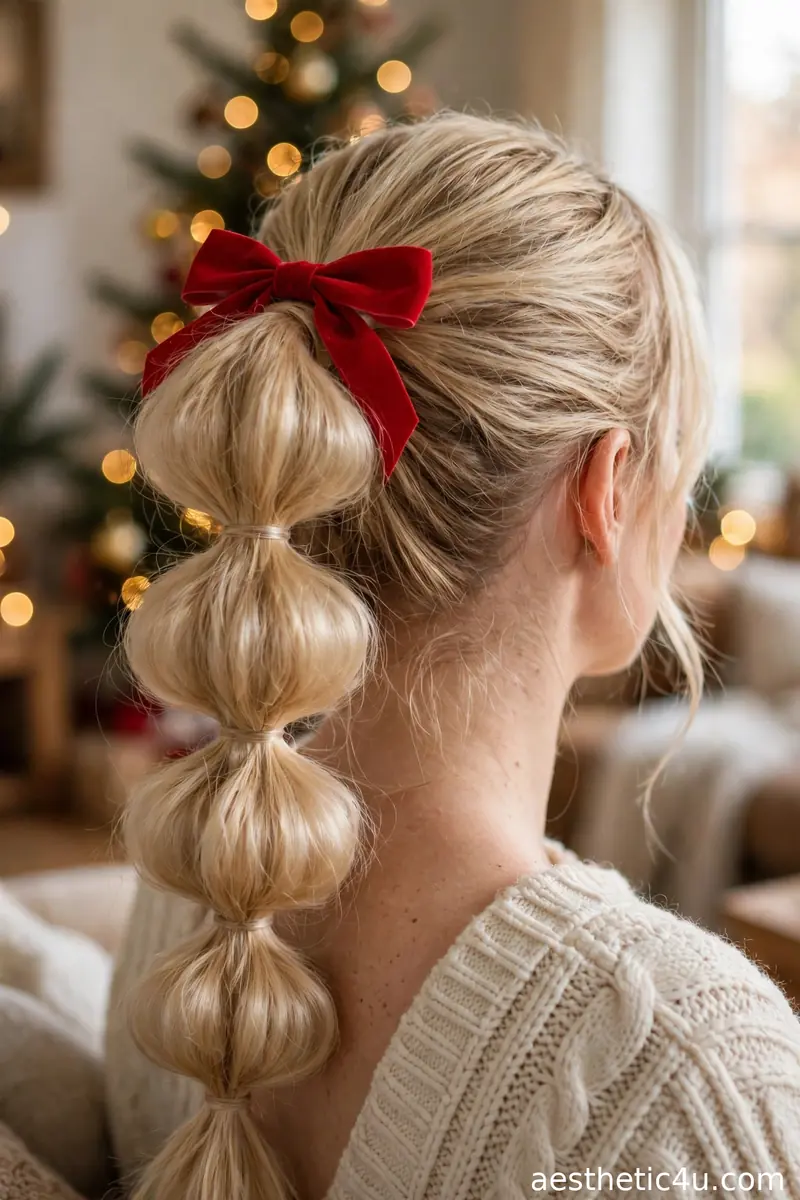
A bubble ponytail – sectioned and puffed with elastics – with a bow tied at the base where the pony starts. Fun shape meets festive finish. Secure a high pony, place elastics every 2 to 3 inches, and puff each section outward with your fingertips. Tie a medium velvet or satin bow around the base elastic, knotting it snugly so it does not rotate. The bow should be proportional – medium, not oversized, or it fights the bubbles for attention. Takes 12 minutes, easy. A light mist of flexible-hold spray keeps the bubbles inflated.
Bubble ponytails are already playful, and the bow leans right into it. I think this is adorable at any age with a chic velvet bow – the fabric choice is what keeps it grown-up. It suits round and oval faces, the vertical line elongating. Great for parties. Pro tip: tie the bow after puffing the bubbles, not before – the base shifts as you pull sections outward, and a pre-tied bow ends up crooked every time.
12. Ribbon Bow Tied at the Nape
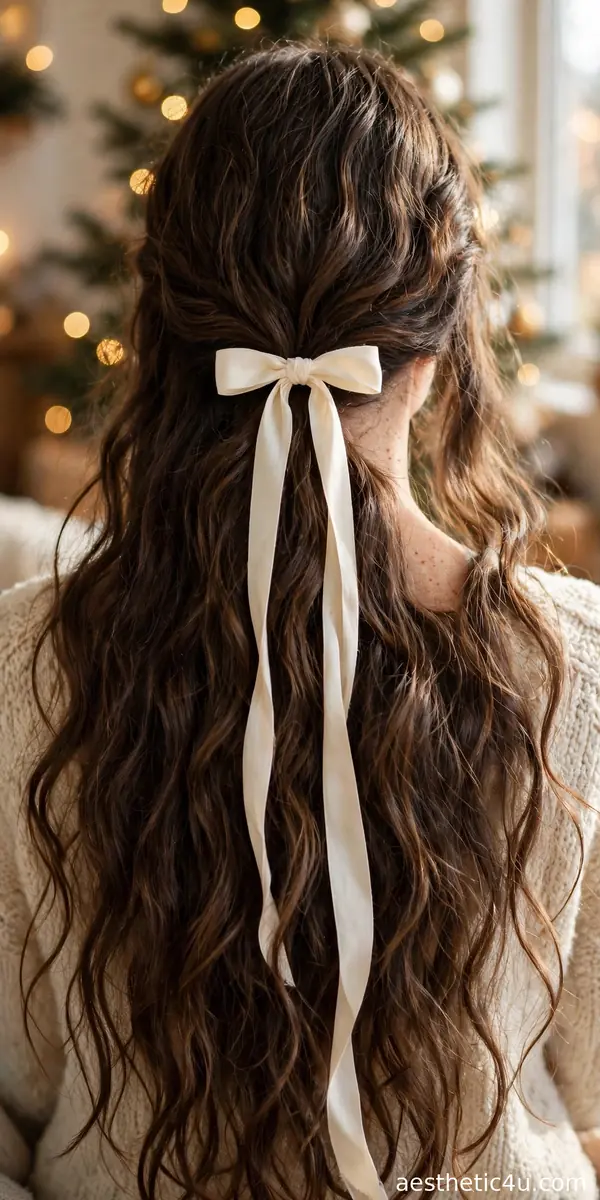
Hair worn down or in a low style, with a simple ribbon tied in a bow at the nape of the neck – the ribbon ends trailing softly down the back. Style the hair simply: smooth blowout, loose waves, or a low pony. Take a 1.5-inch-wide ribbon about a yard long, wrap it around the hair at the nape, and tie a classic bow, letting the ends hang to mid-back. Satin or velvet both work; wired ribbon holds the loops best. Takes 5 minutes on already-styled hair, easy – the simplest and one of the most romantic bows here.
There is something so romantic about a bow at the nape – a surprise detail people notice when you turn around. I love this with a low neckline or an updo; simple, but unforgettable. It suits every face shape since the hair itself is barely styled. Caveat: ribbon slides on silky hair – tie the bow over a small clear elastic already in the hair, not on loose hair alone, or it migrates by hour two.
13. Twin Bows on Low Pigtails
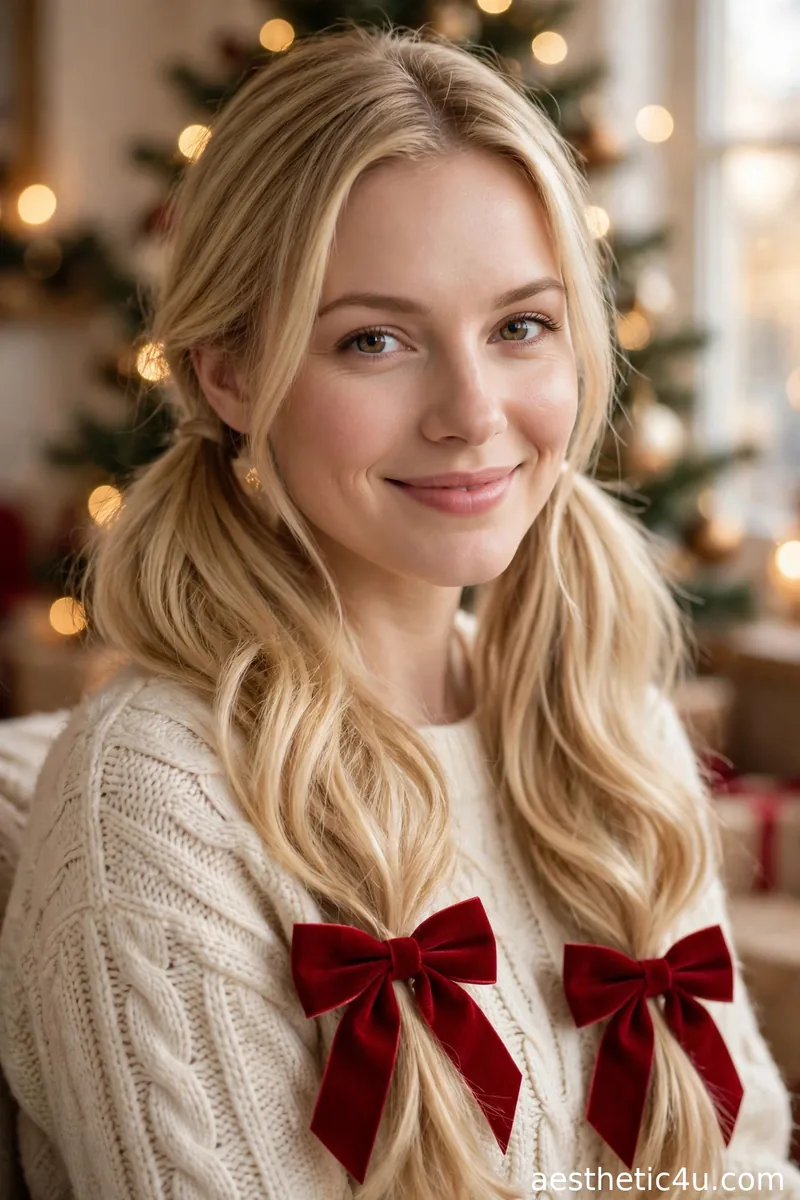
Two low pigtails, each secured with a bow instead of a plain elastic – the bows can match or contrast. Part down the middle, gather each side into a low pigtail behind the ears, and secure with small elastics. Tie a bow over each elastic, keeping them the same size and height – symmetry matters here. Leave the tails straight or wave them loosely; slightly loose and textured beats super tight. Takes 10 minutes, easy. A little texturizing spray through the tails keeps them from looking flat.
Low pigtails with bows are sweet and a little nostalgic. I think they look best slightly loose and textured rather than scraped tight – that is what keeps them chic instead of childish. A cute pick for casual Christmas outings. Pro tip: position the pigtails slightly back, not directly at the sides – side placement widens the face visually, while a back-set pair keeps the silhouette slim and grown-up.
14. Velvet Bow with a French Twist
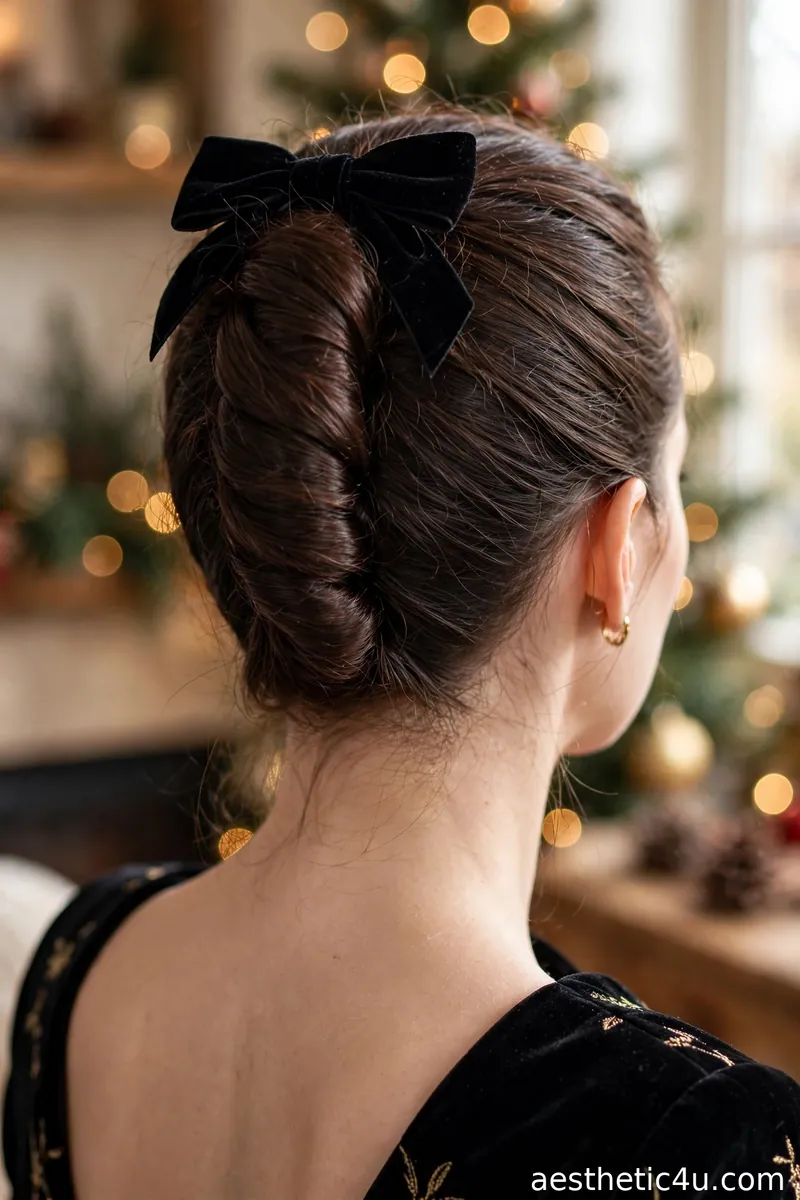
A classic French twist – hair swept up and tucked into a vertical roll – with a velvet bow pinned where the twist meets the head. Old Hollywood meets holiday. Gather hair to one side, twist upward, and tuck the ends into the roll, pinning along the seam with bobby pins. Smooth with a brush and serum. Pin the velvet bow vertically where the roll meets the scalp – two pins through its backing stop drooping. Takes 20 minutes, medium to hard – the twist is the skill; the bow is the reward.
The French twist is already the most elegant updo, and the bow makes it Christmas. I would wear this to the fanciest event of the season – it looks like you hired a stylist, even if you did it yourself. It suits oval and long faces beautifully. Caveat: French twists loosen on very silky or freshly washed hair, so build this on second-day hair with texturizing spray, and pin the seam generously – skimping on pins is why twists collapse.
15. Bow on Top of a Messy Bun
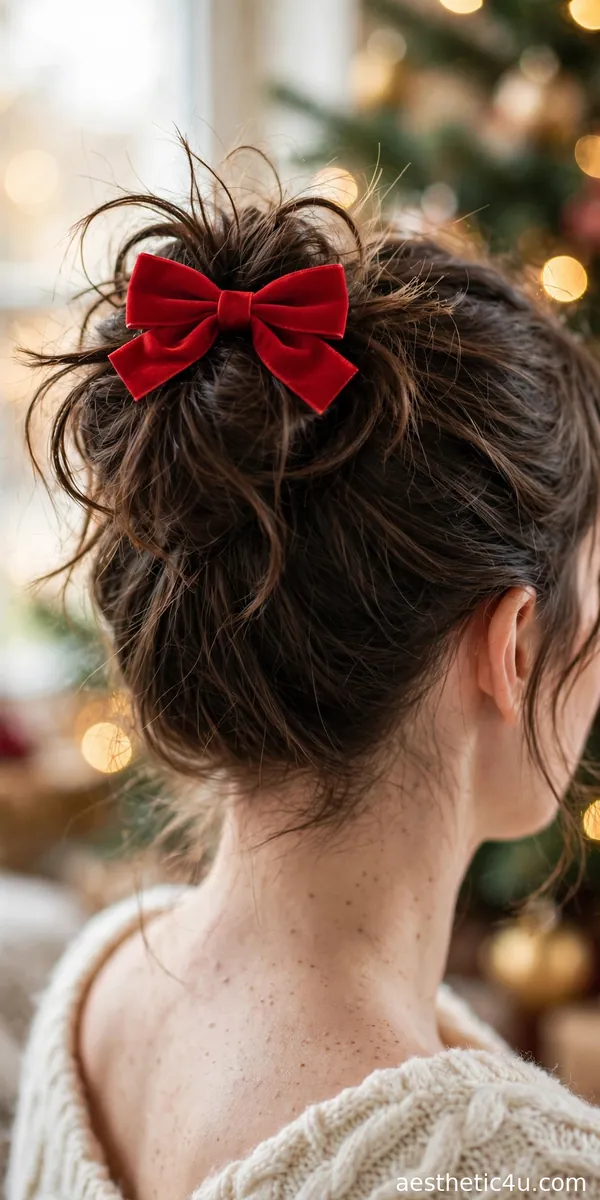
A relaxed, textured messy bun with a bow clipped right on top of it – the contrast between undone hair and the neat bow is the whole charm. Gather hair into a loose high pony, twist loosely, wrap into a bun, and pin – deliberately imperfect. Pull pieces free around the face and at the crown, and tug the bun’s edges for airiness. Clip the bow onto the front-top of the bun, angling it slightly. Takes 10 minutes, easy – the messier the bun, the better the contrast, so perfectionists should practice letting go.
My lazy-girl holiday hack: messy bun, add bow, look festive. I am serious – it works every time. The bow elevates the mess into a style. Keep one in your bag all December. It suits every face shape, and the pulled-free pieces do the framing work. Pro tip: clip the bow after texturizing, not before – hairspray misted over a fabric bow dulls it, so style first, spray lightly, then add the bow as the final step.
Keep exploring: 22 Christmas Hairstyles for Short Hair That Prove Less Is More
16. Satin Bow on a Side Braid
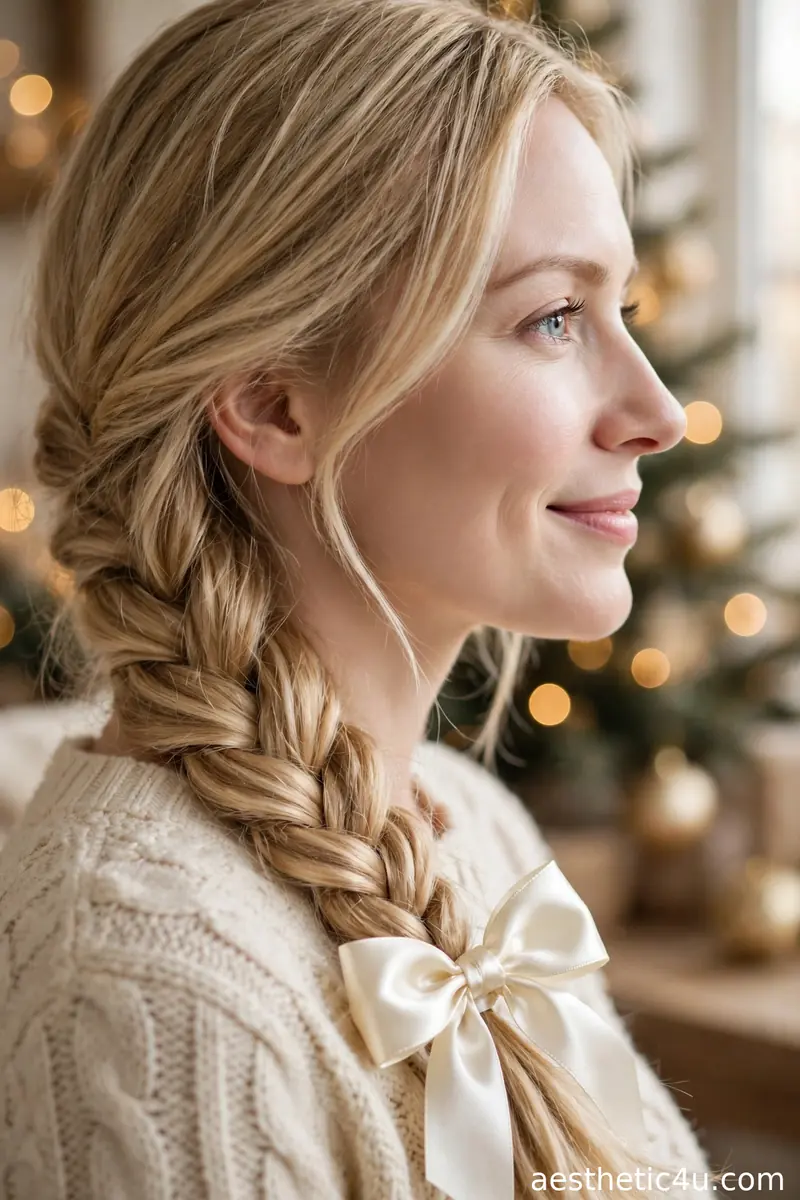
A loose side braid finished with a satin bow tied at the end – the shiny satin against the textured braid is a lovely contrast. Sweep hair over one shoulder and braid loosely, three-strand or fishtail, keeping tension relaxed. Pancake the braid gently for fullness. Tie off with a small elastic, then tie the satin bow over the elastic, letting the tails drape along the braid. Takes 12 minutes, easy – the looseness forgives every imperfection. A spritz of flexible-hold spray keeps the pancaked shape.
Side braids are endlessly wearable, and the bow gives this one its holiday credentials. I like it a little messy and pancaked for softness – the kind of style that looks good in every photo. It suits round and square faces, the diagonal softening width. Caveat: satin ribbon unties itself on the move, so double-knot the bow and tuck the knot under a loop – or use wired satin, which holds its shape and stays tied.
17. Oversized Bow on a Sleek Bob
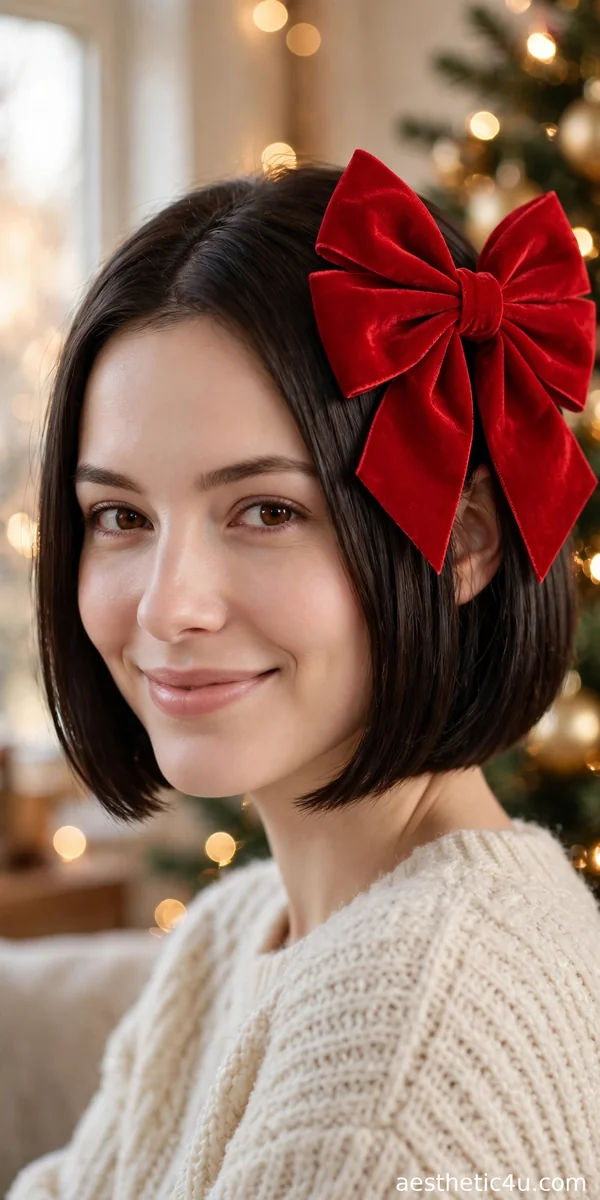
A sharp, straight bob with one oversized bow clipped at the side or back – the sleek hair makes the bow pop even more. Flat iron the bob pin-straight in thin sections, tucking the ends under slightly. Smooth serum through the lengths for glass. Clip the oversized bow at the side above the ear, or at the back for a surprise detail – press the clip firmly into the sleek hair and anchor with a bobby pin behind it, since clips slide on straightened hair. Takes 15 minutes including straightening, easy.
Short hair girls, this one is for you – bows are not just for long hair. Short hair girls, this one is for you – bows are not just for long hair. The blunt-bob-meets-big-bow contrast is striking; I think this is the chicest bow look here, and it suits oval and heart faces. Pro tip: scale matters most on short hair – when in doubt, go one size smaller than your instinct.
18. Bow on a Braided Crown
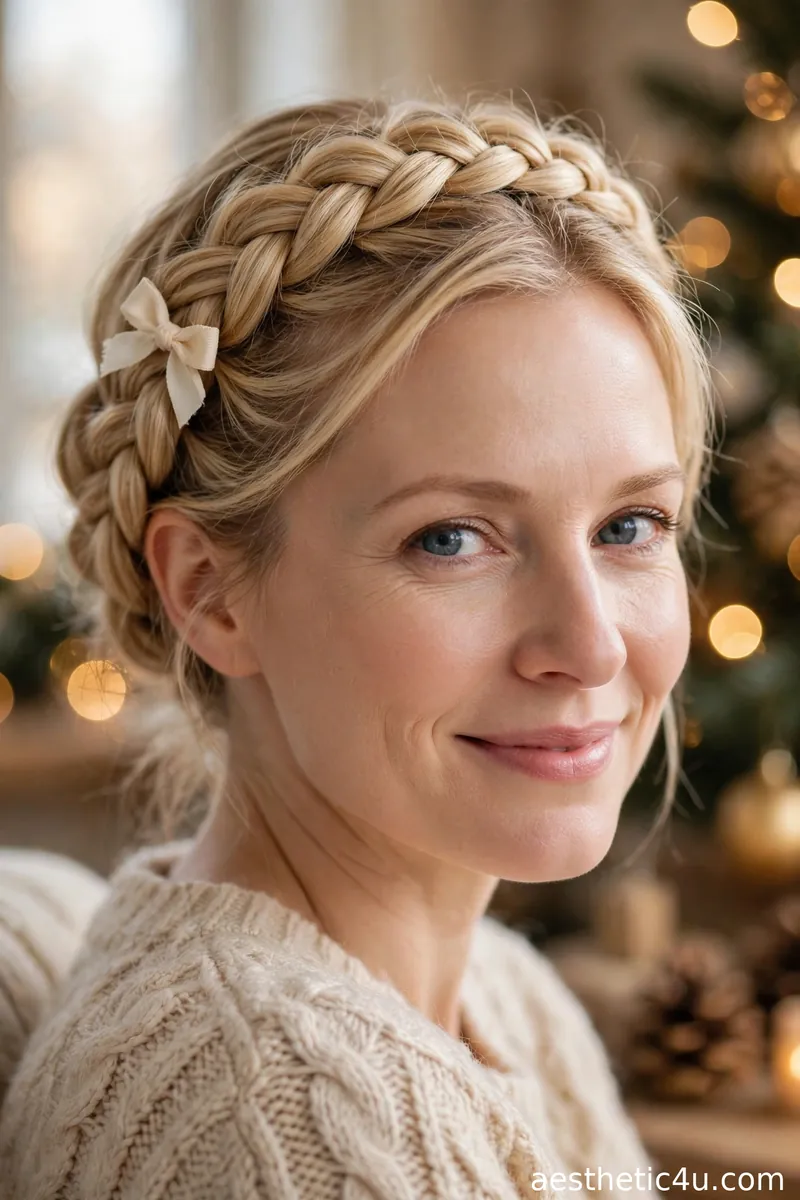
A braided crown circling the head, with a bow pinned at the side or back where the braid ends meet. Regal with a festive twist. Dutch braid around the head from one temple, adding hair as you circle, and pin the tail under the braid’s start. The bow marks the join – pin it exactly where the ends meet, which both decorates and hides the seam. Takes 25 to 30 minutes, hard – the crown braid is the technical part; placing the bow takes seconds. Check the back with a hand mirror before finishing.
The braided crown is already gorgeous, and the bow marks the spot where it all comes together. I love this for Christmas Day – it stays put through cooking, hosting, and hugging everyone. It suits oval and long faces. Caveat: crown braids are heavy and can slide on silky hair, so build on textured, second-day hair and pin the bow through the braid itself – not just surface hair – or the weight pulls it loose.
19. Layered Ribbon Bow on a Low Chignon
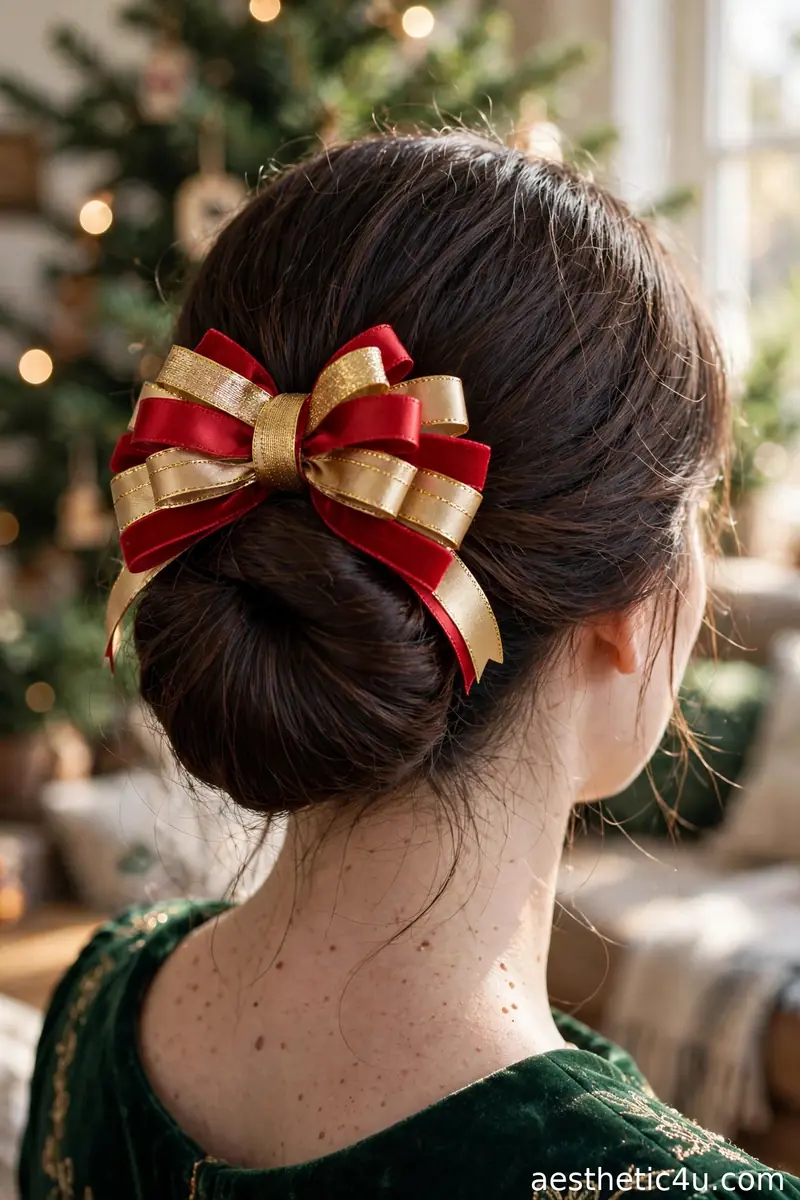
A smooth low chignon with a bow made from layered ribbons – two or three ribbons in different widths or shades stacked together. Rich and dimensional. Build a neat low chignon: twist hair into a low bun and pin smooth. Stack your ribbons – say, a wide velvet under a narrow satin – tie them into one bow, and pin the layered bow above or to the side of the chignon. Mix textures deliberately: velvet with satin, or red with gold. Takes 18 minutes, medium – the chignon needs smoothness; the bow just needs stacking.
Layering ribbons is my favorite bow trick – it looks custom and expensive, like something from a boutique. Mix velvet with satin, or red with gold. This is the bow for someone who loves the details. It suits oval and square faces. Pro tip: keep the palette to two colors maximum – three or more ribbons in different colors reads crafty rather than chic, while two tones look intentional and rich.
20. Bow Clips Scattered Through Beach Waves
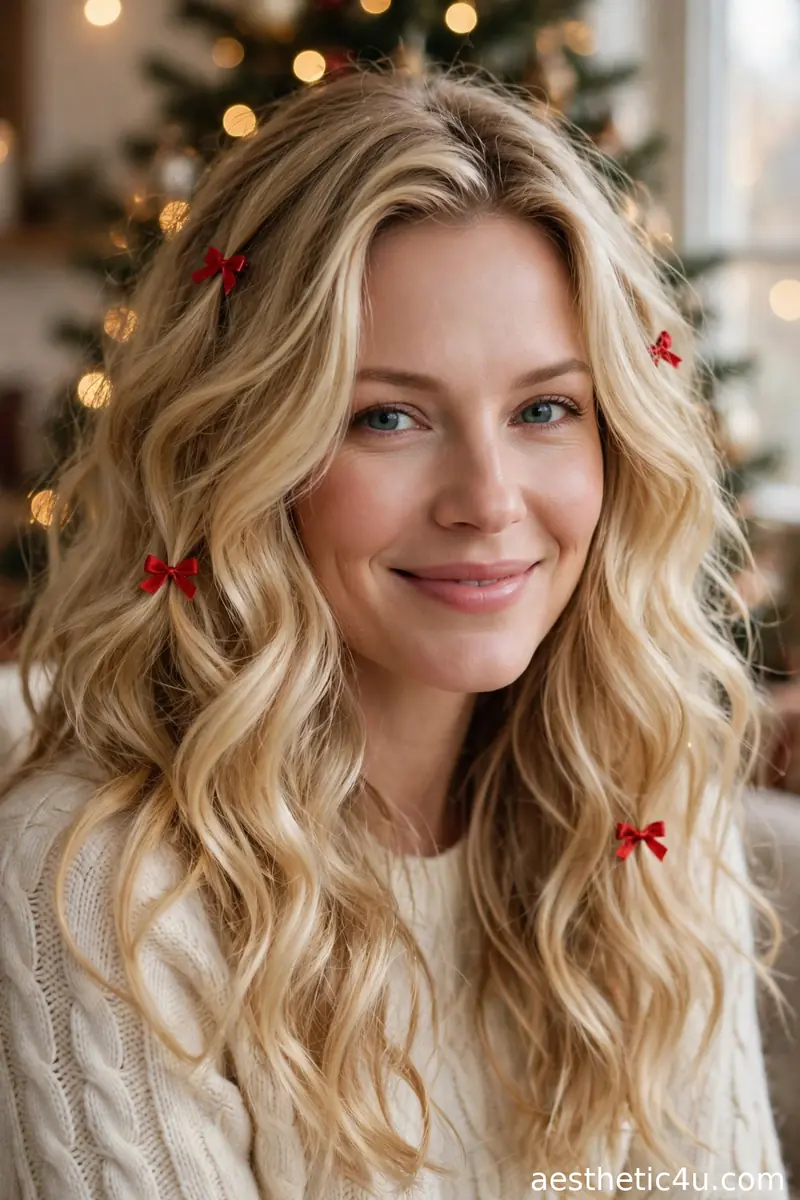
Loose, undone beach waves with three or four small bow clips scattered randomly through the hair. Effortless with a festive sprinkle. Wave all the hair with a 1.25-inch wand, alternating directions, and rake through with fingers – no brushing, which kills the texture. Clip the mini bows at random: one near the crown, one mid-length on each side, one lower – asymmetry is the point, so do not overthink placement. Takes 15 minutes, easy – the randomness means there is no wrong answer.
The “I woke up like this, but make it Christmas” look. I love it for Christmas morning when you want to look cute with zero effort. It suits every face shape and all hair types with some wave. Caveat: scattered clips migrate – check the back before photos, because one bow always ends up hiding behind your ear. A tiny dot of texturizing spray where each clip sits gives the teeth something to grip.
Keep exploring: 24 Christmas Hairstyles for Medium Hair That Hit the Sweet Spot
21. Statement Bow with a Slicked-Back Ponytail
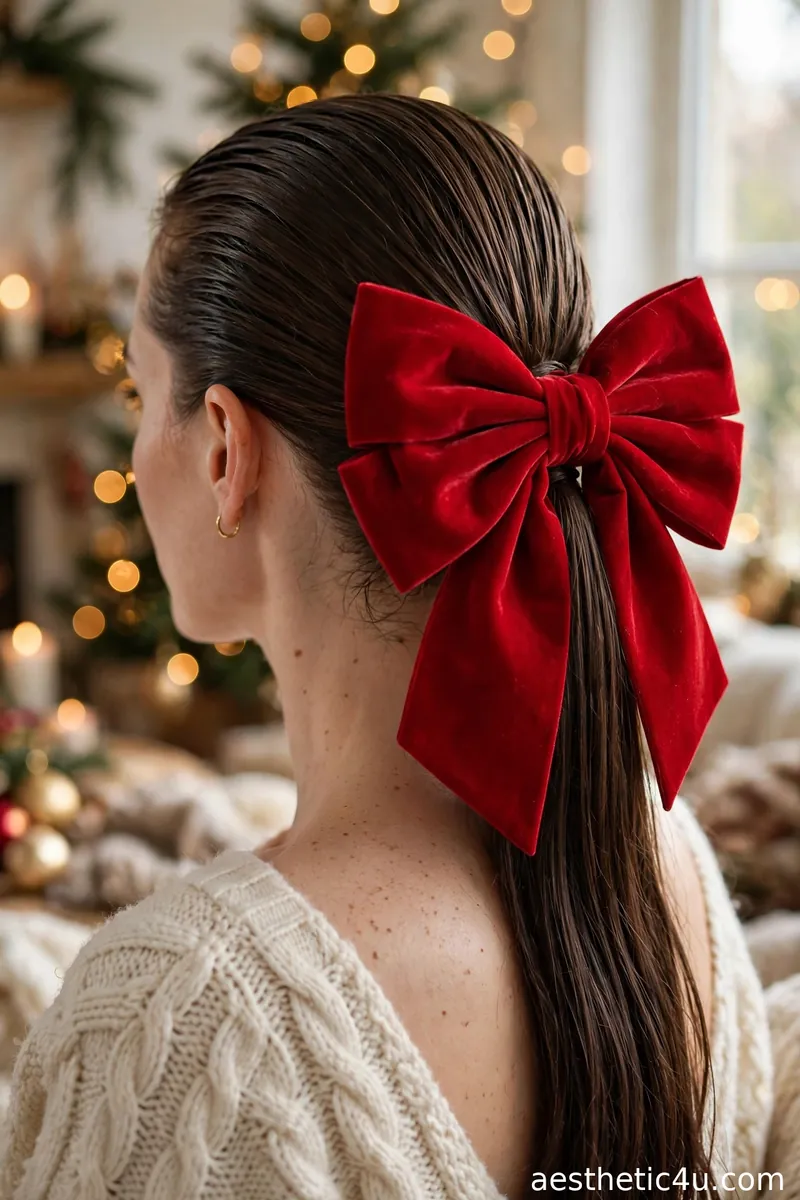
Hair slicked straight back into a tight ponytail, finished with one dramatic statement bow – oversized, structured, impossible to miss. Work strong-hold gel through damp roots, comb straight back with a fine-tooth comb, and secure into a tight mid-height pony. Flat iron the tail straight. Attach the structured statement bow over the elastic, anchoring with crossed bobby pins – at this scale, the clip alone will not hold. Takes 15 minutes, easy – the sleek base is simple; the bow is pre-made drama.
Ending with a bang: sleek meets statement. I would wear this with a bold lip to the biggest party of the season – you will be remembered. It suits oval and heart faces with strong bone structure. Pro tip: a structured bow (with interfacing or wire) is non-negotiable at this size – a floppy oversized bow collapses and looks sad within the hour, while a structured one holds its architecture all night.
How to Choose the Right Bow Hairstyle for You
Start with your hair length, because bow scale must match it. Long hair carries oversized bows beautifully; medium hair suits medium bows; short hair and bobs need careful scaling – one size smaller than your instinct, or the bow wears you. Next, consider fabric. Velvet reads luxe and seasonal, perfect for evenings. Satin reads polished and classic, good for work events. Tulle and organza read playful and dramatic – save them for parties. Structured bows look expensive; floppy ribbon bows look homemade unless tied perfectly. Then match the style to the occasion and your comfort level. Formal events want sleek hair with one refined bow – low buns, French twists, polished ponies. Casual plans allow playful – space buns, pigtails, scattered minis. And be honest about your morning: if you have ten minutes, choose clip-on bows over tied ribbons, and pre-made bows over DIY. My stylist rule: the hair underneath must look intentional – sleek or deliberately textured. A beautiful bow on messy, unstyled hair just looks like you found a bow, not like you styled a look.
Styling Tips & Common Mistakes to Avoid
First: anchor every bow. Clips alone slide – add a bobby pin through the bow’s backing, crossed with another, and it will survive the night. Second: match the bow’s undertone to your outfit – warm reds and golds with warm clothes, silver and emerald with cool ones – and the look appears styled rather than random. Third: place bows with intention. Side placement slims, top placement adds height, back placement surprises. Fourth: steam wrinkled ribbon bows before wearing – a quick blast from a kettle reshapes wired ribbon, and a creased bow is the fastest way to look cheap. The mistakes: choosing a bow too big for your hair – scale it to your length, or it wears you. Second: tying bows on freshly washed, silky hair, where everything slides – texturizing spray at the anchor point fixes this instantly. Third: over-accessorizing. One bow is a statement; a bow plus pearl pins plus glitter clips is a craft project. Let the bow be the star – that was the rule from the start, and it still holds.
Final Thoughts
Bows are the easiest win of the holiday season – one clip and any hairstyle becomes Christmas-ready. Whether you go oversized velvet or scattered minis, there is a bow look here with your name on it. My advice: invest in three good bows – one velvet, one satin, one statement – learn one five-minute style and one polished style, and keep a mini bow in your bag all December for emergencies. Tie one on, check it in the mirror from every angle, and enjoy every compliment.
Follow Us On Pinterest: Easy To Find Next Style