Sana
Some Christmas parties call for elegance. Others call for a Christmas tree on your head. This list is for the second kind. Every December, searches for crazy Christmas hairstyles explode as party season hits – ugly sweater contests, themed office parties, TikTok challenges – and the looks that win are the ones with real commitment behind them. These 26 styles are bold, silly, and absolutely unforgettable: the kind that star in every group photo and get remembered long after the party ends.
Do not worry – crazy does not mean sloppy. Every style here is done well, with real technique behind the fun, and I have included honest difficulty ratings, timing, and removal notes for each one, because glitter is genuinely forever if you remove it wrong. You will learn which statement styles suit your hair length and texture, how to build them so they survive a whole party, and how to take everything out without damaging your hair. My stylist philosophy for novelty hair: commit fully or do not bother. Half a Christmas tree braid just looks confused – full commitment looks legendary.
Go big, have fun, and own it completely. That is the whole secret – and the only rule that matters.
1. Christmas Tree Braid
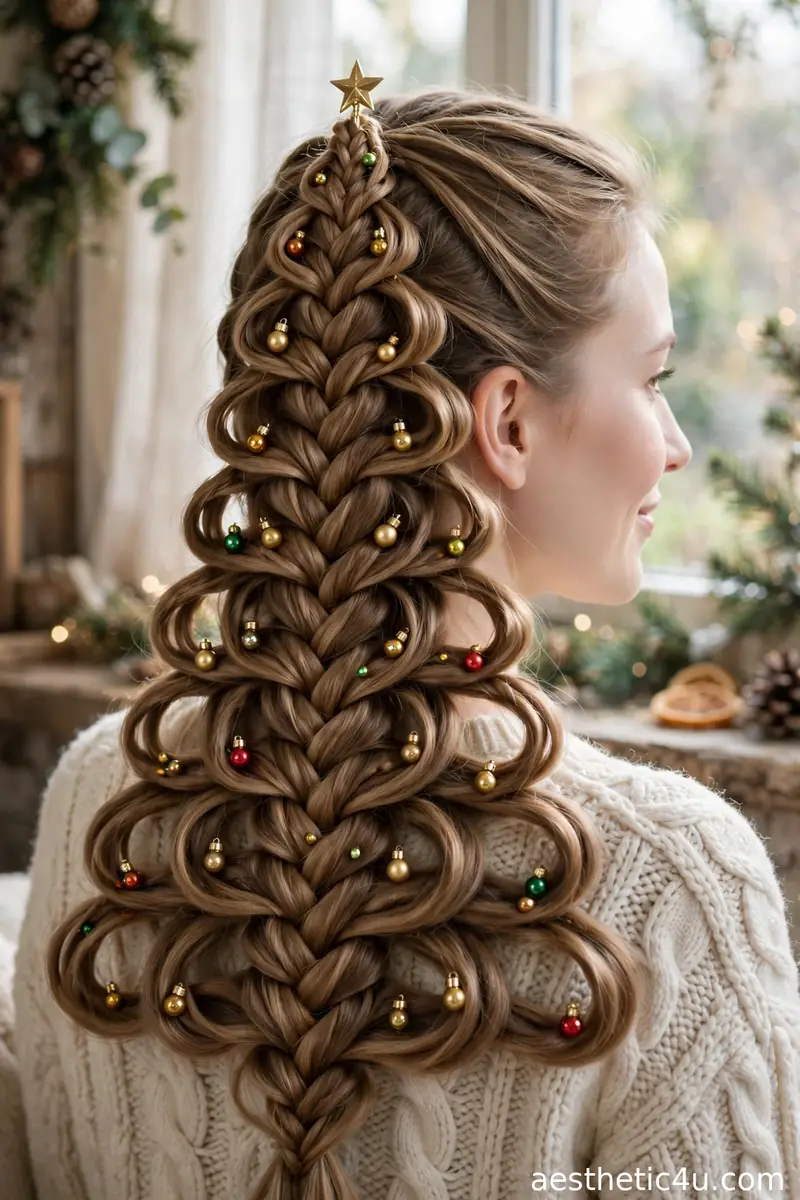
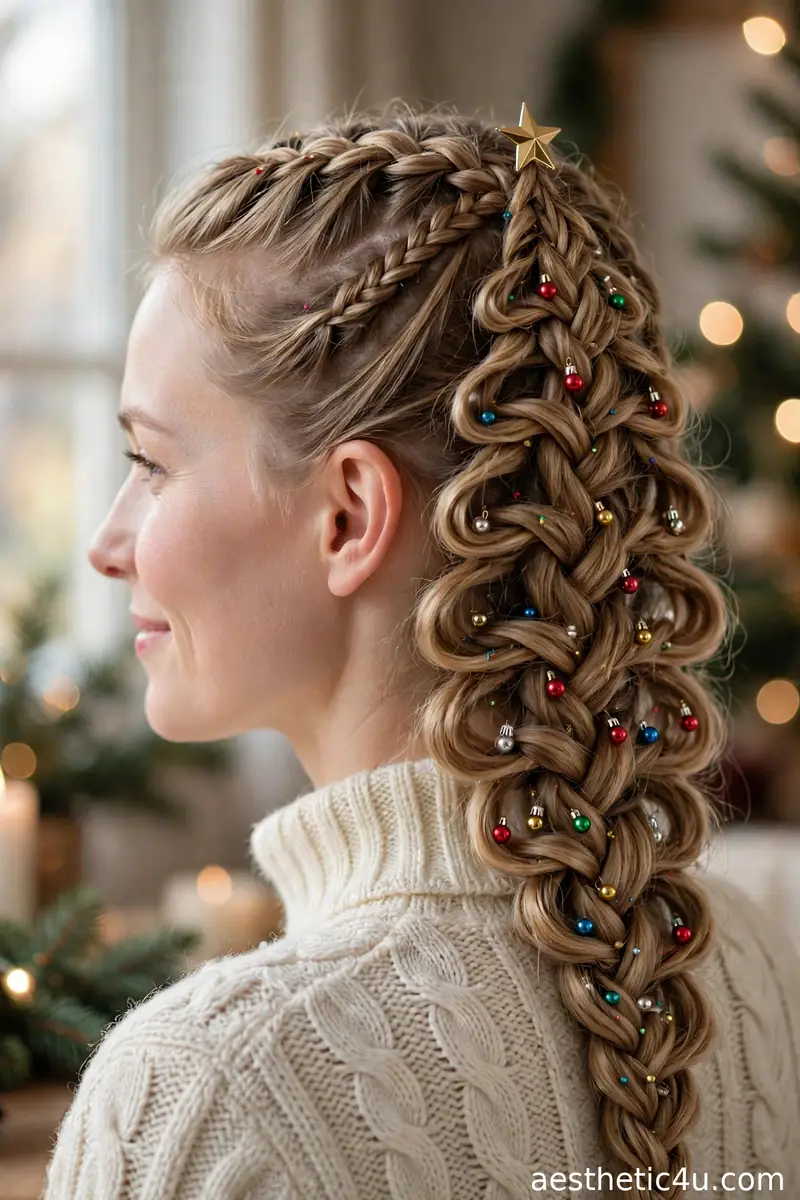
Hair braided and shaped into a triangle like a Christmas tree, decorated with tiny bauble clips and a star on top. The tree braid is the ultimate holiday statement. Start with a high ponytail as the trunk. Braid the tail, then arrange it in widening loops pinned flat to form the triangle – wide at the bottom, narrow at the top. Tuck 8 to 10 mini bauble clips into the loops and perch a small star on the crown. Takes 30 to 40 minutes, hard – shaping the triangle symmetrically is the challenge. A hand mirror is essential.
Yes, it is extra. That is the point. I have seen this win more than one ugly sweater contest, and it photographs insanely well. It suits oval and long faces and needs long, thick hair. I would pick this when winning is the goal – contests, themed parties, content days. Caveat: it is heavy and pin-dense, so build it on dry, textured hair for grip, and bring spare pins – one slipping loop collapses the whole triangle.
2. Reindeer Antler Space Buns

Two high space buns with reindeer antler headbands tucked behind them, so the antlers rise up between the buns. Add a red nose for full effect. Part down the middle, twist each half into a high, textured bun, and pin generously. Slide the antler headband on behind the buns – position it so the antlers emerge between them, not hidden. The red nose is optional but encouraged. Takes 15 minutes, easy – the buns are basic, and the headband does the character work. Texturizing spray gives the buns grip.
Instant costume, zero effort beyond the buns. I love how this reads clearly from across the room – everyone gets it immediately. It suits round and heart faces, the height balancing softness, and works on medium to long hair. Perfect for themed parties and office costume days. Pro tip: choose a headband with a velvet or padded inner band – cheap plastic ones dig behind the ears within the hour, and you will be wearing this all night.
3. Candy Cane Twisted Pigtails
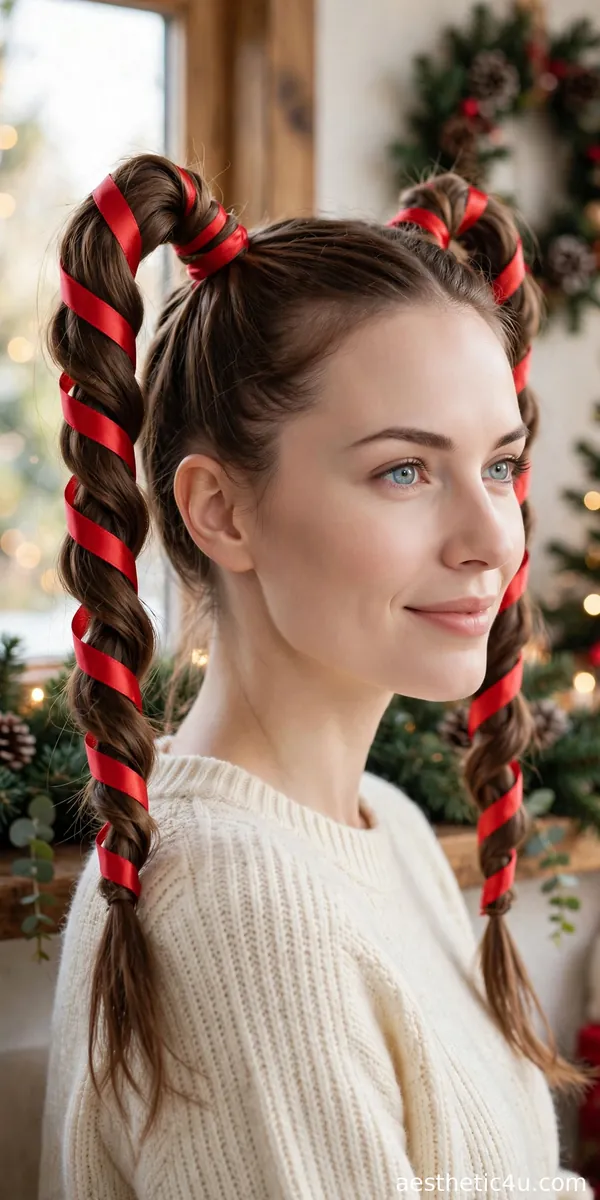
Two high pigtails twisted with red ribbon or red yarn to create a candy cane stripe effect – the twists spiral red and hair-color all the way down. Part down the middle and secure two high pigtails. Anchor a long strand of red ribbon or yarn at the top of one pigtail with the elastic, and twist it around the pigtail’s length in a spiral, tucking the end under at the bottom. Repeat on the other side, mirroring the spiral direction. Takes 15 minutes, easy – the twisting is simple; matching the spirals takes one look in the mirror.
Sweet, simple, and so effective – the red-and-hair stripe really does look like a candy cane. I think this is the cutest entry-level crazy style: fun without being over the top. It suits younger faces and heart shapes. Pro tip: yarn grips better than satin ribbon and will not slide down the pigtail – and red yarn on dark hair gives the boldest stripe, while on blonde hair the contrast is softer and sweeter.
4. Santa Hat Top Knot

A high top knot styled to look like a Santa hat – wrapped with red fabric or colored spray, with a white fluffy pom trim and a pom-pom on top. Hair becomes the hat. Build a large, smooth high bun as the base. Wrap it in red fabric or mist with temporary red color spray in light, even layers. Pin a strip of white faux fur around the base as the trim, and perch a white pom-pom at the very top, tilted slightly. Takes 25 minutes, medium – the bun is easy; the hat construction is the craft project.
Why wear a Santa hat when your hair can BE the Santa hat? I adore the commitment this requires. It suits oval and long faces and needs medium-plus hair for a substantial bun. Use temporary color spray so it washes out, and enjoy being the star of the party. Caveat: color spray transfers – wear a dark top or drape a towel over your shoulders during application, and do not lean on light-colored furniture until it is fully dry.
5. Grinch Green Streaks

Bold streaks of Grinch green – temporary spray or clip-in extensions – through otherwise normal hair. The green pops against any hair color. For spray: section dry hair, hold the can 6 inches away, and mist 4 to 6 streaks, focusing on the front and crown where they show. For clip-ins: snap 5 to 8 green extensions underneath the top layer so they peek through. Style the hair simply – straight or waved – and let the green do the talking. Takes 10 minutes, easy – the lowest-commitment wild style here.
Temporary color is the low-commitment way to go wild. I love green streaks because they are festive but still look cool, not just silly – and clip-ins mean zero damage and instant removal. It suits every face shape and all hair colors. Pro tip: spray streaks look best on darker hair where the contrast pops; on very light blonde, green spray can stain slightly – do a strand test first, or choose clip-ins to be safe.
Keep exploring: 25 Christmas Hairstyles for Kids Every Mom Is Saving Right Now
6. Ornament Bauble Buns
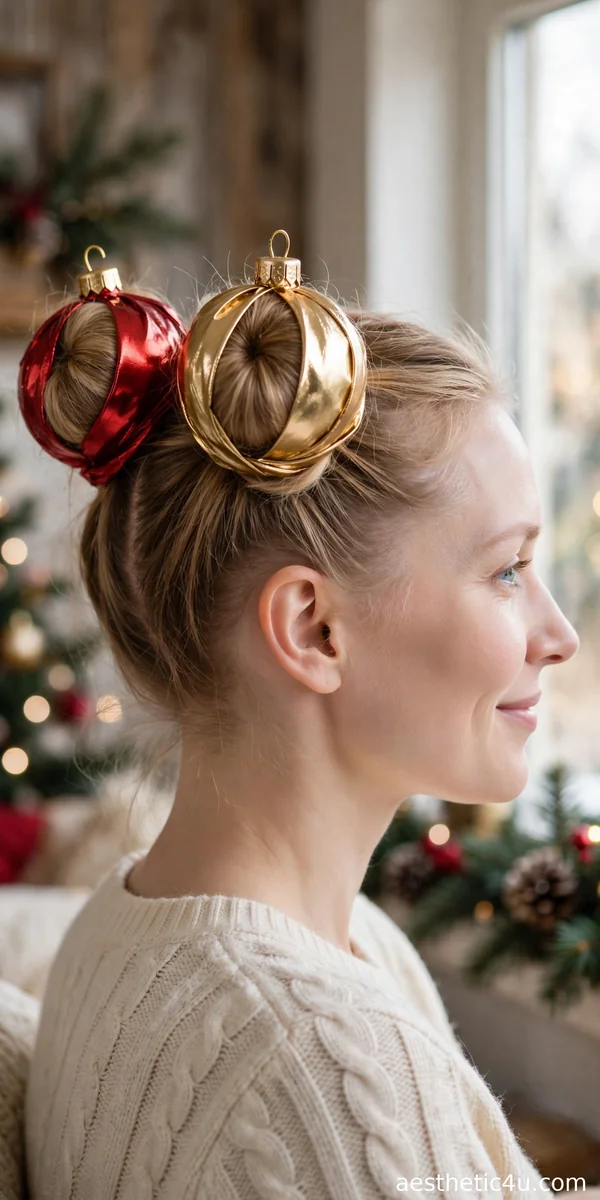
Round, smooth buns – space buns or a single top bun – decorated with shiny bauble-style covers or wrapped in metallic fabric to look like tree ornaments, complete with little hanging hooks. Build smooth, tight buns – sleekness sells the ornament illusion. Cover each bun with a lightweight plastic bauble half or wrap in metallic fabric, securing underneath with pins. Add a small wire hook at the top of each. Takes 20 minutes, medium – the buns are easy; fitting the covers smoothly takes fiddling.
Your head becomes the Christmas tree, and honestly, it works. I recommend lightweight plastic baubles, not glass – safety first, even in crazy hairstyles. This one gets laughs in the best way. It suits round and oval faces. Caveat: keep the decorations light – heavy baubles pull the buns down and ache within the hour. Plastic halves or fabric weigh almost nothing and look just as shiny in photos.
7. Tinsel-Wrapped Braids
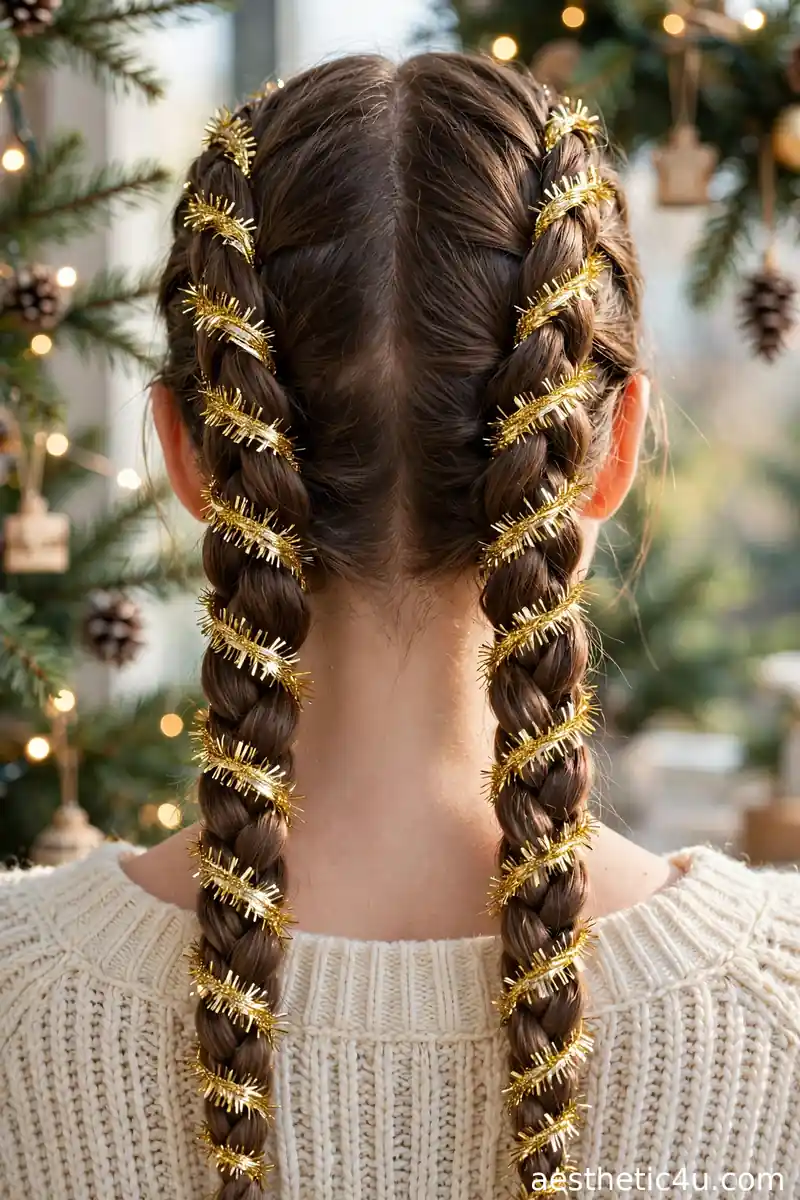
Regular braids with strands of shiny tinsel wrapped around them from top to bottom – the tinsel catches every light in the room. Braid as usual – three-strand, Dutch, or fishtail – then spiral 2 to 3 strands of hair tinsel around the finished braid, tucking the ends under the tie-off elastic. Alternatively, braid the tinsel in with the strands from the start for a more integrated sparkle. Takes 12 minutes plus braiding, easy – the tinsel is just along for the ride. Gold tinsel reads chic; multicolor reads full party.
Tinsel hair is weirdly glamorous – it sparkles like you would not believe. I find gold tinsel looks chic while multicolor goes full party; either way, you will not be ignored. It suits all face shapes and hair types. Pro tip: buy hair-specific tinsel, not craft tinsel – it is finer, moves naturally, and removes without tangling, while craft tinsel snags and sheds glitter into everything you own.
8. Snowman Stack Buns
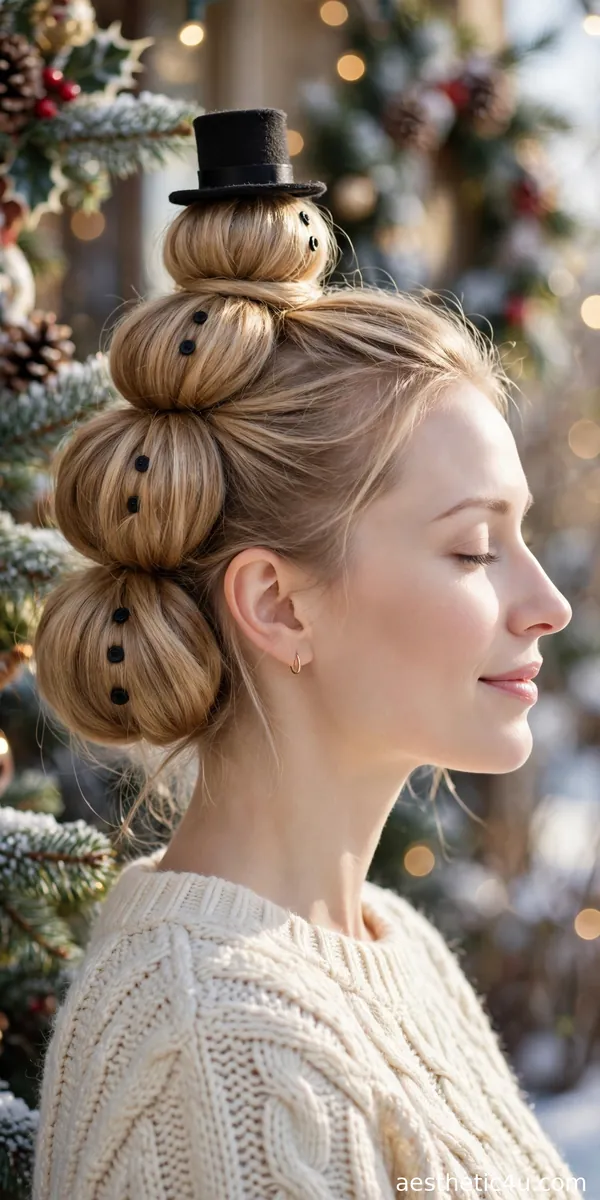
Three buns stacked vertically – big, medium, small – like a snowman, with tiny button and scarf details. The top bun gets a mini top hat. Part hair horizontally into three sections. Build the largest bun at the nape, a medium bun mid-head, and a small bun at the crown in a straight vertical line – check the profile in a mirror. Pin each bun to the one below for stability. Add small black button pins down the “body” and a mini top hat on the top bun. Takes 25 minutes, medium – the stacking alignment is the fiddly part.
Do you want to build a snowman? On your head? This is pure joy in hairstyle form. I love it for family parties where the kids will lose their minds – it is silly, and that is its superpower. It suits oval and long faces. Caveat: three stacked buns are heavy – anchor each to the scalp, not just the bun below, or the snowman leans by dessert. Test-drive it for an hour first.
9. Gift Bow Pigtails
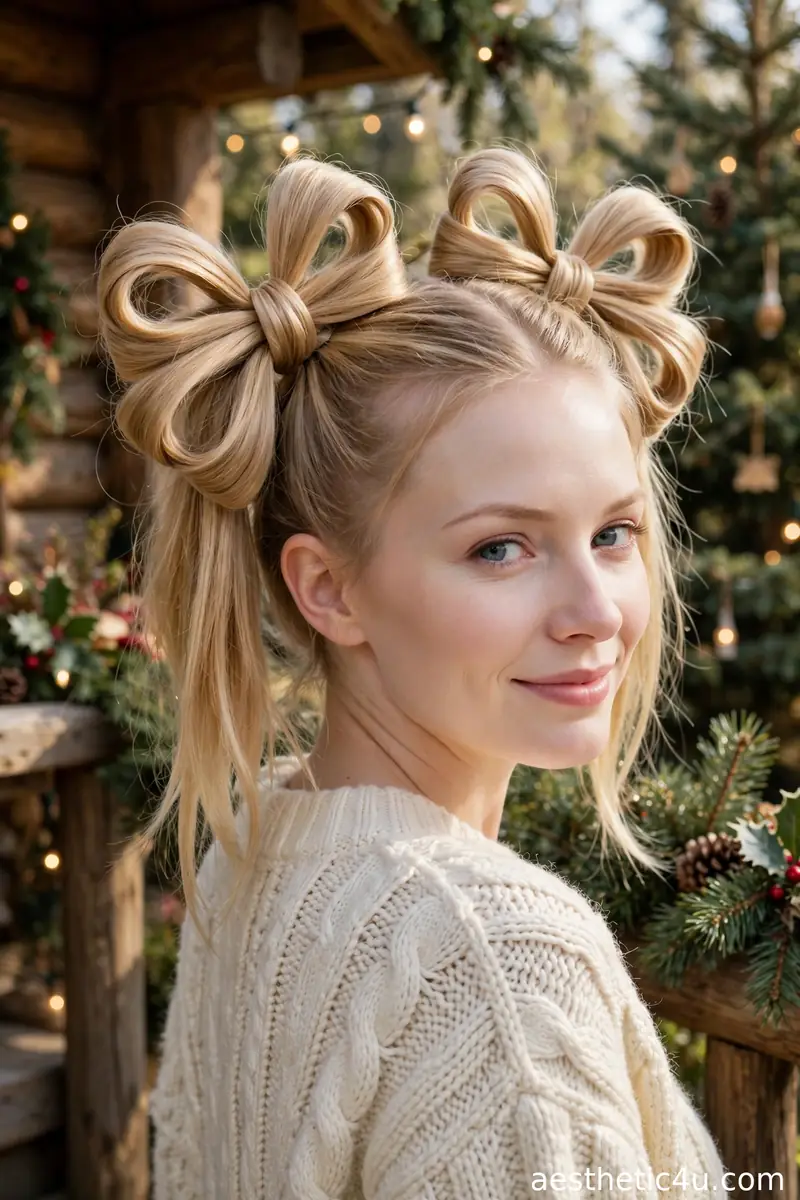
High pigtails where the hair itself is looped and shaped into big bows – like the bow on a wrapped present – with ribbon reinforcing the bow shape. This uses the classic hair-bow technique: pull each pigtail halfway through the elastic to form a loop, split the loop in two, and pin each half flat to form bow wings. Pull the remaining tail up through the center and pin underneath to form the knot. Wrap ribbon around the center for reinforcement. Takes 20 minutes per bow, medium – the looping technique takes one practice run to click.
Hair bows made FROM hair are a real technique, and they look incredible. I think this is the cleverest style on the list – people stare trying to figure it out. Very “how did she do that” energy. It suits heart and oval faces. Pro tip: hair bows need length and stiffness – work texturizing spray through first, since silky loops collapse. Make both bows before the party, not during – they deserve your full mirror attention.
10. Fairy Light Halo Braid
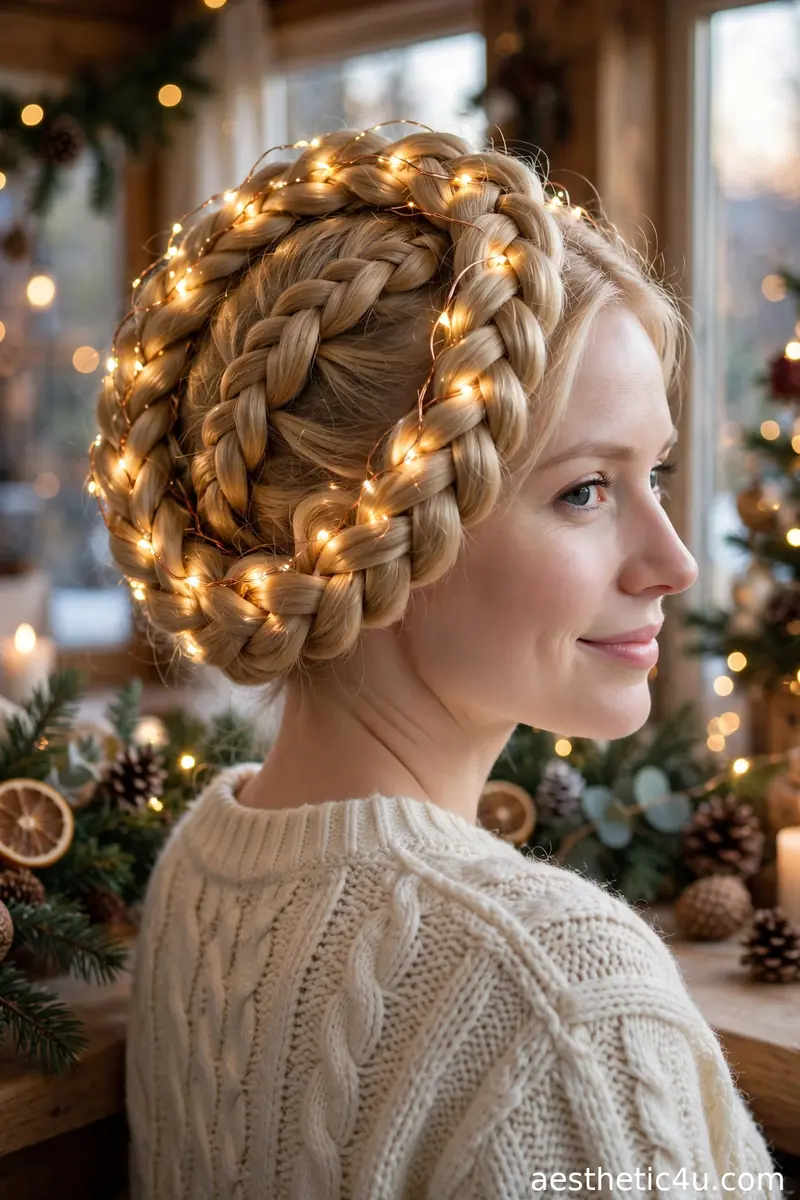
A halo braid around the head with a strand of tiny battery fairy lights woven through it – when the lights are on, your head literally glows. Build a Dutch halo braid around the head and pin securely. Weave a strand of micro LED fairy lights through the braid’s edges, tucking the battery pack behind one ear under the hair – it is tiny and hides easily. Turn the lights on last, after all pinning is done. Takes 30 minutes plus the braid, medium to hard – the braid is the skill; the lights just weave through.
Yes, real lights. Yes, it is as amazing as it sounds. I promise you will be the most photographed person at the party. It suits oval and long faces and needs long hair for the halo. Caveat: use LED fairy lights only – they stay cool. Never use plug-in or incandescent strings near hair. And bring spare batteries; micro LEDs dim after a few hours, and a half-lit halo is sadder than no halo.
Keep exploring: 18 Toddler Christmas Hairstyles Too Cute to Handle
11. Pointed Elf Pigtails
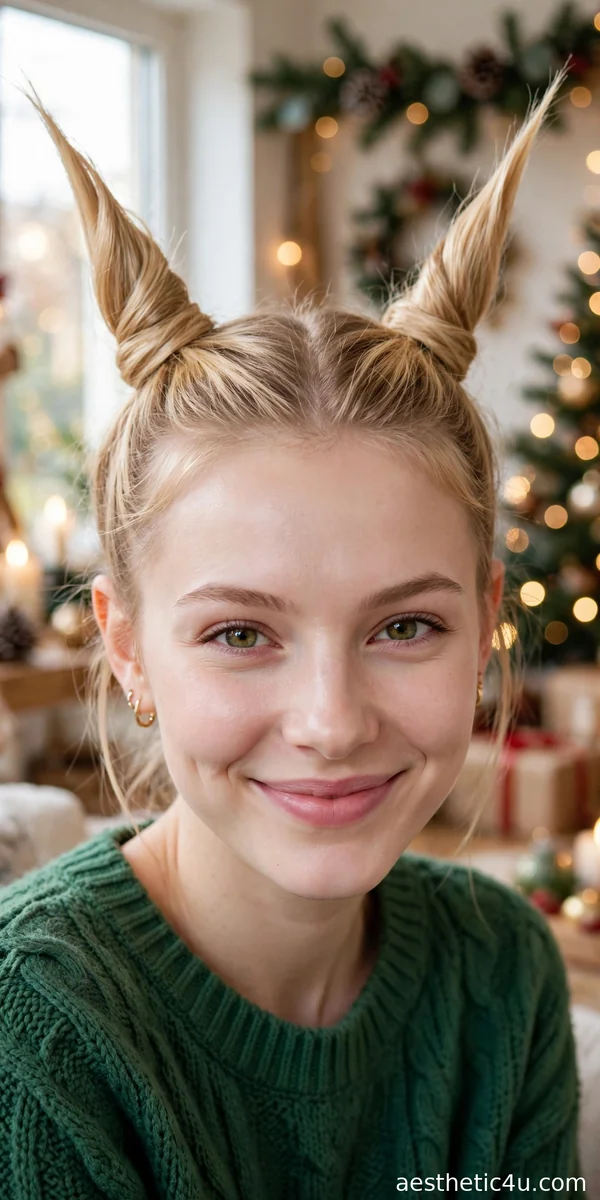
High pigtails gelled and twisted into sharp upward points, like elf ears or a jester hat – the points stiffened with strong-hold gel so they defy gravity. Secure two high pigtails. Work strong-hold gel generously through each tail, then twist each pigtail upward into a point, shaping with your fingers. Hold each point upright for 30 seconds while the gel sets, then mist heavily with strong-hold spray. The points should stand on their own. Takes 15 minutes, easy – the gel does the structural work; your job is just shaping.
Gravity-defying hair is always a crowd-pleaser. I love the elf-ear effect – mischievous and fun. It suits round and heart faces, the upward points adding height and attitude. Caveat: this needs serious gel commitment – do not plan on touching it up, because re-touching breaks the gel cast and the points flop. Build it, spray it, and leave it alone for the night. Wash thoroughly after; strong-hold gel needs shampoo, not just water.
12. Gingerbread Braid with Cookie Clips
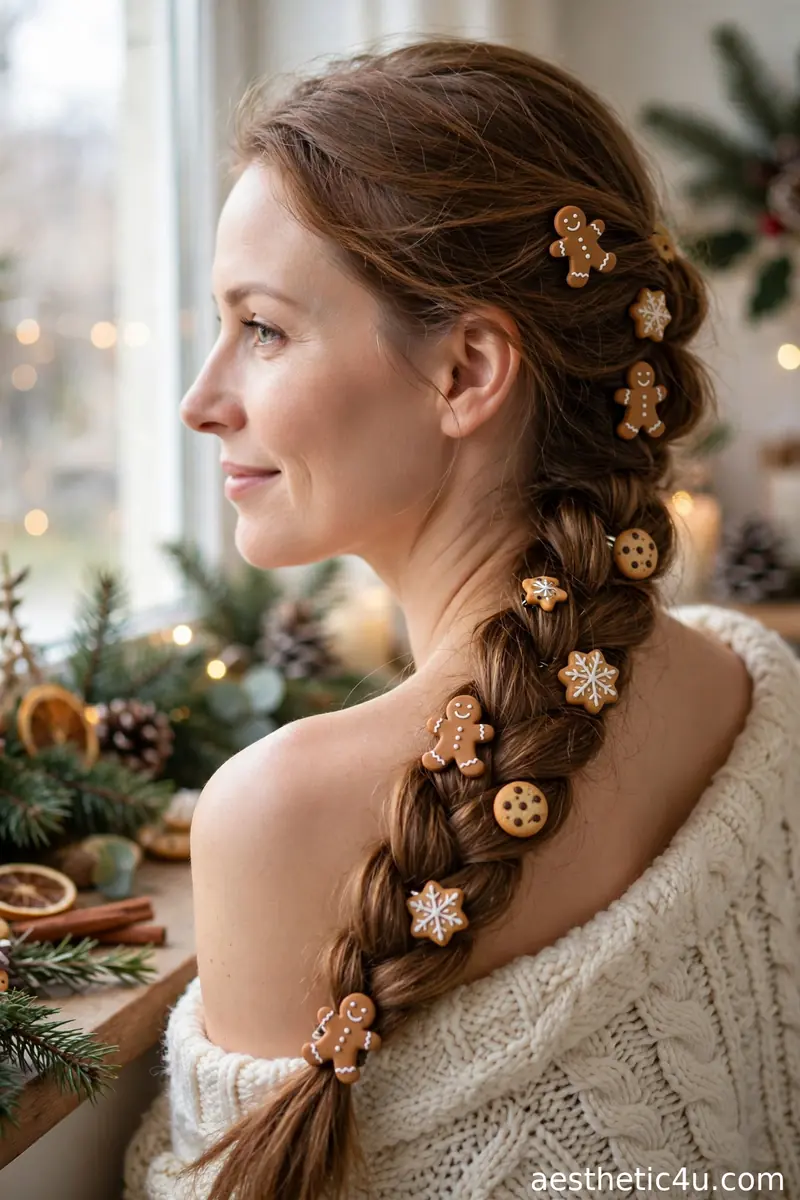
A thick side braid in warm brown tones – enhanced with temporary gingerbread-brown color if you dare – dotted with gingerbread man and cookie clips. Sweep hair over one shoulder and braid a thick, loose three-strand, pancaking it wide for fullness. If using temporary brown color, apply it before braiding for even coverage. Clip 4 to 6 gingerbread and cookie clips along the braid’s edges at intervals. Takes 15 minutes, easy – the braid is basic; the clips are the concept. The warm tones look surprisingly pretty against the festive clips.
Food-themed hair is my favorite kind of crazy. The cookie clips are adorable, and the warm brown tones look surprisingly pretty. I would wear this to a cookie exchange, obviously. It suits round and square faces, the side drape softening width. Pro tip: temporary brown color shows best on light to medium hair – on very dark hair it barely registers, so dark-haired girls should skip the color and let the clips carry the theme.
13. Hot Cocoa Bun with Marshmallow Puffs
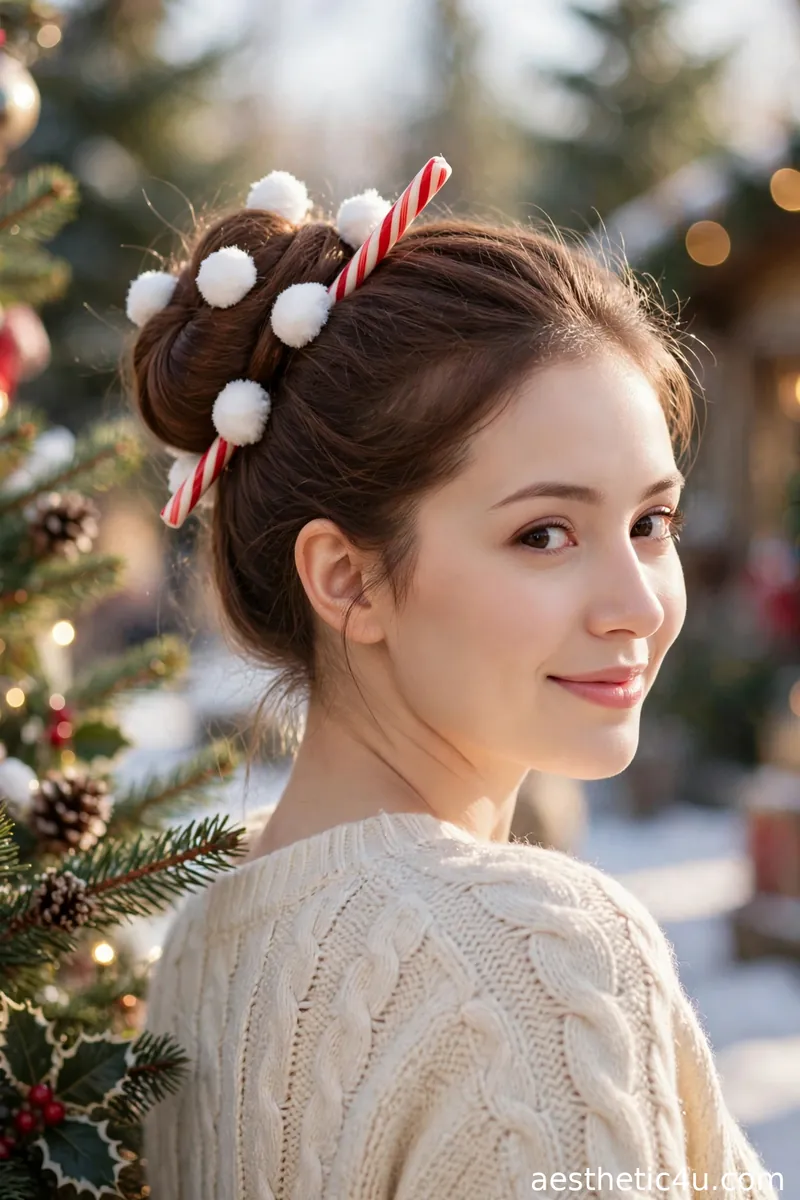
A rich chocolate-brown bun – natural or with temporary brown color – topped with white pom-pom “marshmallows” and a tiny candy cane stirrer. A whole mug of cocoa on your head. Build a round, smooth bun – use a donut for perfect shape if needed. If coloring, mist with temporary brown spray first. Glue or pin 5 to 7 small white pom-poms across the top as marshmallows, and stick a mini candy cane in at an angle like a stirrer. Takes 20 minutes, easy to medium – the bun is simple; arranging the toppings is the art.
This makes me hungry just describing it. The marshmallow puffs are the cutest detail. I think it is perfect for anyone who wants crazy-cute rather than crazy-wild. It suits oval and round faces. Caveat: pom-poms attached with glue need care at removal – use pins instead of glue where possible, or dissolve glue gently with warm water and conditioner rather than pulling, unless you enjoy losing hairs.
14. Star Topper Spiky Bun
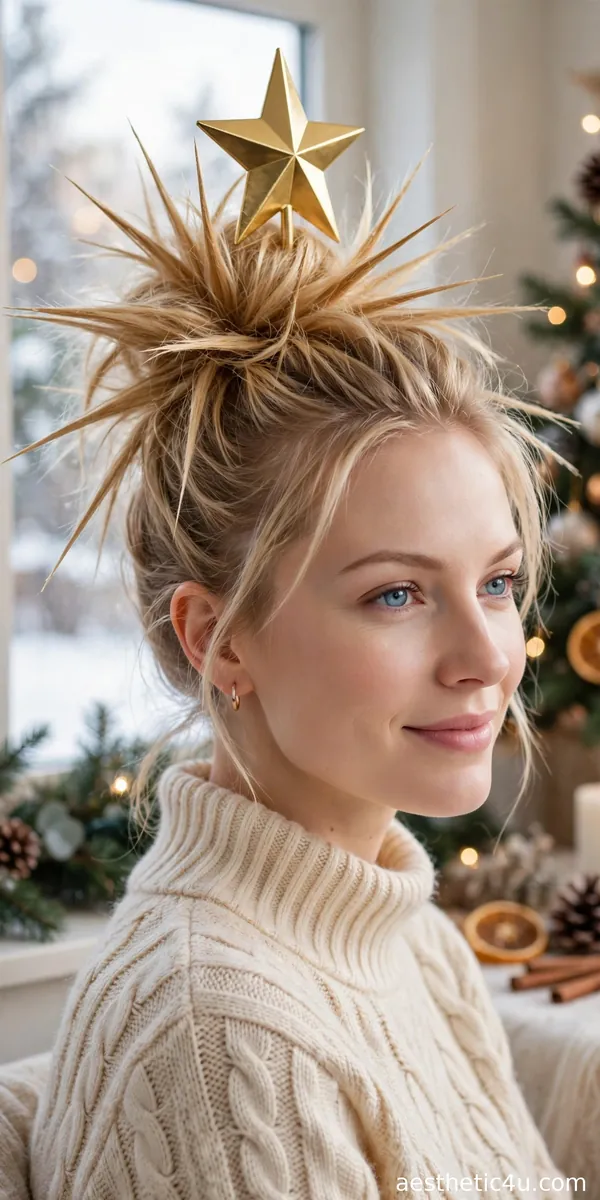
A spiky, textured bun with the ends sticking up in points, crowned with a big gold star – like the topper on a Christmas tree. The spikes ARE the tree. Build a high bun but leave the ends out. Work strong-hold wax through the loose ends and spike them upward in all directions, shaping with your fingers. Mist with strong-hold spray. Perch a lightweight gold star on top, pinning it through its backing into the bun – keep it light or it topples. Takes 15 minutes, easy – spiking is finger work, not technique.
Your head is the tree and the star is the topper – I love a concept with commitment. The spiky texture is easier than it looks with the right wax. Bold, fun, and weirdly chic. It suits oval and long faces. Pro tip: the star must be lightweight – paper, foam, or thin plastic. A heavy ornament star drags the whole bun sideways within the hour, and a lopsided tree topper ruins the concept.
15. Mistletoe Curls with Berry Clips
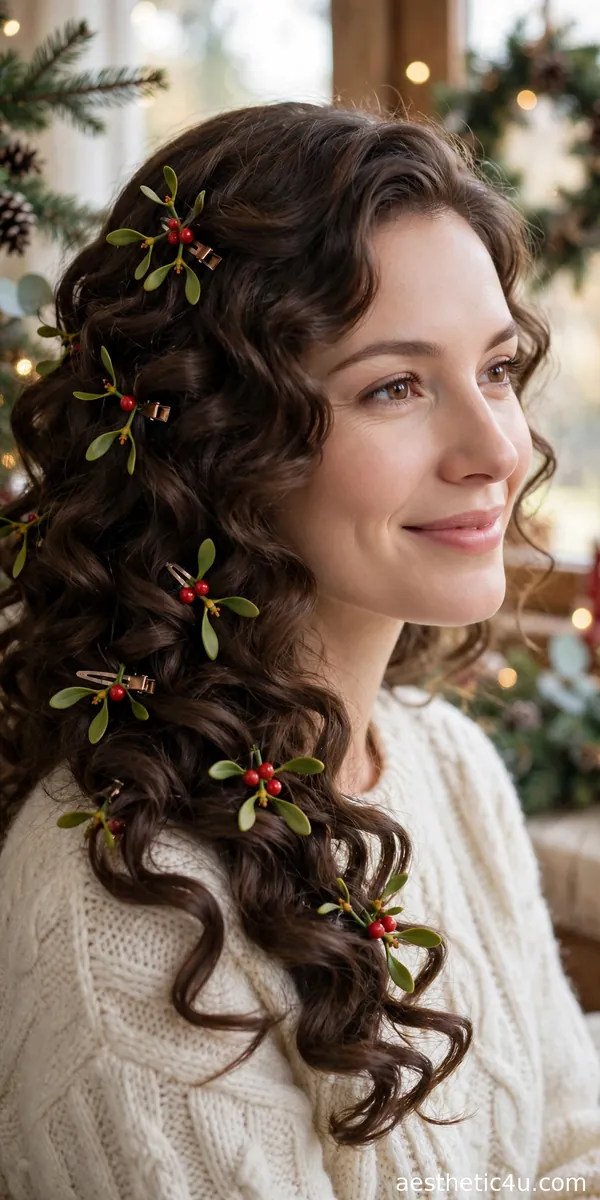
Big bouncy curls with sprigs of faux mistletoe – green leaves and red berries – clipped throughout. Romantic with a wink. Curl all the hair with a 1.25-inch iron for bouncy, uniform curls, and let them cool. Arrange 4 to 6 small faux mistletoe sprigs through the curls – one near the crown, a couple at the sides, one low – clipping each at the stem so it nestles into the hair. Let a few curls fall over the clips’ bases to hide the hardware. Takes 20 minutes, easy – the curls are the work; placing sprigs takes seconds.
Mistletoe in your hair is a conversation starter, and you know exactly what kind of conversation. I think this is the flirtiest crazy style here – fun, pretty, and just a little bit cheeky. It suits oval and heart faces. Caveat: use faux mistletoe only – real mistletoe berries are toxic, and you do not want them near your face, your drinks, or curious toddlers at a family party. Faux looks identical and is completely safe.
Keep exploring: 20 Christmas Hairstyles for Teens That Are All Over TikTok
16. Nutcracker Side Braid
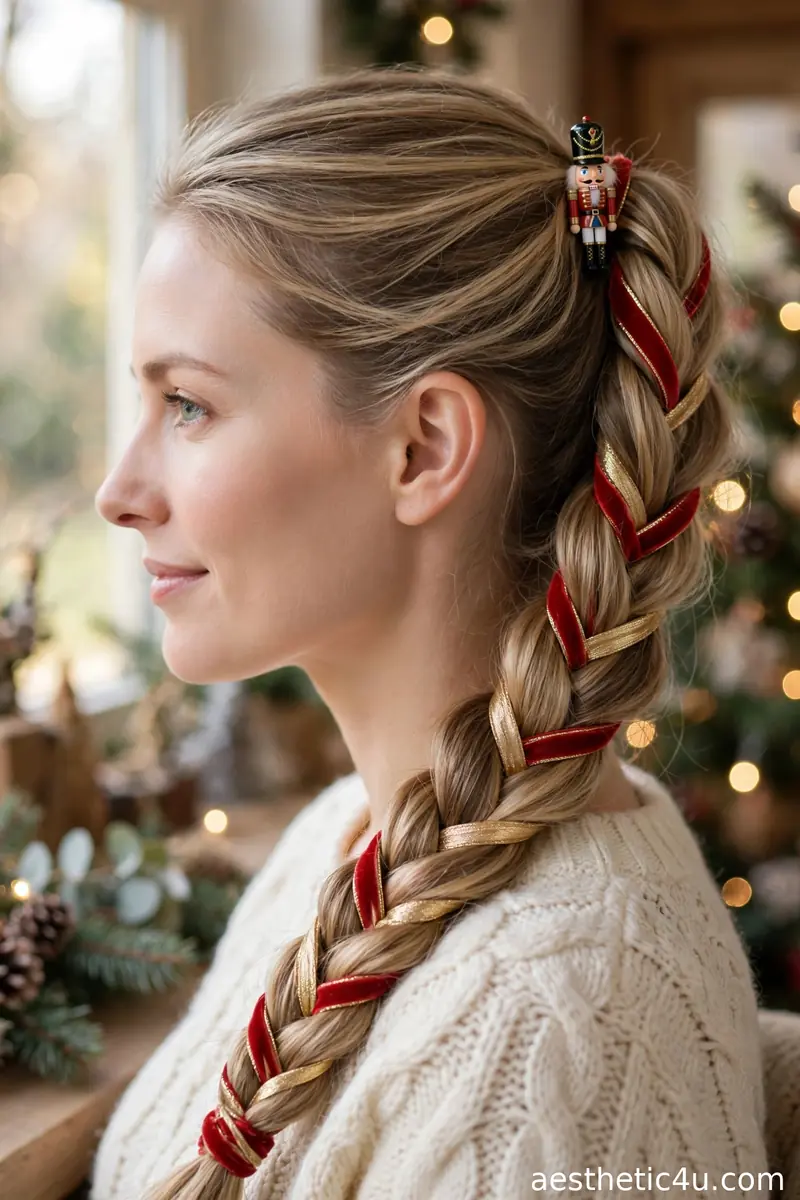
A thick side braid decorated with nutcracker soldier details – a tiny soldier-hat clip at the top, red and gold ribbon woven through, toy-soldier colors throughout. Sweep hair over one shoulder and braid a thick three-strand, weaving red and gold ribbons in with the strands from the start. Pancake the braid for fullness. Clip a mini soldier-hat or nutcracker clip at the top of the braid and tie the ribbon ends into a small bow at the bottom. Takes 18 minutes, easy to medium – weaving two ribbons evenly is the only fiddly part.
The Nutcracker is peak Christmas theater, and this braid brings the drama. I love the red-and-gold color story – it looks rich and festive. A strong pick for ballet lovers and theater kids. It suits round and square faces, the diagonal softening width. Pro tip: keep the ribbon widths narrow – half-inch maximum – since wide ribbon overwhelms the braid and the nutcracker colors read best as accents, not yardage.
17. Icicle Drip Braids
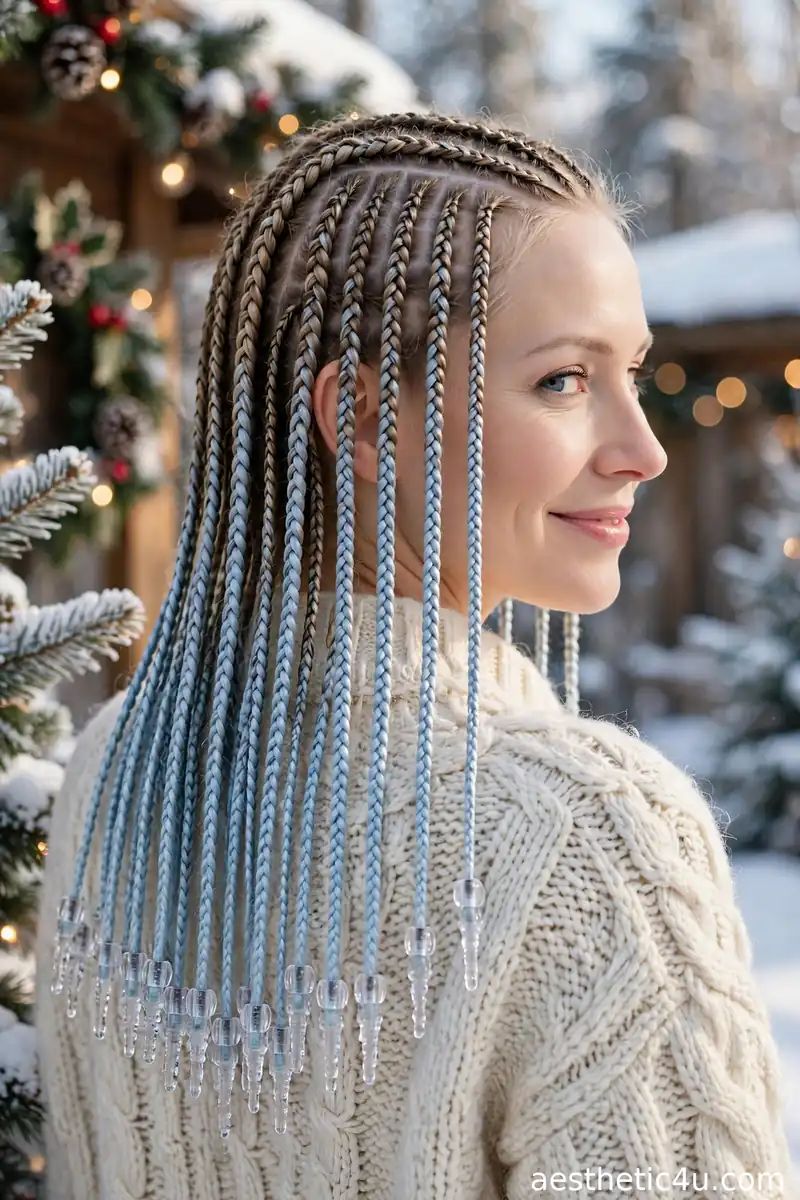
Thin, sleek braids with icy silver-blue temporary color at the ends, finished with crystal-like beads that look like frozen droplets. Winter queen energy. Braid several thin, tight braids – three-strand or tiny Dutch – all over or in a section. Mist the last 3 inches of each braid with temporary silver-blue color spray. Thread 2 to 3 clear crystal beads onto each braid’s end before tying off with a tiny elastic. Takes 25 minutes, medium – many small braids take time; the color and beads are quick.
The most beautiful crazy style on the list, in my opinion. The icy tones are stunning against dark hair especially – dramatic but still genuinely gorgeous, the best of both worlds. It suits oval and long faces. Caveat: silver-blue spray can stain light hair and light clothing – do a strand test first, wear dark colors during application, and sleep on a dark pillowcase if you wear it to a multi-day event.
18. Jingle Bell Braided Pigtails
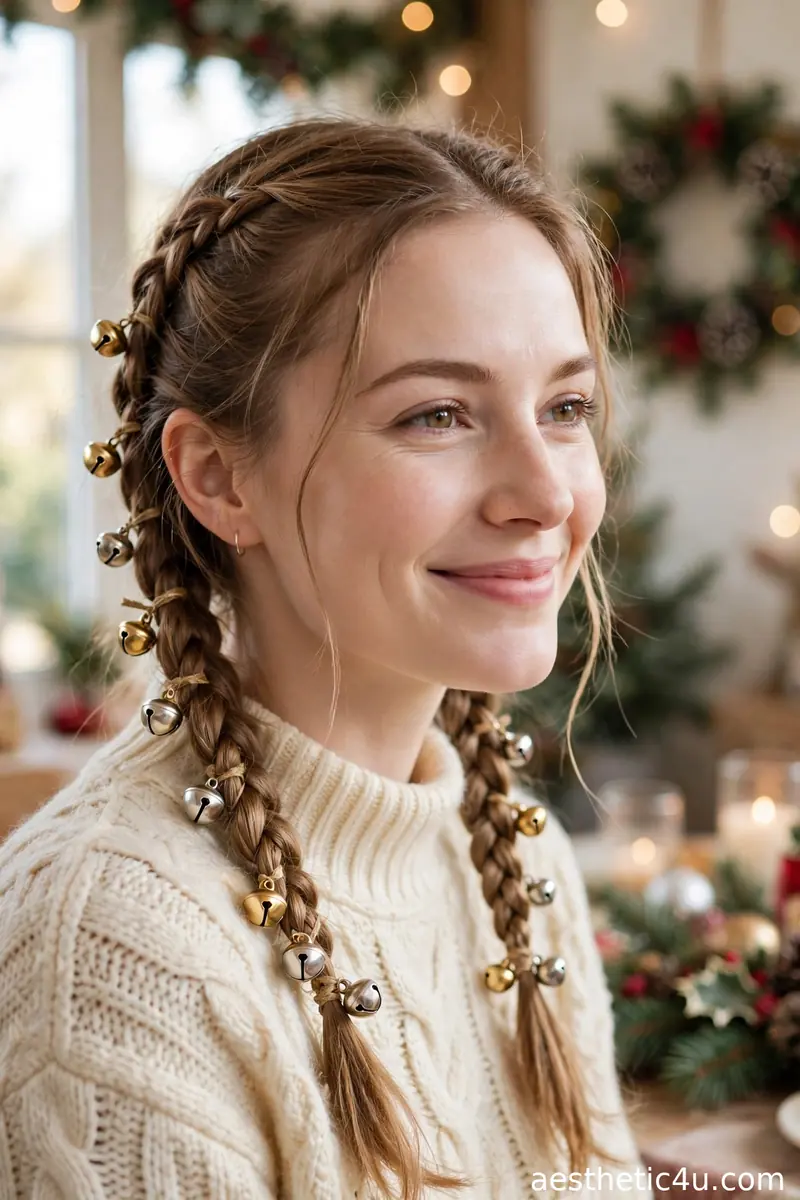
Two braided pigtails with small real jingle bells tied along each braid – they actually jingle when you move. You become a one-woman sleigh ride. Part down the middle and braid two neat three-strand pigtails. Tie 4 to 5 tiny jingle bells along each braid with short pieces of thread or thin ribbon, spacing them evenly and knotting securely – bells must not slide. Keep the bells small and light so they do not pull. Takes 15 minutes, easy – braiding is basic; tying bells evenly takes a few minutes.
A hairstyle with a soundtrack. I am not kidding – people hear you coming and smile before they even see you. Maximum joy, guaranteed. It suits younger faces and heart shapes. Pro tip: test the bells’ weight before committing – tie one on and shake your head. If the braid swings heavily, go smaller. Light bells jingle merrily; heavy bells give you a neck ache and a headache by midnight.
19. Wreath Halo Braid with Mini Ornaments
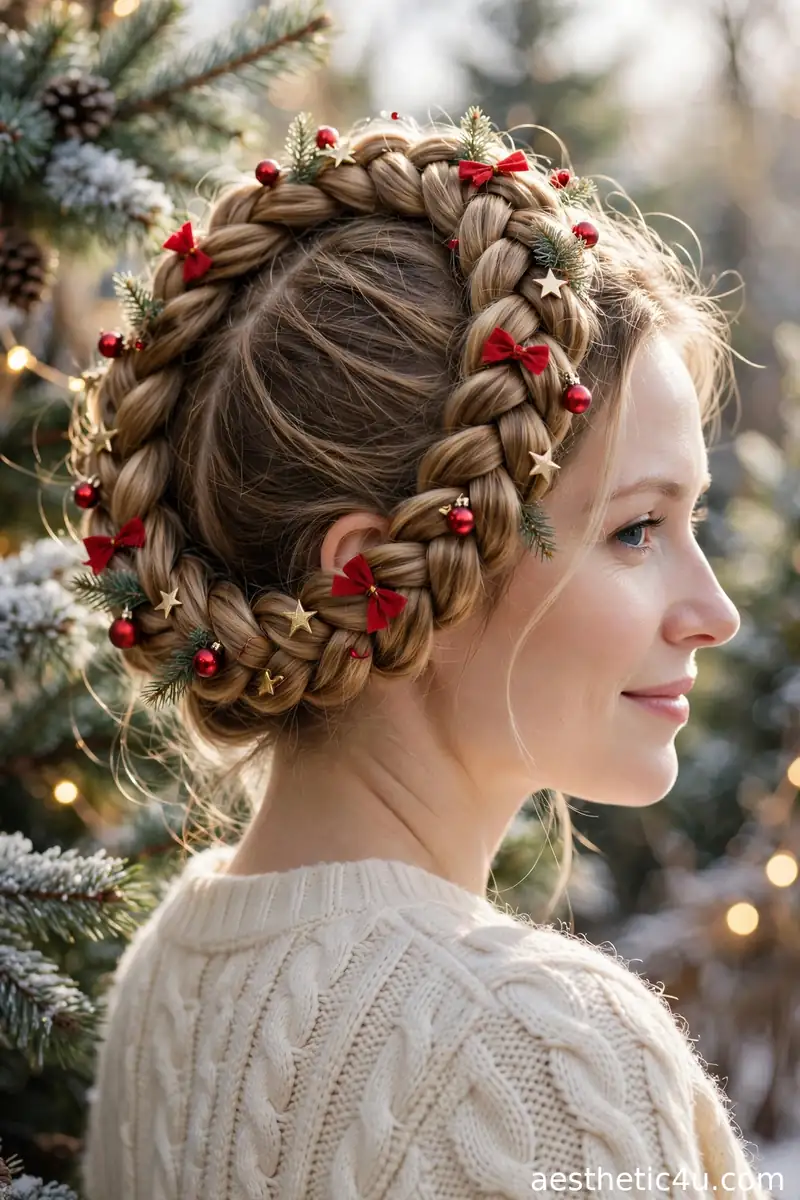
A halo braid circling the head, decorated with tiny Christmas ornaments – mini baubles, stars, and bows – until it looks exactly like a wreath. Your head is the front door. Build a Dutch halo braid and pin it securely – this base must be rock solid. Attach 8 to 12 mini ornaments around the braid with hooks or small pins, spacing evenly: baubles, stars, tiny bows in rhythm. Check the circle in a mirror – gaps show. Takes 35 to 45 minutes, hard – the halo braid alone is advanced, and decorating evenly takes an eye.
The wreath braid is a showstopper – intricate, beautiful, and completely over the top in the best way. I would wear this to win, full stop. It takes time, but the payoff is enormous. It suits oval and long faces and needs long hair. Caveat: this is the heaviest style here – build on dry, textured hair, pin the halo at a dozen points minimum, and do not plan on leaning back in chairs.
20. North Pole Striped Braid
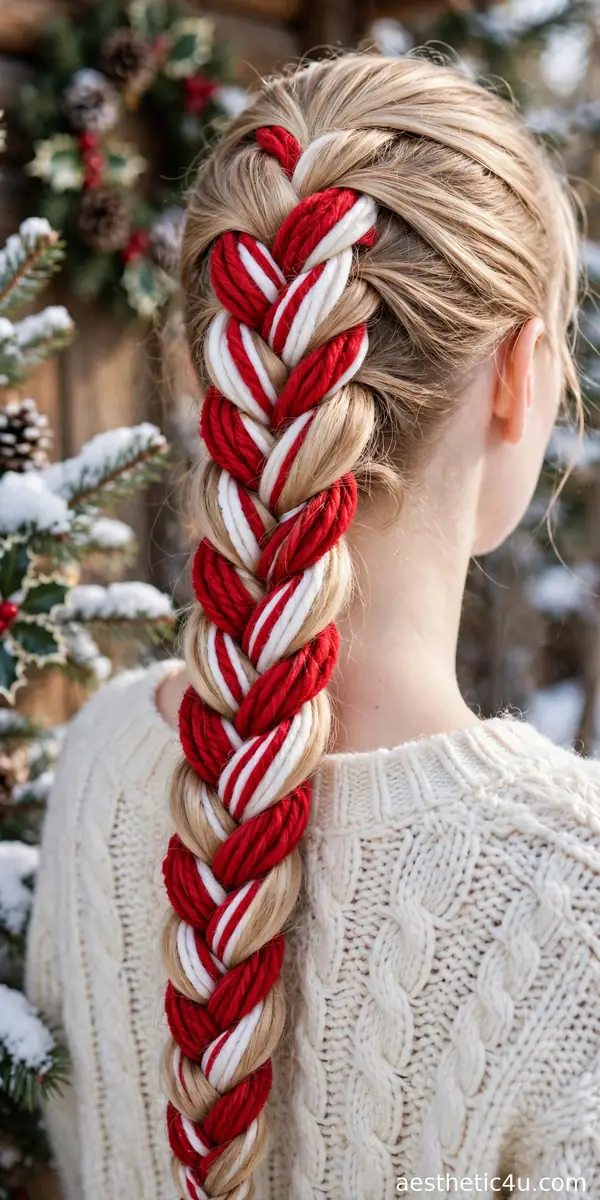
A long braid with red and white yarn woven through every section, creating bold North Pole stripes down the whole length, topped with a tiny “North Pole” sign clip. Braid a standard three-strand, feeding red and white yarn strands in with the hair sections from the very start – the yarn becomes part of the braid, striping automatically. Keep the yarn taut so the stripes stay crisp. Tie off and add the tiny sign clip at the top. Takes 15 minutes, easy – you just braid the yarn in like another strand, but the effect is striking.
The yarn technique is simple but the effect is so striking – I love how graphic and bold this looks. It is basically wearable pop art. It suits all face shapes and needs medium-plus length for the stripes to develop. Pro tip: use smooth acrylic yarn, not fuzzy wool – fuzzy yarn pills and sheds fibers into the braid, while smooth yarn gives clean, crisp stripes that photograph sharply.
Keep exploring: 22 Christmas Hairstyles for Black Women That Deserve Their Own Spotlight
21. Sweater-Pattern Braided Headband
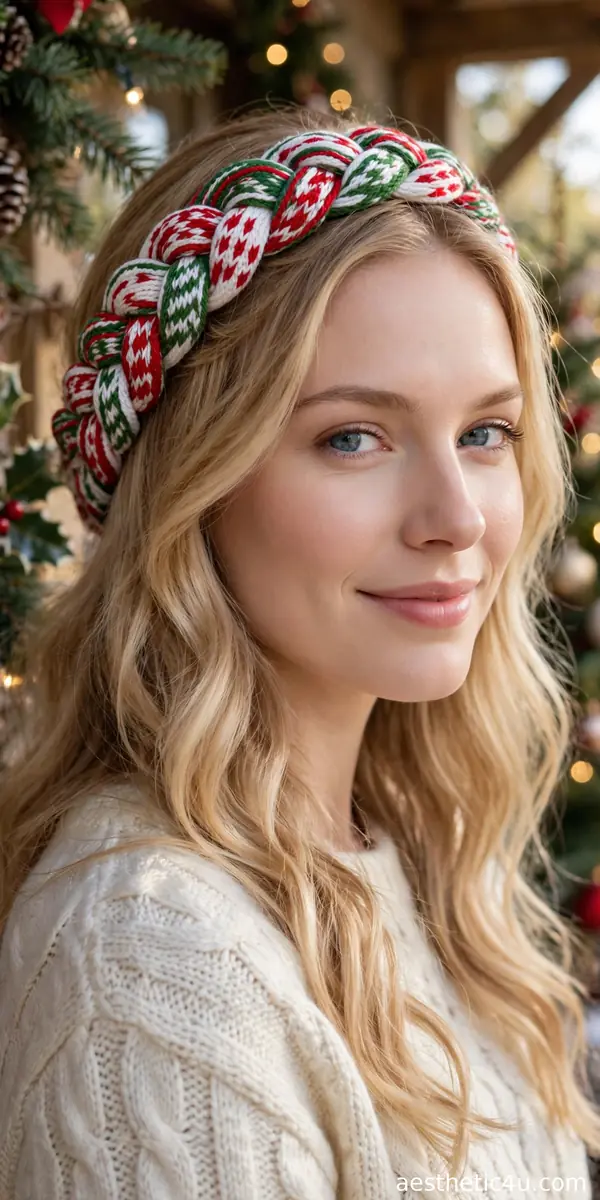
A thick braid across the crown – like a headband – with red, green, and white yarn woven in a fair-isle sweater pattern. Your ugly sweater, but make it hair. Dutch braid from one temple across the crown to the other ear, weaving three yarn colors in with the strands – alternate colors every few stitches to mimic the fair-isle pattern. Pin the tail behind the opposite ear. Keep the yarn strands thin so the braid stays manageable. Takes 20 minutes, medium – the Dutch headband braid is the skill; the yarn just rides along.
This pairs perfectly with an actual ugly sweater – match the colors and you are a whole themed outfit. I think it is genius-level party dressing, and the fair-isle effect is surprisingly pretty up close. It suits oval and heart faces. Caveat: three yarn colors plus hair is a lot to manage – keep each yarn strand thin and separate them before you start, or they tangle into a single multicolor knot within minutes.
22. Frosty Blue-Tipped Spiky Pigtails
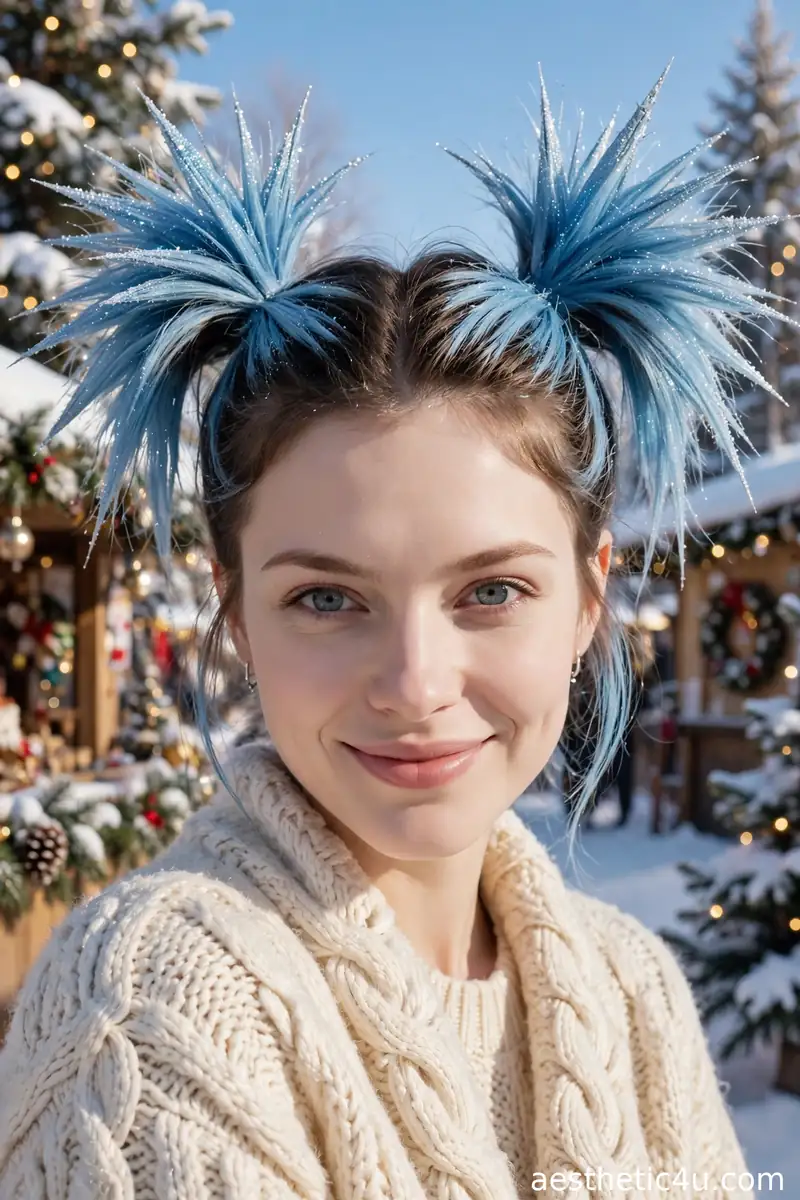
Two high pigtails teased into spiky, frosty shapes with icy blue temporary color on the tips and glitter dusted over everything. Winter explosion. Secure two high pigtails. Backcomb each tail aggressively for a spiky base, then mist the tips with icy blue temporary color spray. While the spray is still tacky, dust cosmetic glitter over the tips – it sticks to the damp color. Shape the spikes with your fingers and set with strong-hold spray. Takes 20 minutes, easy to medium – the teasing is the labor; the frost effect is just spray and glitter.
Part snow queen, part punk rock – I love the attitude here. The glitter is non-negotiable; it is what makes it frosty instead of just spiky. A great choice if cute-crazy is not your thing. It suits oval and long faces, the height elongating. Caveat: glitter migrates everywhere – apply it in the bathroom, not the bedroom, wear it only after dressing, and accept that you will find sparkles until February. Cosmetic-grade glitter only, never craft glitter near eyes.
23. Christmas Pudding Bun
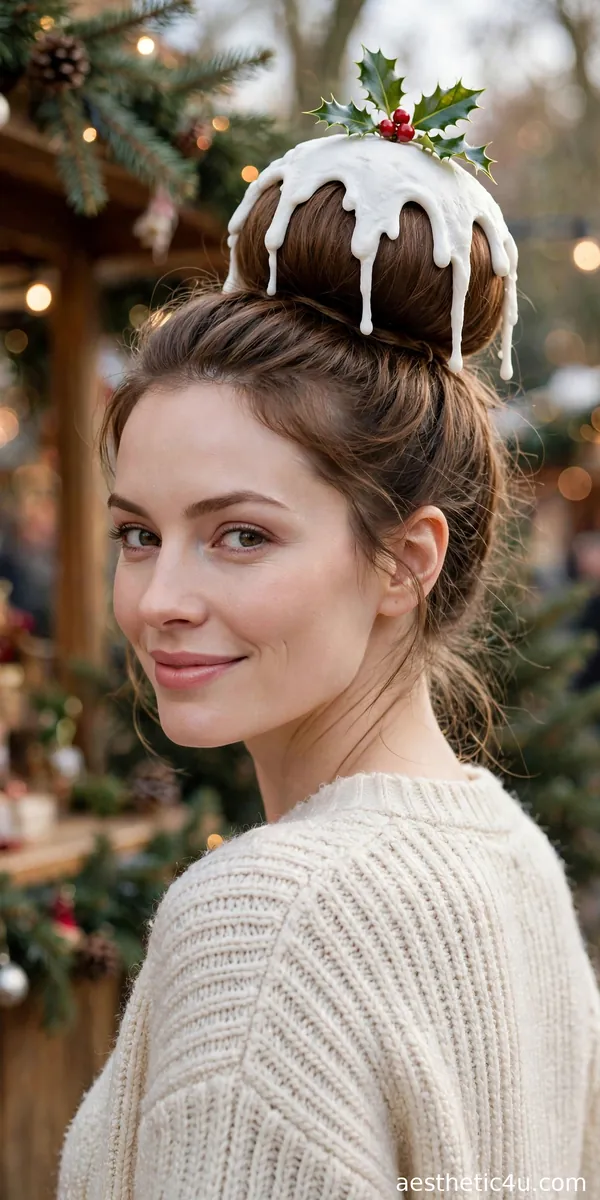
A round brown bun – natural or with temporary brown color – with white “icing” (a white scrunchie or fabric) dripping over the top and a holly sprig on top. It looks good enough to eat. Build a perfectly round bun – a donut helps. If coloring, mist with temporary brown spray. Drape a white scrunchie or white fabric over the bun’s top, letting edges fall unevenly like dripping icing. Pin a small faux holly sprig with red berries on top. Takes 18 minutes, easy – the bun is basic; the icing drape is the styling moment.
The Christmas pudding is iconic, and this bun nails it. I love how it is both silly and weirdly elegant – the round shape is actually flattering. Dessert-themed hair for the win. It suits oval and round faces. Pro tip: the icing must look like it is dripping, not sitting – arrange the fabric’s edges at uneven lengths and let one side fall lower. Symmetry kills the pudding illusion; delicious drips are gloriously uneven.
24. Candy Wrapper Twisted Buns
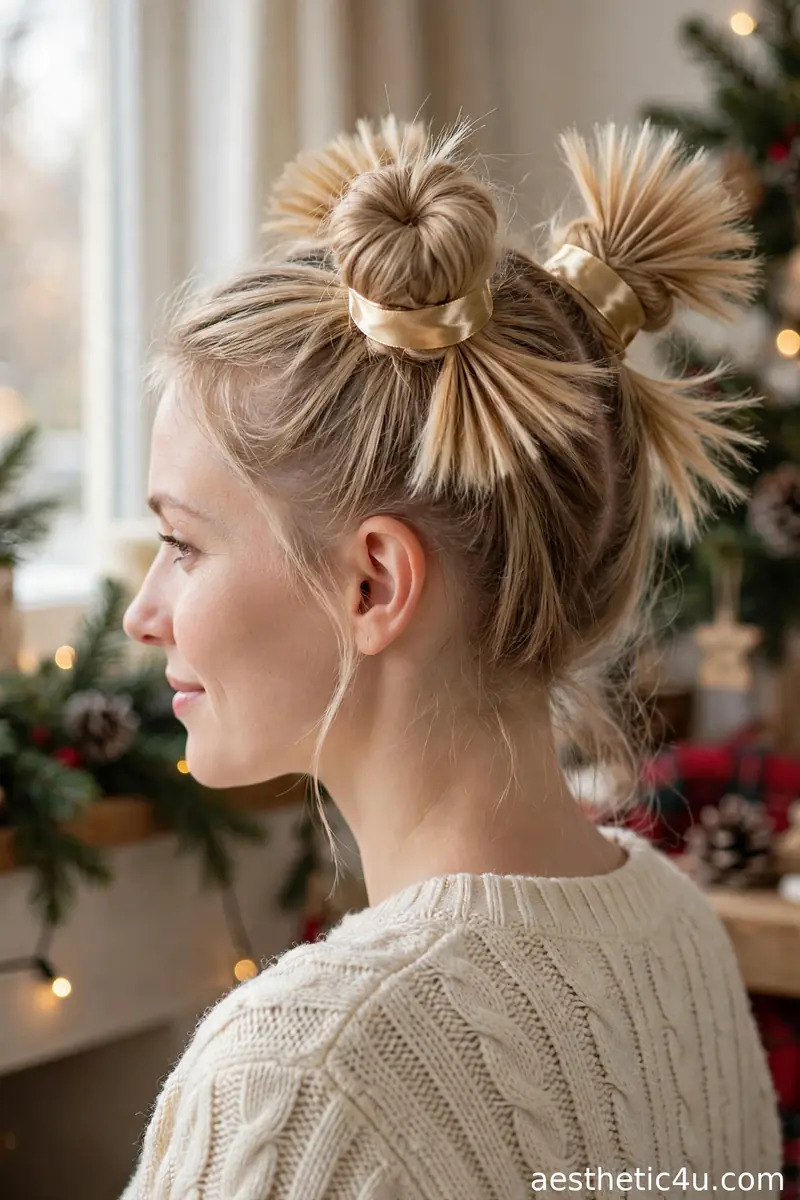
Two buns twisted at the ends like wrapped candy – pinched and fanned at the tips to mimic candy wrapper ends – with shiny ribbon completing the illusion. Build two high buns but leave the ends out. Twist each loose end tightly, then fan it out and pinch it flat to form the wrapper’s crimped tip – this is the key detail, so take time on it. Wrap shiny ribbon around each bun’s base where the “wrapper” twists. Takes 18 minutes, medium – the wrapper ends need shaping patience; the buns themselves are easy.
These look exactly like wrapped candies and it delights me every time. The twisted wrapper ends are the key detail – take time on those. Sweet, clever, and very photogenic. It suits heart and oval faces. Caveat: the fanned wrapper tips are fragile – mist them well with strong-hold spray and do not touch them after setting. One curious finger-poke from a friend and the crimp collapses, so warn your admirers: look, do not touch.
25. Disco Ball Topper Bun
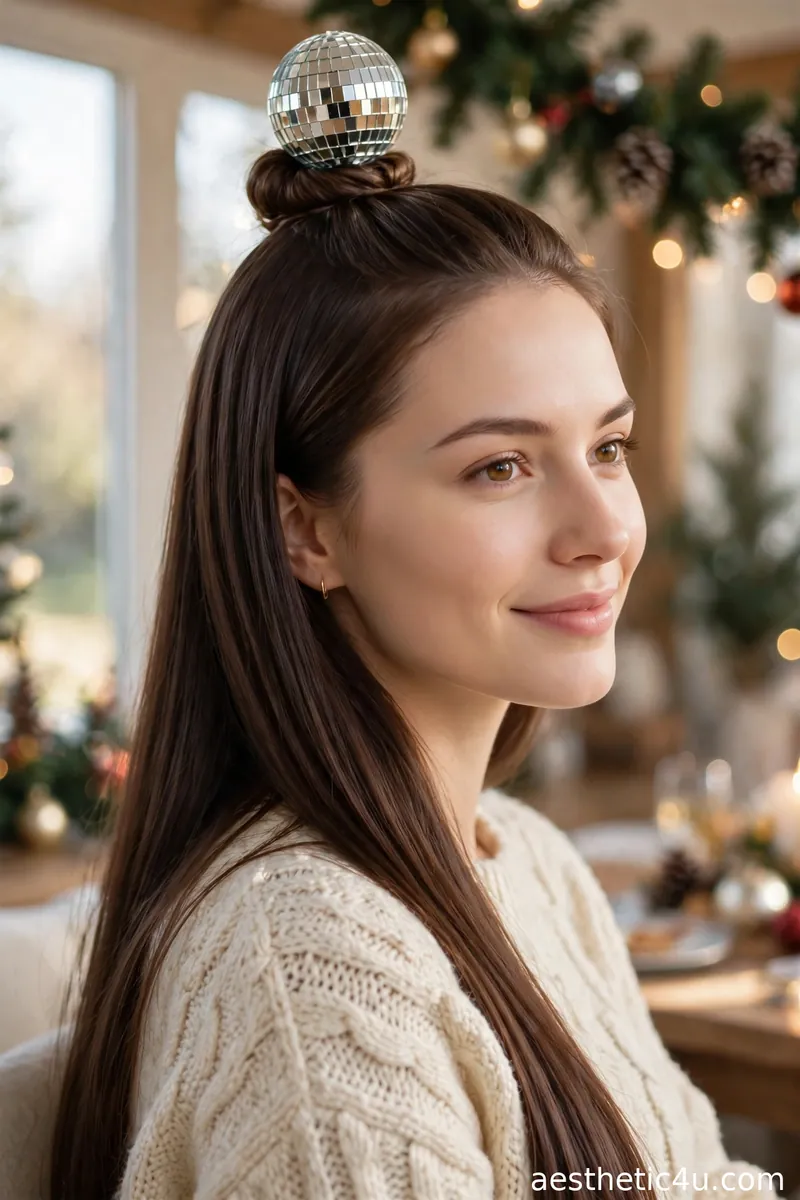
A small, neat top bun on the crown with a full-size silver disco ball perched on top of it – the mirrored ball catches every light while the long dark hair falls straight underneath. Pull the top section into a tight little bun right on the crown and pin it flat; it is the pedestal, not the star. Balance the disco ball on top and pin it through its hanging loop into the bun with crossed bobby pins. Keep the loose hair sleek with serum. Takes 10 minutes, easy – no hairstyling skill, just a steady hand.
For the party girl who wants to be seen from space. The disco ball does all the work – the hair just holds it up – and it photographs well. It suits every face shape and needs enough hair for a sturdy bun. I would pick this for the biggest party of the season; you will be remembered. Caveat: balance is everything – test-drive the ball for ten minutes at home, because a toppling disco ball mid-party is a disaster.
Keep exploring: 25 Christmas Hairstyles Updo Ideas That Look Straight Out of a Movie
26. Reindeer Games Braids with Bells
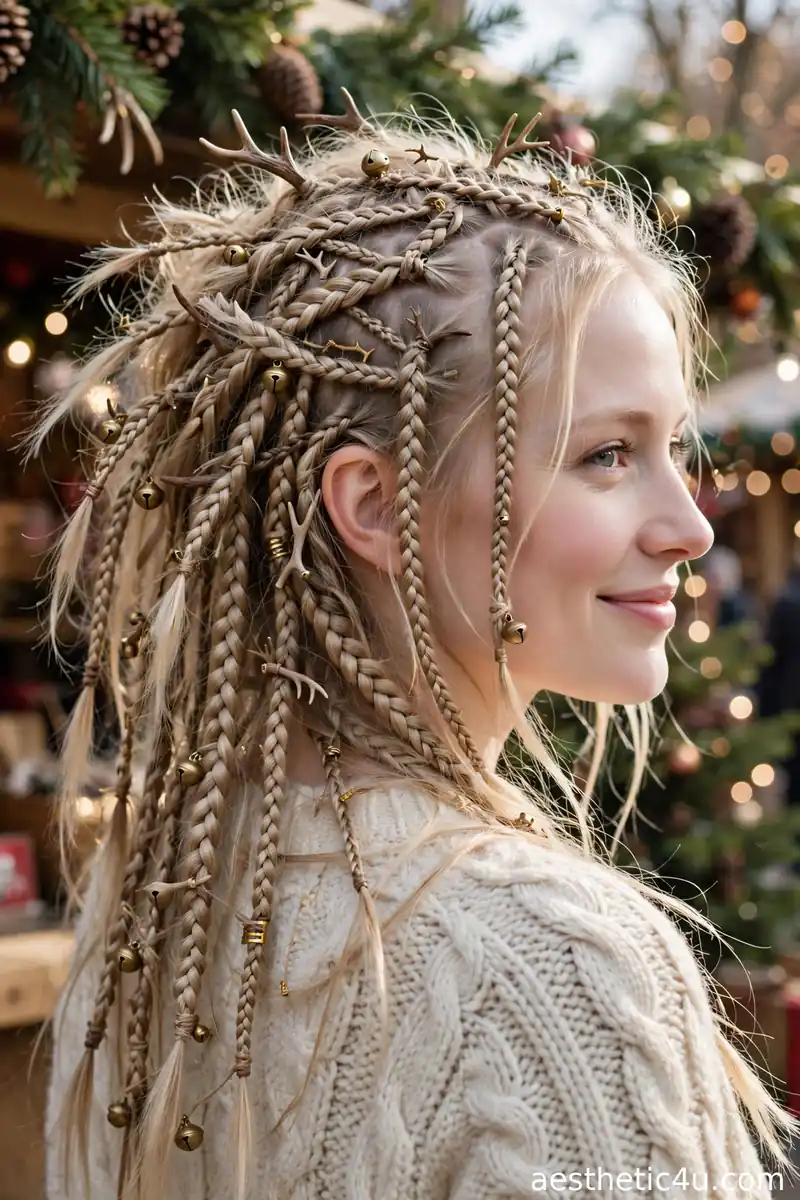
Multiple small braids all over the head – like a reindeer’s wild mane – with tiny bells and antler clips scattered throughout. Organized chaos, holiday edition. Braid 6 to 10 small three-strand braids randomly all over the head – varying sizes and directions is the point; there are no rules. Tie tiny bells onto several braids and clip mini antlers where they sit best. Leave some hair loose between braids for the wild mane effect. Takes 25 minutes, easy – random braiding has no wrong answers, which makes this the most forgiving style here.
Ending with pure joyful chaos – the more braids and bells, the better. I love this because there are no rules: braid randomly, add bells everywhere, and go have the best night. That is the spirit of the whole list. It suits every face shape and all hair types. Pro tip: keep bells small and few enough to still hear conversation – a dozen is festive; thirty is a fire alarm. Scatter, step back, stop while it still looks fun.
How to Choose the Right Crazy Christmas Hairstyle for You
Start with your hair length, because novelty styles are hungry for hair. Long, thick hair can do tree braids, wreath halos, and stacked snowmen. Medium hair suits buns, pigtails, and accessorized braids. Short hair is not excluded – bows, headbands, tinsel, temporary color, and glitter work at any length. Next, be honest about your time and skill. Ten-minute styles: tinsel braids, glitter buns, temporary color streaks, antler buns. Thirty-minute projects: tree braids, fairy light halos, wreath braids – all worth it, but none are morning-of discoveries. Then consider the venue. Contests and themed parties reward maximum commitment – go for the tree, the snowman, the disco ball. Family gatherings want cute-crazy, not scary-crazy – snowmen, cocoa buns, and cookie braids. Offices want tasteful fun – tinsel braids, subtle color streaks, small bows. My stylist rule for novelty hair: match your commitment to the room. The boldest style worn confidently wins every time – but the boldest style worn self-consciously just looks uncomfortable. Own it completely, or scale back one notch.
Styling Tips & Common Mistakes to Avoid
First: build on textured hair. Second-day hair or texturizing spray gives pins, clips, and decorations something to grip – clean hair sheds accessories. Second: pin for the real evening, not the mirror. Jump, shake your head, lean back – if it survives that, it survives the party. Third: use the right adhesives. Bobby pins for structure, small elastics for sections, and pins – not glue – for anything you will remove tonight. Fourth: photograph the back. Novelty styles are 360-degree performances, and the back view is usually the best one – check it before you leave. The mistakes: going too heavy. Ornaments, bells, and baubles add up – if your neck aches during the test wear, remove a third of the decorations. Second: using craft supplies on hair – craft glitter near eyes, hot glue on strands, real mistletoe berries. Use cosmetic-grade and hair-safe versions of everything. Third: skipping the removal plan. Glitter needs conditioner and clarifying shampoo; color spray needs a dark towel and patience; gel-cast spikes need a full wash. Plan removal before the party, not at 2 AM after it.
Final Thoughts
Crazy Christmas hair is about one thing: having the most fun in the room. Whether you go full Christmas tree or just add some jingle bells, the best crazy hairstyle is the one you wear with total confidence. My advice: pick your statement style a week ahead, do one full practice run including removal, pack spare pins and your removal supplies, and then commit completely on the night. Now go win that ugly sweater party – and send me the photos.
Follow Us On Pinterest: Easy To Find Next Style